Today I am sharing the second of the Handcrafted Elements Dies ornament I created. The one is opposite in color to the previous one. I do not know which I prefer. Hopefully you like them both.
The ornament from Monday was the white for the largest section with Lost Lagoon for the center. And this is the opposite. I always try to make two cards, especially when die cutting. If you missed Monday’s card, or just want to compare, you can Click HERE to see it.
Dies
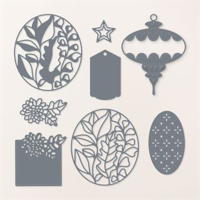
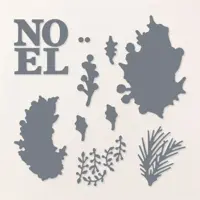
The fabulous Handcrafted Elements Die set is the star of this card. As I said in Monday’s post, they are a bit hidden in the Mini Catalog. They are on page 21 of the Mini in the upper right corner. And I really love these old fashioned looking ornaments. Of course the ornament must have something to hang from. So I used a sprig of fir tree from the Joy of Noel Dies. Sadly, I just realized that I did not add a hanger. How embarrassing!! So pretend that it is just looped through a few of the needles! LOL!!
Papers
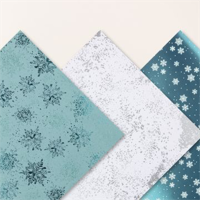
The gorgeous Snowflake Magic Designer Series Paper is just as wonderful as the ornament is. Especially the mottled look on the White piece. It reminds me of the old mercury ornaments. The Lost Lagoon piece has shiny snowflakes that are tone on tone so it has a mottled look as well. I was thrilled when these came out of the die at how pretty the paper played with the die.
To get a softer card this time, I went with more basic colors. I used Lost Lagoon as the card base and to help pop the beauty of the Lost Lagoon in the DSP. The White was needed for the snow and the tag. But I was able to color the tag a bit by running my Lost Lagoon Stampin’ Write Marker along just the edge. This is a great technique to help White stand out against White.
Embossing and Finishes
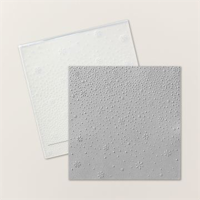
To still give the snow feel, like the previous card, I opted to use the new Snowflake Sky Embossing Folder. This is also new in the Mini Catalog. It is on page 23. And it sort of hidden as well. I love the softness of the snow and the different thickness of the snow coming down. With the White paper it is a little difficult to see in the photo except at the top.
To complete the card I stamped the sentiment from the Brightest Glow stamp set. It is also keeping in the Lost Lagoon color theme. I used the Banner Pick A Punch to flag the one end and tuck it behind the ornament. For the finishing touches I added a scattering of the Adhesive Backed Glitter Sequins. There are two of the white ones in the snow area and a Lost Lagoon on the tag.
Today is the last day for the Seasonal Sale!! Don’t miss out on stocking up on card stock. Plus there are more than expected on sale in the Paper area! Personally I grabbed extra Basic White card stock and replaced a couple of my oldest Ink pads. And I go through Grid Paper like crazy. I was thrilled that was included. Woohoo!!!
Online exclusives are here to stay! Click on the photo and be taken directly to them in my online store. If you place an order, please use my Host Code listed just below.
HOST CODE
My NOVEMBER Host Code is 626NJVKN. Please use this code for orders under $150.00. I will have a small gift for those with orders over $50.00 in addition to the Perk Rewards Program. You can read all of the information at the top of the page in the Menu Bar under SHOP / Perks.
Thank you for stopping by today. I hope you enjoyed today’s project and will come back. I do read and reply to all of the comments individually. They mean a lot to me. Please reach out if you have a question.
Before I share today’s project, I want to let you know about a Fabulous Seasonal Sale. Sale is November 14-16. That is tomorrow!!!! Here are the details:
10% off ribbons and trims.
15% off inks, including pads, refills, markers, and Blends. Bundles are not included.
20% off papers, including cardstock, specialty paper, and Designer Series Paper.
Shop online to see the full selection of discounted products available. This is a limited time offer.
Discounts are automatically applied when sale items are added to any order, including Starter Kits.
This is an amazing sale and I will be stocking up on Paper and replacing some of my well loved blends. Please keep in mind that shipping my be a bit slower during this sale. So many customers and demonstrators will be taking advantage of this. You can click on my Shop Now button in the menu bar of this page to take advantage of the sale. And do not hesitate to reach out to me if you have questions.
Today’s card focuses on some of the Specialty Paper. It is the Snowflake Magic Specialty Designer Series paper. I have used all three sheets of it to create this fun card.
Papers
These sheets from the Snowflake Magic Specialty Designer Series Paper are gorgeous. I have used all three of the sheets in the pack. There are two pieces of each sheet in the package. The layer is one of the pieces. And the ornament is made using the other two. I think the white with silver piece makes the ornament look like one of the old mercury glass, or at least a well loved ornament that might have faded a bit.
Dies and Stamps
The ornament is created using the Handcrafted Elements Die set. It is a stand alone die set that may have been overlooked in the Mini Catalog. It is on page 21 in the upper right corner. There are a few different dies. But his ornament is my favorite. It is made using two die pieces. The outer shell and then the center piece. I used two of the different DSP papers to create my ornament.
The second Die set used is to give my ornament somewhere to hang from. It is the Joy of Noel. The little sprig of pine was just enough to hang the ornament. And the matching stamp set is where the “Joyous” is from. To keep the ornament as the star, I stamped the Joyous on Pool Party card stock and used Lost Lagoon Ink. Even though I wanted it not as prominent it still needed some sparkle. To give the sentiment some shine, I went over it with the Wink of Stella pen. In person you can definitely see the sparkle.
Finishes
The sparkle did not stop with the Wink of Stella. I had to add some bling. There are a few Iridescent Pearls scattered around. They are hard to see because of the snow flakes in the photo. But they are there. You can see the two placed in the center of the ornament.
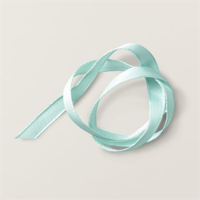
The last touch is the gorgeous Pool Party Ribbon. My ornament needed to have a hanger. The Pool Party and Lost Lagoon work so well together that I decided the ribbon would be perfect. It is the Pool Party Grosgrain Ribbon.
Thank you for stopping by today!! Don’t forget to begin your list for the sale!
Online exclusives are here to stay! Click on the photo and be taken directly to them in my online store. If you place an order, please use my Host Code listed just below.
HOST CODE
My NOVEMBER Host Code is 626NJVKN. Please use this code for orders under $150.00. I will have a small gift for those with orders over $50.00 in addition to the Perk Rewards Program. You can read all of the information at the top of the page in the Menu Bar under SHOP / Perks.
Thank you for stopping by today. I hope you enjoyed today’s project and will come back. I do read and reply to all of the comments individually. They mean a lot to me. Please reach out if you have a question.
Today’s card is a partner to yesterday’s card. They use the same paper and stamp set. However this one is using Deckled Circles for the layers. I love showing the versatility of our products. And this card shows not only the stamp set but the Designer Series Paper as well.
Yesterday’s card used the same Stamp Set, DSP, just different colors and different sentiment. However it used Deckled Rectangles, where this card is Deckled Circles. Both of these are Go To’s in my Die collection. If you want to check yesterday’s card, Click Here.
Dies
The Deckled Circles Dies are a great set of circles. There are 14 circles in the set. With the largest being a 5 3/4″ circle. So these would be wonderful for Scrapbooking as well as card making. You can see them in my online store, or on page 63 of the Mini Catalog. They are sort of hidden on the corner of the page.
Stamps
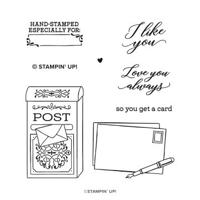
This card began just as yesterday’s card with the Stamped With Love envelope. It is stamped using Memento Tuxedo Black Ink. The fountain pen is colored with Mossy Meadow, Real Red, and Smoky Slate Stampin’ Blends. Smoky Slate was used for the “silver” of the fountain pen part. I love that this stamp set is so flexible!
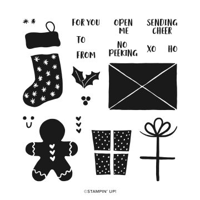
The sentiment used today is from the Sending Cheer stamp set. It is the one with the fun gingerbread man and santa’s hat in the Mini Catalog. I really love the boldness of the message and the font that is used. Stamping with Real Red really makes it pop! And of course the red heart for the postage stamp.
Papers
The colors for today are only one different from yesterday. The card is Mossy Meadow with a Real Red layer. And a Circle layer of Real Red as well. I even placed the focal point in the same place as yesterday. This was done to show off as much of the DSP as possible.
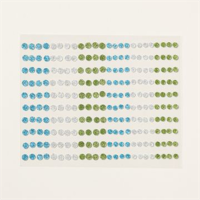
The DSP is from the same sheet of the Traditions of St. Nick Designer Series Paper. This is an online exclusive paper. But it is great for today’s Christmas card, as well as yesterday’s Think of you card. All it took was a bit of a color and sentiment change. The finishing touch is a trio of the green tinted Blooming Pearls.
Thank you for stopping in today!!
Online exclusives are here to stay! Click on the photo and be taken directly to them in my online store. If you place an order, please use my Host Code listed just below.
HOST CODE
My NOVEMBER Host Code is 626NJVKN. Please use this code for orders under $150.00. I will have a small gift for those with orders over $50.00 in addition to the Perk Rewards Program. You can read all of the information at the top of the page in the Menu Bar under SHOP / Perks.
Thank you for stopping by today. I hope you enjoyed today’s project and will come back. I do read and reply to all of the comments individually. They mean a lot to me. Please reach out if you have a question.
The card I am sharing today is one that I really love. Not only for the stamping but the fold as well. This one is definitely Festive & Fun.
The “FUN” open view is a surprise.
Layout
This Fun Fold is a case from a Connie Stewart video. I used the idea and changed the layers quite a lot. My card begins with the card base of Shaded Spruce cut to 5 1/2 X 4 1/4, a quarter sheet of regular card stock. The DSP is then 5 3/8 X 4 1/8, with Basic White cut to 5 X 3 3/4.
For the top, the Shaded Spruce layer begins as another quarter of card stock, but cut down to 4 3/4 X 3 1/2. Save the longer strip cut away and fold in half. It is the mechanism. Then the DSP is 4 5/8 X 3 3/8 with the Basic White at 4 X 2 1/2. Adhere the folded mechanism centered to the top inside of the base piece with the fold flush with the top. Next adhere the DSP and White to that base. This needs to be done for positioning of all the layers. Now lay the top Shaded Spruce down so that it appears as another layer on top of the bottom three pieces. Attach the folded mechanism to it. Then finish card with your stamping and other layers.
Stamps
The Festive and Fun stamp set is the star of this card. I love the animals making their way with the sled of gifts. It is a Smile card. The image is stamped using Memento Tuxedo Black Ink and then colored with a variety of Stampin’ Blends. All of the Blends are listed in the Supply List at the bottom of the post.
The sentiment on the front and inside are from the Merriest Trees stamp set. I love the font of the front sentiment. It is layered using the Banner Pick A Punch on one end. That banner is accented with my one and only bling for this card. It is a Gold Pearl from the Festive Pearls embellishaments.
The inside tree shaped sentiment is also from the Merriest Trees. This is such a pretty font and the shape of the tree really ads to the wording and the card. It serves as the sentiment and the decoration for the inside.
Papers
There are only three papers used, even though it seems like quite a lot with six layers! The Shaded Spruce is the base and grounding for the card, but also the DSP. The plaid DSP is from the Joy of Christmas Designer Series Paper. It is supposed to be Real Red and Cherry Cobbler I believe. Personally I just love how it pops form the Shaded Spruce and Basic White. It also really plays well with the snow and sled theme with the plaid.
Thank you for stopping by today!!!
Online exclusives are here to stay! Click on the photo and be taken directly to them in my online store. If you place an order, please use my Host Code listed just below.
HOST CODE
My NOVEMBER Host Code is 626NJVKN. Please use this code for orders under $150.00. I will have a small gift for those with orders over $50.00 in addition to the Perk Rewards Program. You can read all of the information at the top of the page in the Menu Bar under SHOP / Perks.
Thank you for stopping by today. I hope you enjoyed today’s project and will come back. I do read and reply to all of the comments individually. They mean a lot to me. Please reach out if you have a question.
The card I have to show today is a really quick and simple fun fold. This one includes the Beary Cute Bundle and the Walk In The Forest DSP. A perfect pairing for Christmas.
Here is the open view to see how simple this cute card is.
Fold
This fold is only one extra score line, a mountain and valley fold, into a wonderful card. I have shared this same fold using the Winter Meadow products previously. You can see that card HERE.
The card begins as a 4 1/4 X 11 piece of Thick White card stock. Then score at 4 and 6 3/4. The top section when folded is the smaller of the two end panels. Because the base is Basic White, I did not add additional layers to that. The top piece of DSP is cut 4 X 3 3/4 and the bottom one is 4 X 4. The middle Basic White section for you to write is 4 X 2 1/2. And the Basic White sentiment is 2 3/4 X 1 3/4. That is all you need!
Papers
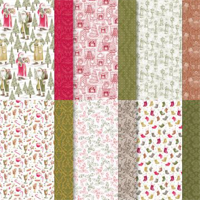
To continue the quick and easy theme, this card uses very little paper. There is the card base and a couple extra pieces of Basic White. This allows the beautiful DSP to shine. I love this A Walk In The Forest Designer Series Paper. It can be seen on page 4 & 5 of the Mini Catalog. This paper is the Stampin’ Up! Making A Difference set for this catalog. I love they are doing paper in place of a stamp set. And especially when it is such versatile paper!
Stamp Bundle
The Beary Cute Bundle is simply adorable! I love the bear. As I have mentioned before, it reminds me of the Coca Cola Bears from many years ago. These bears have so many possibilities. But I loved them giving a gift.
To create the scene, I used a piece of Basic White the same width as the DSP (4″ and probably 5″ tall). I left room to have some “snow” at the bottom, and stamped the sitting bear on the left side. She is stamped with Smoky Slate Ink and with an added Azure Afternoon scarf. Using my Paper Snips, I cut some wavy “snow” lines and then around the bear. The little gift and standing bear were stamped in the cut away of the snow. I colored the gift with Azure Afternoon Stampin’ Blends. The punch was used to cut the standing bear and the gift was fussy cut. They are then added to my little scene with Stampin’ Dimensionals.
The sentiment layer is also from the stamp set. It is stamped using Azure Afternoon also. As is the Merry Christmas on the top DSP. I personally love to stamp on DSP. There are some who say they are afraid to make a mistake. My rules are to go for it!! And I added just the little gift to the center White section where you would sign the card.
Thank you for stopping by today! I hope you will give this fun fold a try. It is quick and easy, and uses very little DSP.
Starter Kit promotion
Reminder of the Join Promotion!!! I would love to have you join my team. There is no pressure to ever place another order. Although you do get a discount being a demonstrator!! Plus we have so much fun sharing our ideas and just enjoying ourselves while stamping. Please reach out if you have any questions. I would love to talk with you. 🙂
Online exclusives are here to stay! Click on the photo and be taken directly to them in my online store. If you place an order, please use my Host Code listed just below.
HOST CODE
My OCTOBER Host Code is NYVXHUMX. Please use this code for orders under $150.00. I will have a small gift for those with orders over $50.00 in addition to the Perk Rewards Program. You can read all of the information at the top of the page in the Menu Bar under SHOP / Perks.
Thank you for stopping by today. I hope you enjoyed today’s project and will come back. I do read and reply to all of the comments individually. They mean a lot to me. Please reach out if you have a question.
Today’s card is a Christmas fun fold card wishing you Cheer! The stamp set is one that I think is being overlooked in the Mini Catalog. It is the Gift of Giving Set.
Stamp set
This set is the fun Gift of Giving stamp set. There are three large images and a couple of little background additions. I was drawn to this Cup of Cheer right away. But I love the entire set. Each of the images can be fully colored, highlight colored, and are all so stinking cute! I have ideas for gift tags and treats with one of these. The image was stamped with Memento Tuxedo Black Ink and then colored with Stampin’ Blends.
Papers
These two pieces of DSP are both from the Joy of Christmas Designer Series Paper. I love how they coordinate, which is how all Stampin’ Up! DSP works, but sometimes it really gets my attention. By pairing the Old Olive card stock with these I have a great card with only the one stamp used. Beautiful paper is one of the reasons I love SU!!
Finishes
There are very little additions to this card other than paper and ink. I did add a trio of the Festive Pearls on the focal layer. The larger image pretty much dominates the card and has it’s own sentiment as well. It makes for a quick and easy card. Although, I did make a bit of a fun fold to highlight the different papers and layers.
Layout
The card base is Old Olive that is cut to 4 1/4 X 8 and scored at 5 1/2. The top section includes a Basic White layer that is 4 X 2 1/4 and the DSP is 3 3/4 X 2. For the focal layer I cut an extra piece of Old Olive that measures 3 3/4 X 3 3/4. It has the second piece of DSP that is cut 3 1/2 X 3 1/2 and the Basic White stamped piece if 2 3/4 X 2 3/4. To give the illusion of White all the way down the front, the inside Basic White layer is 4 X 5 1/4 and is aligned with the upper section White piece. And the focal Old Olive section is aligned with the top section DSP and the bottom edges.
Starter Kit promotion
Reminder of the Join Promotion!!! I would love to have you join my team. There is no pressure to ever place another order. Although you do get a discount being a demonstrator!! Plus we have so much fun sharing our ideas and just enjoying ourselves while stamping. Please reach out if you have any questions. I would love to talk with you. 🙂
Online exclusives are here to stay! Click on the photo and be taken directly to them in my online store. If you place an order, please use my Host Code listed just below.
HOST CODE
My OCTOBER Host Code is NYVXHUMX. Please use this code for orders under $150.00. I will have a small gift for those with orders over $50.00 in addition to the Perk Rewards Program. You can read all of the information at the top of the page in the Menu Bar under SHOP / Perks.
Thank you for stopping by today. I hope you enjoyed today’s project and will come back. I do read and reply to all of the comments individually. They mean a lot to me. Please reach out if you have a question.
The content in this blog is the sole responsibility of Jackie Beers as an Independent Stampin' Up! Demonstrator. The use of and content of classes, services or products offered is not endorsed by Stampin' Up!