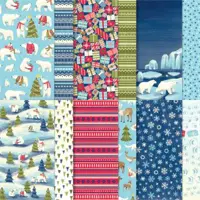
The Beary Christmas DSP is such beautiful paper that it is the star of today’s card. I have made one of my favorite things, a gift card holder to share with you.
Papers
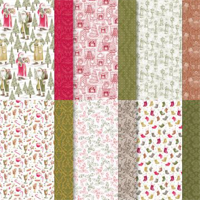
The star of this card is for sure the paper. I used the Beary Christmas Designer Series Paper. The softer colors and all of the animal print in this larger piece make me feel all warm and cozy. Although the prints are in snow and that is not warm and cozy. But making Christmas cards definitely is. And this one is a gift card holder.
To create this card I used two different pieces from the Beary Christmas DSP pack. This snow scene was cut to continue to the inside. Here is an open view.
The gift shares both the left and right side of the open view. Just a bit of fun there. And the little Christmas tree is cut from the same piece that the focal point on the front is from. I fussy cut the tree but it was really quick.
Dies
The two Deckled Rectangles Dies used on the front of the card are a different take on a “spotlight”. At least that is what I am calling it. I loved the little scene with the two bears and wanted a way to showcase them and their gifts. The two sizes of the Dies worked perfectly and fit on the front well. It is hard to believe that there is not stamping on the front of my card again today!
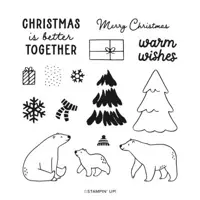
Stamp set
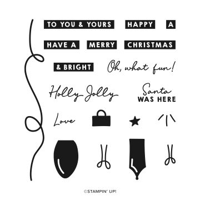
The only stamping on the entire card is the inside sentiment. It is from the Beary Cute stamp set. I love the cursive and simple Merry Christmas. My first plan had been for it to be on the front of the card. So I embossed it in White with that in mind. After building the front panel I realized that there was not a good spot to place a sentiment. So I fussy cut it a little bit and then added it to the inside. The Night of Navy with White embossing really pops as the sentiment and plays with the Night of Navy card base.
Measurements
card base of Night of Navy is 11 X 4 1/4 and scored at 1 1/2 and 5 1/2.
The front layers are Very Vanilla cut to 3 3/4 X 4 and DSP cut to 3 5/8 X 3 7/8
The gift card slot is covered with Very Vanilla at 1 1/4 X 4 and DSP at 1 1/8 X 3 7/8
The inside has a Very Vanilla that is 5 1/4 X 4
The right side DSP is evenly spaced on the end of large Very Vanilla and is 1 1/8 X 3 7/8.
Thank you for visiting with me today!!
Online exclusives are here to stay! Click on the photo and be taken directly to them in my online store. If you place an order, please use my Host Code listed just below.
HOST CODE
My NOVEMBER Host Code is 626NJVKN. Please use this code for orders under $150.00. I will have a small gift for those with orders over $50.00 in addition to the Perk Rewards Program. You can read all of the information at the top of the page in the Menu Bar under SHOP / Perks.
Thank you for stopping by today. I hope you enjoyed today’s project and will come back. I do read and reply to all of the comments individually. They mean a lot to me. Please reach out if you have a question.
Today is a two for one card share. The Merriest Trees Dies make a quick and easy card, or two!
This is such an easy card, that I made two. One is the opposite of the other with the papers.
Both trees together
Dies
The Merriest Trees Dies make this card super easy. With using DSP as the card layer, I was able to cut both pieces at the same time. Then it was easy peasy to simply lay the trees into the die cut section. I told you it was a quick one! And these fabulous Dies are carrying over! That makes me so happy.
Papers
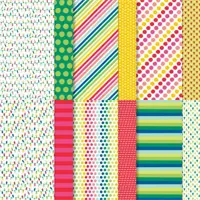
The DSP used on both cards is from the Merry Bold & Bright Designer Series Paper. This bold and bright (hence the name) paper is such a Fun paper. It is definitely bold patterns with bright colors. And I love it! The Fa la la piece may be my favorite, but the little trees are a close second.
The DSP is each paired with Lemon Lime Twist for another bright color. And they both have Basic White layer to highlight the DSP.
Finishes
To complete both cards was very simple as well. I added a Silver Glimmer paper star that also came from the Merriest Trees Dies. And that is complimented by Adhesive Backed Glitter Sequins. They are scattered around the trees to give more sparkle. I decided those two items were all the trees needed and left the fronts clear of sentiments. The fun trees tell you it is a Christmas card.
Thank you for stopping by today! If you want the Merriest Trees Bundle as a discounted bundle, then get it before the catalog retires. They are carrying over, but will not have the bundle priced.
Online exclusives are here to stay! Click on the photo and be taken directly to them in my online store. If you place an order, please use my Host Code listed just below.
HOST CODE
My NOVEMBER Host Code is 626NJVKN. Please use this code for orders under $150.00. I will have a small gift for those with orders over $50.00 in addition to the Perk Rewards Program. You can read all of the information at the top of the page in the Menu Bar under SHOP / Perks.
Thank you for stopping by today. I hope you enjoyed today’s project and will come back. I do read and reply to all of the comments individually. They mean a lot to me. Please reach out if you have a question.
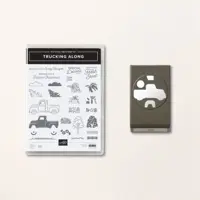
The card I have to share with you today is made with products from the Online Exclusives. The Trucking Along bundle, which was so popular a few months ago, is the star.
Stamp Bundle
The Trucking Along Bundle was very popular and still is in my book. It is available as an Online Exclusive now. I love all of the added pieces that can fit in the back of the truck. Actually I used two of those pieces. The tree for the bed of the truck and then the gifts at the top with the sentiment. There are a couple of sentiments for different times of year. Personally, I love the Festive Christmas!
The truck is stamped with Real Red for the outline, but has Sweet Sorbet as the filler. And I was fine with the splotchy look of the filler. It gives the worn truck look. There is more detail showing up close. I also added the “Farm Fresh” on the truck door with Copper Clay ink.
Dies
The wonderful Dies used here are the Deckled Circles. I have seen so many of the half moon cards made with these dies that I wanted to try something different. My original thought was to only use the truck half, but soon saw that it needed both halves. I apologize for not paying attention to which two of the circles I used. These Deckled Circles are carrying over and will be in the Online Exclusives when the Mini Catalog retires.
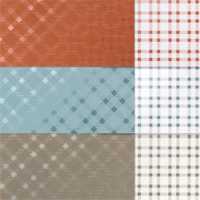
Paper and Finishes
The gorgeous plaid foil is from the Tartan Foil Specialty Designer Series Paper. It too is an Online Exclusive. The paper is a little thinner than regular, which is a good thing for mailing cards. You can see a little of the shiny in the photo where the light caught it. I paired the Tartan with a card base of Copper Clay, but gave a different layer with the Mossy Meadow. That ties into the tree and the circles.
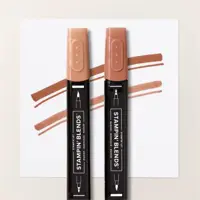
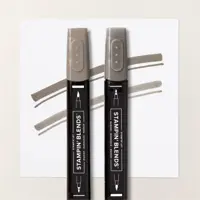
To ground the truck, I used the Copper Clay light Stampin’ Blend to create a dirt road. I also used the Copper Clay ink for the sentiment. All of the gifts are colored using coordinating colors of Stampin’ Blends. The finishing touch was a little milky way look of Iridescent Pearls. I may have gotten a bit carried away with them, but wanted to have a fun swirl between the circle halves.
Thank you for stopping by today!!
Online exclusives are here to stay! Click on the photo and be taken directly to them in my online store. If you place an order, please use my Host Code listed just below.
HOST CODE
My NOVEMBER Host Code is 626NJVKN. Please use this code for orders under $150.00. I will have a small gift for those with orders over $50.00 in addition to the Perk Rewards Program. You can read all of the information at the top of the page in the Menu Bar under SHOP / Perks.
Thank you for stopping by today. I hope you enjoyed today’s project and will come back. I do read and reply to all of the comments individually. They mean a lot to me. Please reach out if you have a question.
I love an easy way to make a wreath. Wreaths are always so welcoming to me. This one is very quick and simple to do. The card contains products on the Last Chance List. And one that is carrying over.
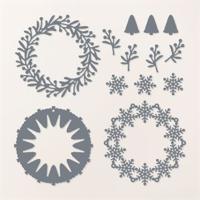
Wreath
This fun snowflake wreath is created using the Wishes All Around Dies. There are a couple of different wreaths but this one caught my eye. It is a very simple wreath, which I love. The wreath itself is one single die that creates the circle of snowflakes. For an addition, I used a separate die to cut the extra snowflake that hangs to the center. And I was wonderfully surprised when it “attached” to the arms of the other snowflakes to hang perfectly. I really love that unexpected fit!
The wreath did not need any extras in my opinion. So all I added was a simple bow. The Simply Elegant Trim, which comes in a pack of gold and silver, was the immediate thought. This trim is so easy to work with and surprisingly does great small bows. To give it a little extra oomph, I did a double loop bow.
Papers
The star paper of the card is the Silver Glimmer Paper. Actually this is a pack of gold and silver glimmer paper. And better yet, it is adhesive backed. The name is simply Silver & Gold Adhesive Backed Glimmer Paper. A mouth full for a beautiful paper. It saves the step of adding adhesive sheets prior to die cutting. And this adhesive backing peeled away very easily. I give this paper a definite 10 on the paper scale!
The card base and layer are both Basic White. I used Thick Basic White for the card base and then regular weight for the layer. With the layer raised with Stampin’ Dimensionals, it did not require the added thickness. I do love the White on White cards, I just rarely make them. LOL!!
Embellishments
There are no extra embellishments! Shocking I know. But, I did emboss the White layer. It is difficult to see in the photo, but I used the Snowflake Sky Embossing Folder. Those snowflakes are great on their own, but were a perfect match tot he snowflake wreath. And this great folder is on the Carryover List. That is a good thing.
Last Chance and Carryover Lists
The card today used the Wishes All Around which is on the Last Chance List. I hope you will give this set a second look if it is not already on your list or in your collection. And the Snowflake Sky Embossing Folder is on the Carryover List. So woohoo there! Although it could sell out as well.
Click on the lists to see the complete PDF of each.
Online exclusives are here to stay! Click on the photo and be taken directly to them in my online store. If you place an order, please use my Host Code listed just below.
HOST CODE
My NOVEMBER Host Code is 626NJVKN. Please use this code for orders under $150.00. I will have a small gift for those with orders over $50.00 in addition to the Perk Rewards Program. You can read all of the information at the top of the page in the Menu Bar under SHOP / Perks.
Thank you for stopping by today. I hope you enjoyed today’s project and will come back. I do read and reply to all of the comments individually. They mean a lot to me. Please reach out if you have a question.
I am going to be focusing cards on products that are retiring for the next little while. With the Last Chance lists out, we are all thinking of those items. This may give you additional ideas for your cards. And as usual, I have chosen to love most of the ones that are retiring!! LOL!! The lists are at the bottom of my post.
Stamps & Bundle
This card is made with the fabulous Joy of Noel Bundle. The stamps are ones that are timeless and classic. I love them! The greenery is from the Joy of Noel stamp set and is cut with the matching Dies. I added two additional sprigs of berries. They are all stamped using Basic Gray for a little softer look, and colored with Stampin’ Blends.
There is an additional stamp set used for the fun sentiment. It is the Merry & Bright stamp set. Personally, I have fallen in love with the cut apart letters. Having seen it done by others for quite a while, I was hesitant to try myself. Now I am hooked. For this card it takes down the elegant a bit to more of just a sweet card.
Papers and Embossing
The gorgeous DSP is what decided the green for this card. It is from the Traditions of St. Nick Designer SeriesPaper. This is one of the Online Exclusive papers and is still available. The two tones of green gave me Mossy Meadow and Old Olive for the coloring of leaves. Real Red for the card base was a given for the berries and ribbon.
The White layer is embossed using one of the pack of 3 Online Exclusives Embossing Folders. They are simply called Basics 3D Embossing Folders. And they are wonderful to have in your tool kit! This one is floral. I always thought of it as a summery type flower. But after using it, it could very easily be visioned as a poinsettia. Take a look for yourself and let me know what you think.
Finishes
The ribbon seemed perfect for the attaching the greenery. It is from the Real Red and Garden Green ribbon combo in the Annual Catalog. I love that it is very easy to work with. That is always a win. And the finishing touch is the Basic Rhinestones Jewels for a touch of bling.
Last Chance Products
Online exclusives are here to stay! Click on the photo and be taken directly to them in my online store. If you place an order, please use my Host Code listed just below.
HOST CODE
My NOVEMBER Host Code is 626NJVKN. Please use this code for orders under $150.00. I will have a small gift for those with orders over $50.00 in addition to the Perk Rewards Program. You can read all of the information at the top of the page in the Menu Bar under SHOP / Perks.
Thank you for stopping by today. I hope you enjoyed today’s project and will come back. I do read and reply to all of the comments individually. They mean a lot to me. Please reach out if you have a question.
The card I have to share today is with a set that caught my eye immediately. It is one of those from our childhood that just makes you smile. I hope you like my idea.
Bundle
Sorry: When I made this card and began the post, I did not realize the Rocking Horse Dies are sold out. However, you can make the card without the dies by fussy cutting the horse.
This fun Stamp and Die Bundle is the Rocking Horse Bundle. That rocky horse is such a great memory. Even if you never had one, the idea of it from old movies, just makes me Smile and feel loved. I used quite a lot of the images in the set. The rocky horse is stamped with Early espresso and then colored with Stampin’ Blends to match the card base colors. Then it is die cut using the matching Die.
The gifts are also included in the stamp set. They are in a stack with one die. I stamped them twice using Memento Tuxedo Black Ink, colored them with Stampin’ Blends, and die cut one stack. The second stack was fussy cut. I wanted a lot of presents!! Some of them are a bit odd shaped when cut apart. So I used the other gifts and the horse to hide the partial shape. A stack of presents is a good thing!
The sentiment is also part of the stamp set. That sentiment is right there with the rocky horse in why I wanted the set. It is fun to just say the words. Actually the sentiment is one long sentiment. I wanted to present it in a more fun and bold way. So I cut the words apart and spread them across the card.
Papers
The lights are from the Merry Bold & Bright Designer Series Paper. Actually the striped piece is as well. The lights were my first idea and then the stripes went along with the Fun part of the card. These lights remind me of the larger bulb lights on the trees growing up. So I new they needed to be prominent in the card. They cover an entire piece of the paper, but I only needed a few. It only took a couple minutes of fussy cutting to cut around this strand of lights. I did not try to be too perfect in my cutting.
The striped background paper is also from the Merry Bold & Bright Designer Series Paper. This piece became the “wallpaper” of the Christmas room. It pairs great with the Christmas lights and I was sure to add little touches of Poppy Parade in the gifts and on the rocky horse.
The bright Granny Apple Green was pulled from the Christmas Lights and was a perfect Green for the Poppy Parade as the Red for this card. I love traditional, but sometimes you must stretch outside the box a bit. And to complete the card, I added a scattering of Rhinestones around the sentiment pieces and the horse.
Thank you for stopping by today!!
Online exclusives are here to stay! Click on the photo and be taken directly to them in my online store. If you place an order, please use my Host Code listed just below.
HOST CODE
My NOVEMBER Host Code is 626NJVKN. Please use this code for orders under $150.00. I will have a small gift for those with orders over $50.00 in addition to the Perk Rewards Program. You can read all of the information at the top of the page in the Menu Bar under SHOP / Perks.
Thank you for stopping by today. I hope you enjoyed today’s project and will come back. I do read and reply to all of the comments individually. They mean a lot to me. Please reach out if you have a question.
The content in this blog is the sole responsibility of Jackie Beers as an Independent Stampin' Up! Demonstrator. The use of and content of classes, services or products offered is not endorsed by Stampin' Up!