Today’s card is a fun use of the Beary Cute Bundle of products. These bears remind me of the old Coca Cola white bears each Christmas. And since it is a punch bundle, it had two reasons for coming to my house!
Stamp Bundle
The Beary Cute Bundle is stamps and a bear punch. All of the stamps used are from this stamp set. I love these type cards! My idea was to create a little snow scene like I remember of the Coca Cola bears.
The scene began by stamping the left side bear on a piece of white card stock the same width as the DSP piece. Next I added the tree. It is an outline and the filling, so two stamps. Then I fussy cut a quarter of the way up the bear, around him and the tree so they appear to be in the snow. The scene continued to the other side as just an inch or so of “snow”.
The standing bear and the gift were stamped on scrap and fussy cut for the gift and punched for the bear. They are both added to the scene with Stampin’ Dimensionals.
Papers and Inks
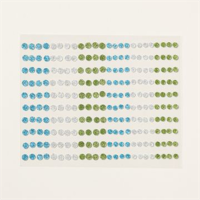
The snowy DSP piece is from the A Walk In The Forest Designer Series Paper. It was the catalyst for the card. So the card base is Balmy Blue with a layer of Smoky Slate for the bear color. To put the scene together with the layers I was brave and stamped the Merry Christmas directly onto the snow DSP. The tree is stamped both the outline and filling with Shaded Spruce Ink. The single bling is the one Adhesive Backed Glitter Sequin in blue at the top of the tree.
Thank you for stopping by today!!
Online exclusives are here to stay! Click on the photo and be taken directly to them in my online store. If you place an order, please use my Host Code listed just below.
HOST CODE
My September Host Code is 7BSV39GV. Please use this code for orders under $150.00. I will have a small gift for those with orders over $50.00 in addition to the Perk Rewards Program. You can read all of the information at the top of the page in the Menu Bar under SHOP / Perks.
Thank you for stopping by today. I hope you enjoyed today’s project and will come back. I do read and reply to all of the comments individually. They mean a lot to me. Please reach out if you have a question.
The card I have to share today is a fun fold with extra folds! It is a use for all of the DSP we tend to hide away. This really shows off the beauty of the paper. It also stars a wonderful new multi-season stamp set.
Stamps
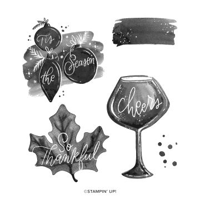
This card was highlighted as the star being a Multi-fold card. But I truly love this stamp set so am going to begin there. There are three stamps in the Cheers To The Season stamp set. They are all distinctive ones like this lovely Christmas stamp. There is also a wine glass with Cheers written on it, and a fall one with a maple leaf. I really like them all and they are great for quick cards.
The inside sentiment is from the Brightest Glow stamp set. It was a carryover from a previous catalog and is full of beautiful sentiments for your Christmas cards.
Papers
The star of the card in terms of paper is this 1/2 sheet of A Walk In The Forest Designer Series Paper. I cased this card from Connie Stewart. My first thought was that it used a large amount of DSP. Then I looked at my paper shelf and just laughed. You would think I was a hoarder of DSP looking at what I have stored. So I need cards like this one!!!
The layout of this card allows you to see both the front and back of the DSP. Which means you need to look carefully if you have directional paper. Mine is not so the scoring was pretty simple. I just needed to decide which paper is my inside view and score with that side facing up. ** If the paper is not directional this is not as much of a concern as you can refold the paper.
The 12 X 5 1/2 DSP is scored at 1 3/4, 4 3/4 and 7 3/4. Then fold and burnish with a mountain in the center. I always fold my valleys into mountains to make sure the score lines line up properly, then if it needs to go the opposite direction, I can then refold and burnish. Just do not burnish the first fold until you are sure of direction as not to tear the paper.
Inside View
This view allows you to see the folds and the mountain in the center. I have a layer of Garden Green card stock behind the White sentiment layer. It probably should have been Cherry Cobbler like the front layer! The front layer is 3 1/2 X 3 1/2 with a 3 1/4 X 3 1/4 white layer. And you can see that it is only adhered to that front folded section.
The only thing to be careful of is your inside sentiment. Do not place it too high so that it shows when the card is closed. And with a scattering of the Festive Pearls in Red on the front panel the card is a quick finish!
Thank you for stopping by today!
Online exclusives are here to stay! Click on the photo and be taken directly to them in my online store. If you place an order, please use my Host Code listed just below.
HOST CODE
My September Host Code is 7BSV39GV. Please use this code for orders under $150.00. I will have a small gift for those with orders over $50.00 in addition to the Perk Rewards Program. You can read all of the information at the top of the page in the Menu Bar under SHOP / Perks.
Thank you for stopping by today. I hope you enjoyed today’s project and will come back. I do read and reply to all of the comments individually. They mean a lot to me. Please reach out if you have a question.
It is a So Very Merry July! I have a Christmas card to share because I could not wait to try this new Online Exclusive stamp set. It is a bit different from the normal sets.
Stamp set
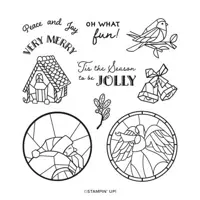
The So Very Merry is a new Christmas set that is now available in the Online Exclusives part of the Online Store. Some people seem to have some difficulty getting there though. When you are in the store, click on Shop Products, and then scroll down and you will see Online Exclusives in the options.
This set has the stamp I have used of Santa, plus an angel in a circle, a gingerbread house, and various extras with sentiments. I personally love the stained glass look. My Santa scene is stamped and embossed with Black Embossing Powder prior to coloring with Stampin’ Blends. And best of all…..the circle fits perfectly to the 2 3/8 Circle Punch! (The photo is not great as I was trying to show details and it was either too dark or too light!)
Colors
The colors for this card were decided after I finished coloring Santa. I knew it would be a simple layout so did not worry about matching DSP or anything like that. I chose Real Red for Santa, so that is the card base. The layer is Boho Blue due to the sky, and the embossed layer is Wild Wheat because of Santa’s toy sack.
Embellishments
To add some detail to a simple layout I went with the Basics 3D set of Embossing Folders. These are also in the Online Exclusives. There are three folders with different designs. This one is by far my favorite! And it definitely adds the texture my card needed. To ground the Santa image, I added a strip of the Boho Blue across the panel. And finished with a trio of the Classic Matte Dots. This is a very minimalistic card from me! LOL!!
Thank you for visiting today!!!
Please do not forget about Bonus Days when you place orders. An order of $50.00 of products gets you a coupon code to use in July. And it gets you a Blue Star Reward from me as well.
Bonus Days for the remainder of July!
For every increment of $50.00 in product per order you will receive a Coupon for $5.00. There is no limit to the number of coupon codes you can receive. Then you can redeem all of your codes during the month of August! Additionally, my Blue Star Rewards are for every $50.00 in product per order. So you would also be earning my rewards as well.
Online exclusives are here to stay! Click on the photo and be taken directly to them in my online store. If you place an order, please use my Host Code listed just below.
HOST CODE
My July Host Code is MXQY2UE9. Please use this code for orders under $150.00. I will have a small gift for those with orders over $50.00 in addition to the Perk Rewards Program. You can read all of the information at the top of the page in the Menu Bar under SHOP / Perks.
Thank you for stopping by today. I hope you enjoyed today’s project and will come back. I do read and reply to all of the comments individually. They mean a lot to me. Please reach out if you have a question.
Merry Christmas Eve to all of you. Things are beginning to settle down! Since I failed to get a post completed yesterday with some pound cake baking and gift wrapping, I decided to re-gift you all some of my favorite Christmas card posts from this season.
I hope you enjoy these cards. By clicking on each one you will be taken to the original post for it.
Merry Christmas everyone!
HOST CODE
My December Host Code is Y7T7EMTC. Please use this code for orders under $150.00. I will have a small gift for those with orders over $50.00 in addition to the Perk Rewards Program. You can read all of the information at the top of the page in the Menu Bar under SHOP / Perks.
Thank you for stopping by today. I hope you enjoyed today’s project and will come back. I do read and reply to all of the comments individually. They mean a lot to me. Please reach out if you have a question.
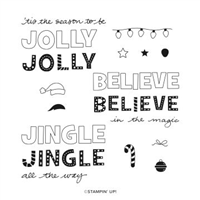
I have shared a few cards using the Jingle, Jingle, Jingle stamp set. I think it is such a fun set that you cannot help but Smile over. So I have one more to share with you using that set.
Stamps
As I mentioned this is another of the Jingle cards. They just make me Smile and this one especially. I have created a fairly monotone card here and I am happy with it. The only stamping is the simple Jingle. Although the fun letters are not really simple. However, it is easy to stamp and that counts as simple. The Jingle and the little bell are both stamped with Bermuda Bay Ink. The outline of Jingle is Memento Tuxedo Black Ink so stand out a little.
The bell was to add a bit of humor. After stamping it, I fussy cut it with my handy Paper Snips and then tied a Silver Thread bow to attach it to the sentiment. You may not be able to tell that the thread is looped over the sentiment. I couldn’t have Jingle and not a bell to go along with it.
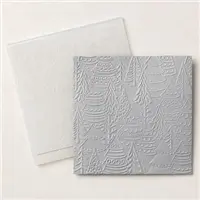
Background
The background is what determined that this card was going to be monotone. I wanted a lighter greenish tone for the trees. So after embossing the White layer with the Whimsical Woods Embossing Folder, I used Coastal Cabana Ink and Blending Brushes to highlight the raised areas. It took a little bit of blending then looking at it a minute, and then blending some more. But I finally got a result I was happy with. I definitely recommend giving the blending brushes a try. Doing it over an embossed image is a bit more forgiving!
I checked the Last Chance products as I was typing this post. Both the Jingle set and the Embossing folder are both still available for purchase!!
HOST CODE
My December Host Code is Y7T7EMTC. Please use this code for orders under $150.00. I will have a small gift for those with orders over $50.00 in addition to the Perk Rewards Program. You can read all of the information at the top of the page in the Menu Bar under SHOP / Perks.
Thank you for stopping by today. I hope you enjoyed today’s project and will come back. I do read and reply to all of the comments individually. They mean a lot to me. Please reach out if you have a question.
I have another Bath and Body Gift box idea to share with you. This is a nice way to give a gift and show your paper crafting talents. The Handmade Wishes Bundle is perfect for little gifts.
Today’s project was made for the Make My Monday Blog Challenge as part of the Design Team. You can see all of the designer’s projects and join the challenge by clicking on the emblem.
Here are the gifts on the inside. There are several small size candy packages that will fit in this space. The Mini Ghirardelli’s have been hard to find this year.
Stamps
I am sad to say that the fun Handmade Wishes Bundle is gone from the Last Chance List. It was there when I was making this last week. However, there are lots of Christmas sentiments that you probably have that will work just as well. And it does not have to be for Christmas! This is a great year round little gift.
If you do have the Handmade Wishes set, or the punch, I used Thick Basic White card stock and punched the tag. Using the Stampin’ Up! grid paper, I lined it up straight and then stamped the sentiments. They are three different words. But being photopolymer they are so easy to line up and place.
Papers and Ribbon
The card base is Garden Green card stock with the matching striped DSP from Sweetest Christmas Designer Series Paper. That is the candy cane paper! The box does not need a ribbon for a closure. But I wanted to add more color, plus the addition of the candy cane. I used the Real Red Faux Linen Ribbon. It is wrapped around the box and I tied a simple bow. The candy cane tucks easily behind the ribbon and is fairly secure.
The Box Instructions
You may have already recognized this box as being a Paper Pixie box. And you would be correct! Julie makes such great box projects that I don’t even try to change anything. Here is a link to her post and video. She is the best at giving directions and making it easy! Paper Pixie Essentials Box
HOST CODE
My December Host Code is Y7T7EMTC. Please use this code for orders under $150.00. I will have a small gift for those with orders over $50.00 in addition to the Perk Rewards Program. You can read all of the information at the top of the page in the Menu Bar under SHOP / Perks.
Thank you for stopping by today. I hope you enjoyed today’s project and will come back. I do read and reply to all of the comments individually. They mean a lot to me. Please reach out if you have a question.
The content in this blog is the sole responsibility of Jackie Beers as an Independent Stampin' Up! Demonstrator. The use of and content of classes, services or products offered is not endorsed by Stampin' Up!