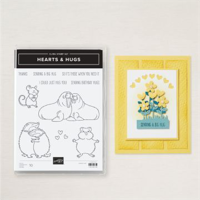
Everyone knows I love the cute animals that the Stampin’ Up! Designers create. I have used one of those sets for a sweet birthday card to share with you. A smile and a hug are good things on your birthday.
Stamps
This is a one stamp set card, which I comment on all the time. It is nice on occasion to simply pick everything from one set. This Hearts & Hugs stamp set has adorable huggable animals and sweet matching sentiments. The simple sentiment is perfect for this rather large Hug! So why not use it. Right!!
The walruses are stamped with Gray Granite ink and then colored using both Smoky Slate Stampin’ Blends. I tried to add different shades of the gray in their bodies to give a more natural look. Playing around with the Blends in my coloring is something I really enjoy. One day I may get it to a good spot.
Dies
The large walruses were a challenge to decide how to frame them. Then I remembered the Nested Essentials Dies. This was a perfect fit! I called this shape the oblong diamond. LOL!! I am not sure what it is actually called but it remind me of that. These are the two largest of this shape. They fit the card as well as the image. Since the sentiment was much smaller, I was not able to use the flag dies included in the Die set. So I made my own layered flag by clipping the white layer, adhering to the Night of Navy, and then clipping the Navy layer to match. It is not perfect, but close enough.
Papers
The card base was chose to match the walruses. It is Smoky Slate cut to 5 1/2 X 8 1/2 and folded at 4 1/4. I added the thin layer of Basic White at 5 1/4 X 4. And then this fun piece of DSP is 5 1/8 X 3 7/8. The papers needed to be larger due to the size of the image.
The wonderful blue plaid DSP is from the Take To The Sky Designer Series Paper. It seemed a great match for the images by adding a bright color without being too busy. Of course the Night of Navy layer came from this paper.
Finishes
There are not a lot of finishes needed or really room for them. So I kept it simple and added a trio of bling. This time I went with the Adhesive Back Sparkle Gems. These are a trio of basic colors. I used the silver sparkle. There is also a gold and a black sparkle gem in this pack. It is a good one to have for masculine cards especially. Plus they are flat embellishments as well.
Thank you for stopping by today!! I hope you have a fun weekend.
New Scrapbooking Catalog
The newest addition to Stampin’ Up! is an Online catalog of Scrapbooking products. You can see the catalog by clicking the photo below and save it to your computer.
Online Exclusives
New Online Exclusives have dropped. There are Halloween, Fall, Christmas, and many that are great year round. Of course the new Designer Series Papers and Embellishments are fabulous as well!
You can go directly to these in my Online Store by clicking HERE
HOST CODE
My SEPTEMBER Host Code is S9CRPBZ4. Please use this code for orders under $150.00. I will have a small gift for those with orders over $50.00 in addition to the Perk Rewards Program. You can read all of the information at the top of the page in the Menu Bar under SHOP / Perks.
Thank you for stopping by today. I hope you enjoyed today’s project and will come back. I do read and reply to all of the comments individually. They mean a lot to me. Please reach out if you have a question.
I hope you are enjoying the new Mini Catalog. Please reach out if you have any questions that I can assist you with.
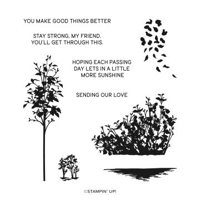
Today’s card is a quick masculine birthday card. I believe it would be a sweet sympathy / thinking of you card as well. Quick and versatile, that is always a winner in my book.
Stamps
The main stamp set used is the Delicate Forest stamps. The tree and the leaves are both from this set. I love that tree! It is a single tree that I stamped twice at full strength and then the center tree was stamped off first. It stands out more in person. And the leaves were stamped down the side to fill in that area. Plus it is almost time for that to begin happening around here. Some of you may already see leaves falling.
The sentiment is the only stamp not included in the Delicate Forest set. This small birthday is from the Loveliest Tree stamp set. I kept it in the tree family today!
Papers and Ink
The card base and the Ink are both Mossy Meadow. It is very rare for me to only have one color like this. Although I did add Very Vanilla for the sentiment layer as well as on the inside. I wanted this to be a quick and easy one to duplicate.
The paper the trees are stamped on may be a bit difficult to really see. It is from the Country Lace Designer Series Paper. It has almost a linen look to it. But is very soft. It provides some added texture I believe.
Extras
The simple part of the card does include a few extras. However they are items you may already have in your stash and are easy to grab. First is the Die for the sentiment layer. I used the smallest rectangle from the Nested Essentials Dies. These are such handy Dies that I highly recommend them. With rounded rectangles, banners and a long, slim, stretched diamond shape these dies fit about any stamp you would want to use.
The next addition is the green Baker’s Twine at the top. This is a new in the Mini Catalog three color Natural Tones Linen Thread. And the final extra is the bling. Except there are two! I used the , also new in the Mini Catalog, Woven Golden Leaves. These are so pretty. They are almost see through they are so light. And finally the Regal Foiled Adhesive Back Dots that are also from the Mini. These are in a few different colors. Of course I went with the green for this pretty monotone card.
Thank you for stopping by today!!
New Scrapbooking Catalog
The newest addition to Stampin’ Up! is an Online catalog of Scrapbooking products. You can see the catalog by clicking the photo below and save it to your computer.
Online Exclusives
New Online Exclusives have dropped. There are Halloween, Fall, Christmas, and many that are great year round. Of course the new Designer Series Papers and Embellishments are fabulous as well!
You can go directly to these in my Online Store by clicking HERE
HOST CODE
My SEPTEMBER Host Code is S9CRPBZ4. Please use this code for orders under $150.00. I will have a small gift for those with orders over $50.00 in addition to the Perk Rewards Program. You can read all of the information at the top of the page in the Menu Bar under SHOP / Perks.
Thank you for stopping by today. I hope you enjoyed today’s project and will come back. I do read and reply to all of the comments individually. They mean a lot to me. Please reach out if you have a question.
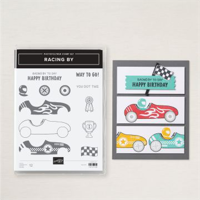
I am channeling my favorite racing series today. I love Formula 1 Racing and when I saw the Racing By stamp set, I knew it was for me. And I have a sweet little friend that just turned 4 who loves race cards as well.
Stamp Sets
The Racing By stamp set includes the cards, driver, flag, and sentiment. I love being able to make a card from one stamp set. The only extra are the stars. I felt it needed a touch more for the victory. These come from the Merriest Trees stamp set.
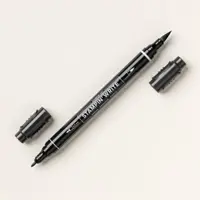
The cards are Blueberry Bushel and Poppy Parade. With the drivers in Crushed Curry. To make the flag pole, I used a ruler and the Basic Black Stampin’ Write Marker to simply draw the line. I went over it twice to give a bit more darkness.
Papers and Punch
There are no DSP on this card. I know that is amazing to those who follow me regularly! Sometimes it just happens. LOL!!! The card base is Blueberry Bushel with a layer of Poppy Parade. The sentiment is stamped on Crushed Curry card stock and then punched using the Happy Labels Punch.
Thank you for stopping by today!!
Online Exclusives
New Online Exclusives have dropped. There are Halloween, Fall, Christmas, and many that are great year round. Of course the new Designer Series Papers and Embellishments are fabulous as well!
You can go directly to these in my Online Store by clicking HERE
Bonus Days are winding down……
Do you have a wish list? I always have one on my desk. Bonus days are a good time to get some of those items. You then have a discount for next month’s order of a few more from that list. I call that a Win!
HOST CODE
My JULY Host Code is 2GCQ4HB6. Please use this code for orders under $150.00. I will have a small gift for those with orders over $50.00 in addition to the Perk Rewards Program. You can read all of the information at the top of the page in the Menu Bar under SHOP / Perks.
Thank you for stopping by today. I hope you enjoyed today’s project and will come back. I do read and reply to all of the comments individually. They mean a lot to me. Please reach out if you have a question.
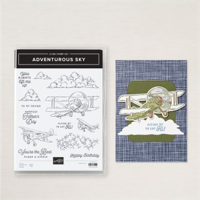
My card today stars the new Take To The Sky Suite of products. It is on page 37 of the Annual Catalog. I loved the samples shown at OnStage but was hesitant to get the set. Would I really use it. I have to say the answer to that is a definite YES. This is an awesome suite!
Paper
The paper is really the star of this card. It is the most used and a variety of the pieces are used, so I had to begin here. First the airplane is fussy cut from a piece of the DSP. All of the DSP is from the Take To The Sky Designer Series Paper. There are planes, clouds, scenery, and then sort of industrial on the opposite sides. The two pieces you see as the layer are both sides of one piece. I cut a 3 5/8 X 4 7/8 piece and then cut 2″ off the top. The clouds are the 2″ piece. Then I flipped over to the other side for the Gray Granite grid.
The card base and the tag are both Boho Blue. This is my favorite of all of the beautiful blues we carry. It reminds me of a Country Blue. I think it is the perfect color to pair with an airplane. The layer of Basic White was to break up things a bit and to help the grid of the bottom DSP to pop a little more.
Stamps
The Happy Birthday is from the Adventurous Sky stamp set. There are several great sentiments but I needed one for a birthday and it fit the best on my tag. 🙂 I stamped on a scrap of Basic White then cut one side straight to fit the edge. The other was angled. Then I decided that it needed a backing. And Gray Granite seemed a great fit as it is in the grid design. There were no precise cuts here, just eyeballing. I apologize to those of you who like exact measurements. For the inside I used another sentiment that says “You’re The Best Plane & Simple”. Isn’t that perfect for an airplane suite!
Tag and Embossing
The tag seemed the right addition for this card. It holds the little airplane and helps it to stand out a bit. Plus it could be used as a bookmark or even a gift tag as well. This tag Die is from the Merriest Trees Dies. I love the size of it.
To give the tag some added dimension, I embossed it. The new So Swirly 3D Embossing Folder is wonderful. These swirls would work for a variety of scenes, like air or waves. Plus it is simply different and very pretty.
Finishes
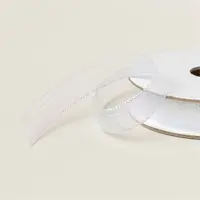
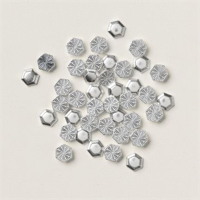
To complete the tag, I added some of the Iridescent Striped Trim. Even though this is 1/2″ wide, it is very soft and flexible. So no problems with using it as a tag pull. To complete the tag, I used the Industrial Trinkets that are part of the Take To The Sky Suite. They are fairly thick and fit a glue dot perfectly on the base to adhere them. I am not mailing this card so no worries on the thickness. But you might want to keep that in mind. And it would be ok except that I had raised the tag as well.
Thank you for stopping by today!!
May Join Promotion
New demonstrators who join during the month of May will receive the following products in their Starter Kit at no additional cost:
2024–2026 In Color Classic Stampin’ Pad Bundle
2024–2026 In Color 8-1/2″ x 11″ (21.6 x 27.9 cm) Cardstock
2024–2026 In Color 6″ x 6″ (15.2 x 15.2 cm) Designer Series Paper
2024–2026 In Color Stampin’ Write Markers
HOST CODE
My MAY Host Code is 96AT2UNW. Please use this code for orders under $150.00. I will have a small gift for those with orders over $50.00 in addition to the Perk Rewards Program. You can read all of the information at the top of the page in the Menu Bar under SHOP / Perks.
Thank you for stopping by today. I hope you enjoyed today’s project and will come back. I do read and reply to all of the comments individually. They mean a lot to me. Please reach out if you have a question.
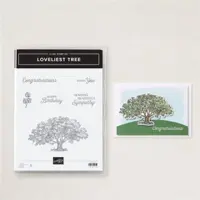
I have two new products paired up today. And they are not two that you would expect. One is quite feminine and the other is neutral. Yet it makes a wonderful masculine card. I was so excited for the final result.
Stamp set
This stamp of the tree may look like an old friend to some of you. It is reminiscent of the long time stamp set Lovely As A Tree. It was around for many, many years. Well there is somewhat of a return. The new set is titled Loveliest Tree. And I have to agree. This is a beautiful tree. All of the stamps are included in the set.
The tree was inked with Stampin’ Write Markers. This is a great technique but only works on Red Rubber stamps. I used Pretty Peacock and Lost Lagoon on the tree leaves. Early Espresso is the tree trunk and Granny Apple Green is the grass at the tree base. It can be a little nervy stamping directly onto DSP. And this was no exception. But I overcame my fear and love the results. Note: the Stampin’ Write Markers are only available as a Color Family and not individually.
The sentiment and little leaves were a last idea for getting the sentiment in. I just couldn’t bring myself to stamp on the DSP again. Or to cover up anything. But it needed something. So I stamped the leaves with Pretty Peacock and the sentiment with Early Espresso on Basic Beige card stock. After fussy cutting around these, I realized it blended in too much. So I adhered it to a Pretty Peacock scrap and fussy cut again. I was really happy with the outcome. let me know what you thing!
Papers
This card became quite a simple one in terms of products and colors. I knew after stamping the tree that I wanted Pretty Peacock as the base. Of course I had already decided on the linen look piece of DSP. This gorgeous paper is from the Country Lace Designer Series Paper. Who would have thought of that name with a masculine card? Well ,hold on to your hat because the eyelet layer is from the same Country Lace DSP. And again, not what you would usually expect. I am so happy that I tried it though. I think both of them are perfect for this card.
The thin layers of Pretty Peacock seem to really highlight the DSP. And when you add the sentiment piece, it further adds to the pop. We have a painting from my late Mother In Law that is a river scene. And on the edge of the painting, next to the matting, is a miniature version of the painting. I have always loved and been amazed at that. The little touch really “makes” the painting. If I squint my eyes, I see this little sentiment layer as a similar thing. And I understand if you roll your eyes at me! LOL!!!!
Measurements
The card base of Pretty Peacock is 5 1/2 X 8 1/2 with the eyelet DSP cut to 5 3/8 X 4 1/8. Then the Pretty Peacock layer is 4 3/4 X 3 1/2. And the focal DSP tree layer is 4 5/8 X 3 3/8. I hope you will try using some unexpected DSP and stamp set combinations.
Free Shipping coming soon…..
May Join Promotion
New demonstrators who join during the month of May will receive the following products in their Starter Kit at no additional cost:
2024–2026 In Color Classic Stampin’ Pad Bundle
2024–2026 In Color 8-1/2″ x 11″ (21.6 x 27.9 cm) Cardstock
2024–2026 In Color 6″ x 6″ (15.2 x 15.2 cm) Designer Series Paper
2024–2026 In Color Stampin’ Write Markers
HOST CODE
My MAY Host Code is 96AT2UNW. Please use this code for orders under $150.00. I will have a small gift for those with orders over $50.00 in addition to the Perk Rewards Program. You can read all of the information at the top of the page in the Menu Bar under SHOP / Perks.
Thank you for stopping by today. I hope you enjoyed today’s project and will come back. I do read and reply to all of the comments individually. They mean a lot to me. Please reach out if you have a question.
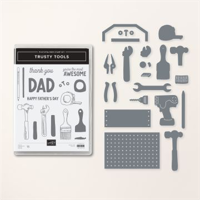
The card I am sharing today stars the Trusty Tools Bundle and matching Sale-A-Bration DSP. And it is an interesting Fun Fold.
Fun Fold
This is such a simple Fun Fold. It is more of a Fun Cutting of the paper! I got this from Lovenstamps. She made a card with this cut and I had to do it. It is such a fabulous use of DSP!! I love, and have a ton of, DSP. So a perfect card for me. To make the cut is so simple. I will warn you that it can be confusing at first. So you need a photo to refer to paper placement!
The card base is 8 1/2 X 4 1/4. Fold the card at 4 1/4. Using your paper trimmer, open the card and place the upper right corner of the front flap in the cutting line. Hold that in place and move the bottom of the card so the bottom of the score line is in the cutting track. Cut off that triangle from the card but keep it handy.
To further illustrate, look at the photo of my card. The lower card stock you see is what you have cut away. I know that is confusing but it will make sense in just a minute. Next take a 4 X 4 piece of DSP and adhere it to the upper triangle that is still attached to the card. Again, look at the photo. After adhering the DSP to ONLY that upper triangle of card stock, now add back the triangle you cut away. You will adhere it to the bottom section of the DSP. Here is an open view of the card which may help a bit.
NOTE: After making the cut away of the triangle close the card. Adding the DSP to the front, you need to align with the top and bottom of the card. With the bottom front being cut away, you will use the back of the card for alignment. And same is tru for adding the bottom card stock back, you will need to align it all sides as well as the point at the top right.
Stamps and Tools
The Trusty Tools stamp set is so fun and has perfect sentiments to go along with the stamps and dies. I love the “You’re The Most Awesome”. It makes this set work for many occasions and not just a Dad or even manly. I stamped the sentiment on a reverse of the DSP. And then punched it with the Decorative Circle Punch. That is layered on Crushed Curry that is punched with the 2 3/8 Circle Punch. These two punches seem to be made for each other they fit so well together!
The ruler is a 3 X 3/4 piece of one of the DSP pieces. That is so perfect for this set. And the tool is one from the DSP as well. I naturally chose a tool that does not have a matching die. So I just fussy cut it. The Dies in the set actually do fit and cut out several from the DSP as well as matching stamps.
For the inside of the card I stamped and colored the tape measure and then added a scattering of bolts and screws. The sentiment was left off of the inside until I decide who to send it to. I do that quite often.
Papers
The paper color choice came from the DSP of course. It is the Trusty Toolbox Designer Series Paper and is a Sale-A-Bration FREE item with a $50.00 order. Since the Trusty Tools Bundle is $54.75 you can order the bundle and get the paper free! Although you only have a couple more days to get the paper. Sale-A-Bration ends on the 29th!!!
The card base is Poppy Parade with the Lost Lagoon DSP piece with the screws. For a pop of another color, I added the Crushed Curry for the background circle. And I colored the tape measure using Stampin’ Blends with Poppy Parade and Lost Lagoon. The finishing bling is the Brushed Metallic Adhesive Backed Dots. It is supposed to be a nail holding up the sign. 🙂
Thank you for stopping by today!!!
HOST CODE
My FEBRUARY Host Code is PR4KTFTS. Please use this code for orders under $150.00. I will have a small gift for those with orders over $50.00 in addition to the Perk Rewards Program. You can read all of the information at the top of the page in the Menu Bar under SHOP / Perks.
Thank you for stopping by today. I hope you enjoyed today’s project and will come back. I do read and reply to all of the comments individually. They mean a lot to me. Please reach out if you have a question.
The content in this blog is the sole responsibility of Jackie Beers as an Independent Stampin' Up! Demonstrator. The use of and content of classes, services or products offered is not endorsed by Stampin' Up!