Today’s card is an All Abut You card. This one is made with distressed products which are not my normal card making. I love a challenge.
Layer
The Distressed Tile Embossing Folder is one of my favorites. I love the design and the “worn” spots in the design. And it seemed a perfect choice for this pairing. With the card base of Crumb Cake, the Misty Moonlight is a great match in my book. I am partial to blues and this is the one I tend to lean towards. Plus it really shows the detail of the embossing clearly.
Bundle
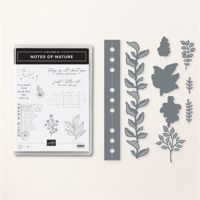
The Notes of Nature Bundle is a wonderful set for several reasons. It pairs perfectly with the distressed look of my embossed layer. But it could create a multitude of backgrounds. I have trouble with the large background stamps. But these small ones included here are perfect to create your own backgrounds. I used the grid one all over the layer. Then I had to add some of the splatter here and there. And I even through in the tiny flower for a softer look.
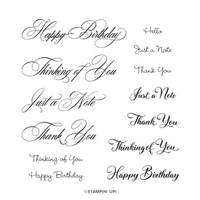
The sentiment is from the stamp set and states the way a Birthday should be. It is all about you! I love the three different sentiments included with this set. They are so different. And then to the Dies in the bundle. The fun notebook die created the holes down the left side. Stampin’ Up! has had similar ones but this one is long and only adds the holes. I think there is a lot that can be done with this one. And those gorgeous twigs of greenery, except in blue, are a great addition for more texture and interest.
Finishes
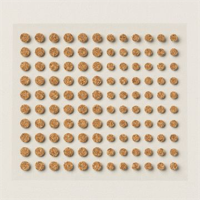
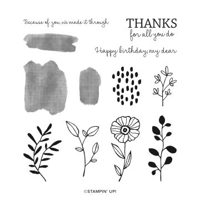
The finishes to this card are small ones. With the textures and distressed paper, it really did not need very much. But to add to the textures, I gave the card two more of different types. First is the Linen Thread. It is wrapped around the end of the sentiment with a double bow added. I love Linen Thread and how easy it ties. And the second and final touch is a new embellishment. The Adhesive Backed Cork Rounds are a fun addition included in the Nature’s Sweetness Suite of products. One is all I felt it needed and that is showing restraint on my part. LOL!!! The Stamp Bundle is part of that suite also. This is all on page 41 of the Mini Catalog.
Thank you for visiting today! I hope you have a fun and safe weekend. There is awful weather everywhere it seems.
Online exclusives are here to stay! Click on the photo and be taken directly to them in my online store. If you place an order, please use my Host Code listed just below.
HOST CODE
My JANUARY Host Code is BQEMX92K. Please use this code for orders under $150.00. I will have a small gift for those with orders over $50.00 in addition to the Perk Rewards Program. You can read all of the information at the top of the page in the Menu Bar under SHOP / Perks.
Thank you for stopping by today. I hope you enjoyed today’s project and will come back. I do read and reply to all of the comments individually. They mean a lot to me. Please reach out if you have a question.
The card I have for you today is another mix of products. I love this and a adding my new favorite, the new Perennial Postage Dies. They are such a fun addition.
Stamps and Bundles
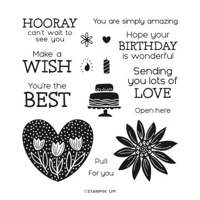
The star of this card is hard to choose. I love the different aspects of it. But to begin with the stamps make sense. I will say the cake was the inspiration. It is from the new Hooray For Surprises Bundle. This set has pull tab openings for a real Surprise to the recipient. I did not go that route today and went much simpler. I stamped the cake, which has a matching die, and then added the candle and flame, which do not have dies.
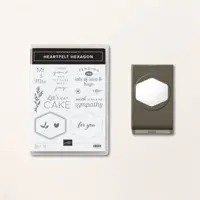
The sentiment matches the cake, but is from a different set. It is from the Heartfelt Hexagon Bundle. I loved the boldness of this one. And let’s face it, eating the cake is the star attraction! The fun opening is the Heartfelt Hexagon Punch. I really love punches and this is a good one. It is a great size for most of our sentiments and I like the shape. Plus using it as an opening like this is an added bonus!
Papers
The papers I chose for this card are much more subtle than my normal colors. Of course the DSP was the color decider. This is a piece from the Lighter Than Air Designer Series Paper. It has such great colors that it was difficult to choose only a couple. I decided on highlighting the flame from the candle and went with Lemon Lolly for the card base. Surprising to myself, I did not add a layer between the base and the DSP. That is also very different for me. And then the Postage layer in White. Wow! But I did use the bright Azure Afternoon for the sentiment and the cake to make up for the less layers.
More Dies and Finishes
The fun outline of the layer is the Perennial Postage Stamp Dies. This is the 2nd largest of the dies. I love the Scalloped Contours Dies that are similar sizes, but this gives a unique and different shape. You will be seeing more of the these guys for sure. To finish the card I went with fun shapes instead of bling. The flowers and heart on the cake and card are from the Adhesive Backed Hearts & Flowers embellishments. They add a Fun look and I though went well with the colors of the papers.
I appreciate you stopping by today!!
Online exclusives are here to stay! Click on the photo and be taken directly to them in my online store. If you place an order, please use my Host Code listed just below.
HOST CODE
My JANUARY Host Code is BQEMX92K. Please use this code for orders under $150.00. I will have a small gift for those with orders over $50.00 in addition to the Perk Rewards Program. You can read all of the information at the top of the page in the Menu Bar under SHOP / Perks.
Thank you for stopping by today. I hope you enjoyed today’s project and will come back. I do read and reply to all of the comments individually. They mean a lot to me. Please reach out if you have a question.
I am back!! It has been way too long since I was posting regularly and I have missed it, and making cards. The Flu hit me Christmas Eve and then my husband. Finally we are back to semi-normal. And if you know me, that is close enough. LOL!!!
My first play with new products for the year is a mix of On Line Exclusives and Sale-A-Bration items. And since the cold is hitting me hard this year, I have opted for more of a springtime card. It is wishful thinking.
Stamp Bundle
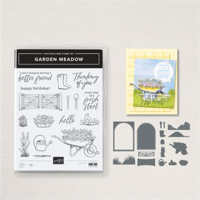
This sweet garden set is appropriately named Garden Meadow. It is a Bundle. You have probably seen the beautiful cards with the arched window look. That is a die in this set. I opted for a simpler card to get back in the swing of things. Please give the OnLine Exclusives a look. There are some beautiful sets there. Plus a few of the staple items are in that section as well. The machine cutting plates are one thing.
The stamps used are all from the set. I stamped with Memento Tuxedo Black Ink and colored with a variety of Stampin’ Blends. Boho Blue is the base of everything, with the accompanying Pecan Pie. All are listed in the supply list at the bottom of the post. The watering can I did die cut with the matching die to use it as the grounding piece for the sentiment.
Papers
The card base is Boho Blue to match the colored image. And the floral DSP piece has Boho Blue as well as the Flirty Flamingo and Bubble Bath colors of the flowers. I added the DSP piece of Pecan Pie to highlight the dirt and the color used on the sentiment. Plus I just love the simple detail on that Pecan Pie piece of DSP. And the DSP is one of the Free with a qualifying order in Sale-A- Bration. It is the sweet Flight & Airy Designer Series Paper. There are gorgeous card examples in the SAB Catalog using this paper.
Finishes
The watering can supporting the sentiment is a different look. I like something unexpected to be highlighted. Just simple trimming of the end of the sentiment strip gives a little more detail. And the finishing touch is a couple of the new Rainbow Adhesive Back Dots. I chose to use a trio of them in the colors of the flowers. They are Bubble Bath, Fresh Freesia, and Flirty Flamingo. A perfect finish to the card.
Thank you for stopping by today!!
Online exclusives are here to stay! Click on the photo and be taken directly to them in my online store. If you place an order, please use my Host Code listed just below.
HOST CODE
My JANUARY Host Code is BQEMX92K. Please use this code for orders under $150.00. I will have a small gift for those with orders over $50.00 in addition to the Perk Rewards Program. You can read all of the information at the top of the page in the Menu Bar under SHOP / Perks.
Thank you for stopping by today. I hope you enjoyed today’s project and will come back. I do read and reply to all of the comments individually. They mean a lot to me. Please reach out if you have a question.
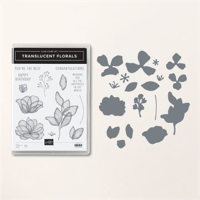
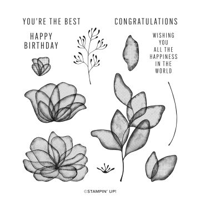
Today’s card showcases the Translucent Florals Bundle. This bundle is really fabulous and I am thrilled to say that it is carrying over!
Bundle
The Translucent Florals Bundle is really beautiful images with well scripted common sentiments. It is going to carrying over , however the bundled price will not carry over. So if this is on your Wish List, it is 10% less now as a bundle.
To create this card, I stamped the two flowers and the large leaves image using Soft Sea Foam Ink. And it is stamped on Vellum card stock. Sadly, this is not really clear in the photo. At least it does not stand out well. In person, it is much more apparent. But I still love the look this created. And I failed to mention that it is a Fun Fold. 🙂
Sentiment
There is not a front sentiment on this card which I have done a couple of times recently. This is really shocking and I did not even realize it. LOL!!! However the inside sentiment is from the Sending Smiles stamp set. It’s simplicity goes well with the card.
Papers
The card base is Lost Lagoon with layers of different pages of the Hello Irresistible Designer Series Paper. I still love this paper and the patterns and shading it has. Here is the open view of the card.
The Fun Fold opens to show the three different patterns of the DSP. And the simple sentiment. The Basic White layer is a full 4 X 5 1/4 and I simply added the far right DSP piece flush with the top, bottom , and right side. You can see the Vellum card stock a little better from the open view. I will caution you to be careful when stamping on Vellum. It is slick, so carefully stamp and hold the block steady. And it does not dry quickly at all! I let it sit for a few minutes and still used my Heat Tool to make sure it was dry before I did the die cutting. Better safe than sorry!
Finishes
The vellum pieces are attached to the edge of the front fold with Glue Dots strategically placed. Vellum is a bit difficult to adhere since you can see through it. I was careful to hide the glue dot behind the next layer as I added the images. And for the flowers, I added the Glue Dot to the center. Then I finished with a trio of the smallest Blooming Pearls for the flower centers.
Measurements
card base of Lost Lagoon is 5 1/2 X 8 1/2 and scored at 2 1/8 and 4 1/4. Fold and burnish to create the folds.
DSP layers are all three cut to 2 X 5 1/4
Inside Basic White is 4 X 5 1/4 with the DSP adhered over the right half. * You could cut the Basic White to fit without the DSP over top.
Thank you for stopping in today!!
Online exclusives are here to stay! Click on the photo and be taken directly to them in my online store. If you place an order, please use my Host Code listed just below.
HOST CODE
My DECEMBER Host Code is YJUB2G6X. Please use this code for orders under $150.00. I will have a small gift for those with orders over $50.00 in addition to the Perk Rewards Program. You can read all of the information at the top of the page in the Menu Bar under SHOP / Perks.
Thank you for stopping by today. I hope you enjoyed today’s project and will come back. I do read and reply to all of the comments individually. They mean a lot to me. Please reach out if you have a question.
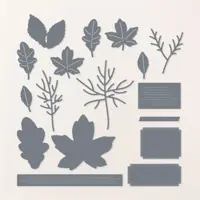
The Autumn Leaves Bundle has been a fabulous Fall and Thanksgiving “go to” for me. But I love the stamped images so much I had to carry it over for a Fall Birthday.
Leaves
The Leaves are the star of this card in my opinion. I actually did not use the Autumn Leaves stamp set, only the Autumn Leaves Dies were used. Two of the little oak leaves were die cut from Copper Clay card stock. I really love the detail the little dies have included. And then a large leaf was cut from Gold Foil paper. It really helps the gold in the papers to pop!
The sentiment layer is also cut using the sentiment die from the Autumn Leaves Dies. This shape is great for so many of the SU sentiments. And there is also one that is more square with similar details included. The sentiment itself is from the Translucent Florals stamp set. It is a simple and bold Happy Birthday.
Papers
The unusual color I pulled from the All About Autumn Designer Series Paper is Moody Mauve. I was surprised at how well I like this color here. And yes, I am sad to say the All About Autumn Designer Series Paper is gone for good. But as popular as it was, I am sure several of you have it to still use. And if not, there are lots of gorgeous DSP available that could be used with this layout.
The layout I used is one I came up with when looking through the DSP. I chose different papers to showcase and ended with these three and the layout. They are all from the DSP pack. Pairing the Crumb Cake and Moody Mauve was from looking at what seemed to be the dominant colors.
Finishes
The gold foil leaf was a surprisingly good choice to pop! Next came the placement of the two little leaves and they needed something to hold them together. The Bakers Twine was great for this. I made a double bow to stand out a little more. Then the Adhesive Backed Speckled Dots were scattered around the sentiment. And yes, they are gone as well.
Layout Measurements
Card base of Moody Mauve is 5 1/2 X 8 1/2 scored and folded at 4 1/4
Crumb Cake back layer is 5 1/8 X 3 1/8 with wood DSP 5 X 3
Crumb Cake middle layer is 4 1/8 X 2 1/8 with leaves DSP of 4 X 2
Crumb Cake bottom layer is 4 1/8 X 1 5/8 with metallic DSP of 4 X 1 1/2
Online exclusives are here to stay! Click on the photo and be taken directly to them in my online store. If you place an order, please use my Host Code listed just below.
HOST CODE
My NOVEMBER Host Code is 626NJVKN. Please use this code for orders under $150.00. I will have a small gift for those with orders over $50.00 in addition to the Perk Rewards Program. You can read all of the information at the top of the page in the Menu Bar under SHOP / Perks.
Thank you for stopping by today. I hope you enjoyed today’s project and will come back. I do read and reply to all of the comments individually. They mean a lot to me. Please reach out if you have a question.
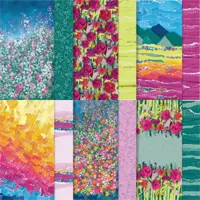
The card I have to share with you today is one that appears to be created by torn paper. In fact that is the case. Except the paper is produced from the talents of Stampin’ Up!s creative artists who did actually tear paper. I love the look it gives.
Papers
The card layers to this card are mostly from the Masterfully Made Designer Series Paper. One of the Stampin’ Up! artists created this paper. She is obviously very talented. It is one of my favorites. And to prove that I used three different patterns from the pack.
The card base is Pretty Peacock to match the leaves of the flowers. Then the Basic White layer to help the colors pop. And the Berry Burst is a beautiful color with the white mixed in from the pattern. I added the Lemon Lime Twist for a brightness and to help the flowers really stand out. Finally the flowers are cut from the Berry Burst piece with the leaves from a third sheet of the paper.
Dies and Stamps
The flowers and leaves are cut using the Timeless Charm Dies. (I also used the stamps for the inside sentiment) I love these flowers and leaves. And with the different shades of green from the paper, it really helps them to pop! NOTE: I apologize. This card was made a little while ago and now the dies have sold out. It was/is an Online Exclusive. The stamp set is still available but not the dies. However there are several floral dies that would work just as well. Sorry!!
The sentiment is simple but one I use regularly. This Happy Birthday is the perfect size for the front of a card. It is from the Go To Greetings set. There are a few sentiments in different sizes. I really love that. And to finish the card I added three of the Iridescent Discs. These are great because they are flat. So no added bulk in the envelope when mailing.
Thank you for stopping in today!! I hope you have a wonderful weekend.
Online exclusives are here to stay! Click on the photo and be taken directly to them in my online store. If you place an order, please use my Host Code listed just below.
HOST CODE
My NOVEMBER Host Code is 626NJVKN. Please use this code for orders under $150.00. I will have a small gift for those with orders over $50.00 in addition to the Perk Rewards Program. You can read all of the information at the top of the page in the Menu Bar under SHOP / Perks.
Thank you for stopping by today. I hope you enjoyed today’s project and will come back. I do read and reply to all of the comments individually. They mean a lot to me. Please reach out if you have a question.
The content in this blog is the sole responsibility of Jackie Beers as an Independent Stampin' Up! Demonstrator. The use of and content of classes, services or products offered is not endorsed by Stampin' Up!