The card today is a pocket card of sorts. I am calling it a “tuck card” because a small card tucks in the behind the corner. It features the Zany Zoo products. I have neglected these fun products for too long.
The Card
This is a fun Birthday card for any age. The idea came from Karen Titus. I love a simple Fun Fold card. The card base is Basic White that is a quarter sheet of card stock. The layer, which is an opposite side of the Zoo Crew DSP, is 4 X 5 1/4. Next I cut a square of Basic White 3 1/2 X 3 1/2 with a square of matching DSP at 3 1/4 X 3 1/4. Both of these are cut on the diagonal. You layer one White and one DSP and save the other two for another card. Then add the diagonal piece to the bottom left corner of the card. Only adhere the left side and bottom!
Here is a photo of the real card.
The small card is a card base of Pool Party that is 3 1/4 X 4 1/4. And the DSP is 3 X 8 and folded at 4. Layer the DSP folded piece onto the Pool Party. I added the Basic White inside with a strip of DSP at the bottom. The inside White is 2 3/4 X 3 3/4.
The Bundle
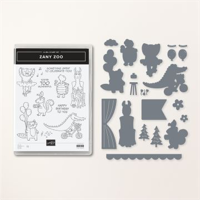
The Zany Zoo Bundle is an awesome one. Not only are their great animal stamps and sentiments, but Dies that cut them out. Plus there are some additional Dies for added layers and scene creations. Also, and one of the best parts, the animal Dies will cut some of the animals from the Zoo Crew DSP. Both sentiments are stamped from the stamp set. The front sentiment is then Die Cut with the banner Die included in the Bundle.
DSP
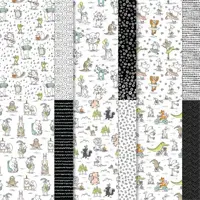
This Zany Zoo Designer Series Paper is so fun! I love the animals and their different actions they are doing. There is not a die for the elephant on the card front. But I wanted an unusual focal point on the front of the card. Since the DSP is thinner than card stock, I cut the elephant from the DSP leaving a wide area around her and then glued her to a scrap of White. While the glue was drying I finished coloring her with Stampin’ Blends. Once the glue had dried, I fussy cut the elephant and then added her to the front of the card with the banner. It was really quick and easy to do.
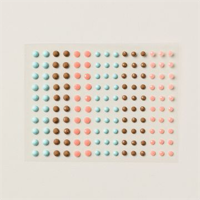
To finish the card I simply added a trio of Classic Matte Dots in Black. I felt they would show the best with all of the White and Black of the card.
Thank you for stopping by today!!
HOST CODE
My MARCH Host Code is GBUE3X7H. Please use this code for orders under $150.00. I will have a small gift for those with orders over $50.00 in addition to the Perk Rewards Program. You can read all of the information at the top of the page in the Menu Bar under SHOP / Perks.
Thank you for stopping by today. I hope you enjoyed today’s project and will come back. I do read and reply to all of the comments individually. They mean a lot to me. Please reach out if you have a question.
The Notes of Nature Bundle is one that I really like but have not given much time to. My card today gives it a partnership with the gorgeous Layered Floral Embossing Folder. They are a great pairing.
Bundle
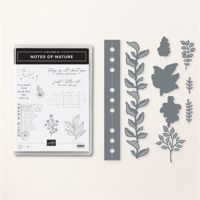
The Notes of Nature Bundle is a really nice one. And has an item from the stamp set and from the die set on this card. The sentiment is from the set and is one I especially was drawn to. Your birthday should be All About You! So I definitely had to use that sentiment and make it fairly prominent.
The die from the Notes of Nature that is used is the notebook looking Pebbled Path piece. One of the things I like about this particular die is of course the holes and perforations. But also that it does not cut out on either side. So it could be made as a piece of notebook paper, or as I used it for simply a strip for decoration. Versatility is something I always look for.
Extra Features
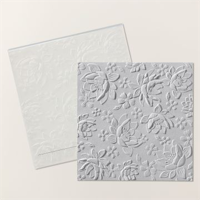
The embossing folder used here is the Layered Floral 3D Embossing Folder. It is in the Mini Catalog and seems to be overlooked quite often. It is on page 65 and in the center of the book fold, so a bit difficult to see. And it is well worth seeing!! The details are amazing. Even done in Basic White you can clearly see the details on my card. I love the different flowers mixed in together.
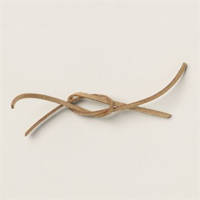
The sentiment was highlighted by using the Banner Pick A Punch to give it some detail. And by using the Wild Wheat Ink, it appears to be embossed. Another of the Extras is the Gold Faux Leather Trim. I used it to lace through the holes of the die cut piece. It really does have what looks like gold flecks on the leather. For my purpose I simple adhered each end underneath the Pebbled Path strip of card stock.
Papers
To continue with the different pairings of products, I used Pebbled Path card stock as the card base and the strip of die cut. Next is the Basic White of the sentiment and the embossed floral. And finally is a strip of the Natures Sweetness Designer Series Paper. The gold from the paper was the Pop the card needed. And it did not take very much.
To finish the bling from the DSP, I added a scattering of the Iridescent Foil Gems. They are scattered around as flower centers and to highlight the sentiment. This mix of products is not my norm at all. Mixing the shining with the leather and the leather with floral is a stretch that I am really happy with. I hope you will try some of these different pieces as well.
Measurements
The card base is Pebbled Path cut to 5 1/2 X 8 1/2 and folded at 4 1/4
The embossed Basic White layer is 5 1/4 X 4
The Natures Sweetness layer is 5 1/4 X 1 1/4
The die cut Pebbled Path layer is 5 1/4 X 3/4
The sentiment layer is 3 1/2 X 3/4 prior to the banner tips punched
HOST CODE
My FEBRUARY Host Code is PR4KTFTS. Please use this code for orders under $150.00. I will have a small gift for those with orders over $50.00 in addition to the Perk Rewards Program. You can read all of the information at the top of the page in the Menu Bar under SHOP / Perks.
Thank you for stopping by today. I hope you enjoyed today’s project and will come back. I do read and reply to all of the comments individually. They mean a lot to me. Please reach out if you have a question.
The card for today is one I loved coloring using the Blueberry Bunches stamp set. The envelope even received some special details. This card also includes the upcoming Online Exclusive Sweetly Scripted. I used this one last week also. You are going to love this set.
Stamps
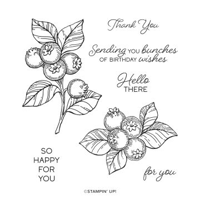
The star of this card is the large bunch of blueberries. I love this large image. There is also another image that is a smaller bunch. That is what I used, only partially stamping, on the inside of the card as well asl the envelope. Because of the darkness of the Blueberry Bushel Stampin’ Blends used for coloring. I used Memento tuxedo Black Ink for the stamping. This gives a much darker outline to color. For the leaves I used Lemon Lime Twist for a little brighter green.
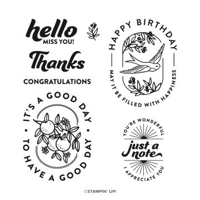
The sentiment is from the Sweetly Scripted stamp set. This is the same stamp that was used on Friday’s card. I had shortened the tails on that card. But I wanted the width of the included scripty tails for this one. Here is a look at the stamp set. It will be available to customers on March 5.
Paper and Finishes
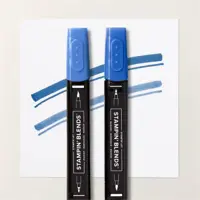
This is a quick card without the coloring. And even then it is pretty fast. Plus, I love to color as you all know! Choosing the colors of paper was a piece of cake in that I went with the two colors I used for the blueberries. These are Blueberry Bushel for the card base and Lemon Lime Twist for the layer.
To finish this card, I added a double looping of ribbon using the Starry Sky Metallic Ribbon. And then tied a double loop bow, which was added with a glue dot. That little trick is much easier than trying to tie a bow and keep the wrapped ribbon tight. And the bling for this card is a couple of the Iridescent Pearls scattered around. They are a bit difficult to see against the White layer in the photo.
Thank you for stopping by today!!
HOST CODE
My FEBRUARY Host Code is PR4KTFTS. Please use this code for orders under $150.00. I will have a small gift for those with orders over $50.00 in addition to the Perk Rewards Program. You can read all of the information at the top of the page in the Menu Bar under SHOP / Perks.
Thank you for stopping by today. I hope you enjoyed today’s project and will come back. I do read and reply to all of the comments individually. They mean a lot to me. Please reach out if you have a question.
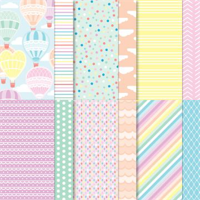
Today I have a card with the Hot Air Balloon Bundle. Paired with the Lighter Than Air DSP, it is a fun card for any age.
The photo above is the closed view. Here is the open view.
And here is the stretched out flat view.
Stamp Bundle
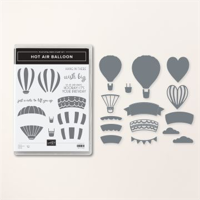
The Hot Air Balloon Bundle has several balloons, or parts that can be used to create a balloon. And the dies has even more pieces to die cut and create balloons. I used three different dies to cut the three balloons. The baskets are separate dies and there are a few of those as well. My favorite may be the heart shaped balloon that is pink on the back section.
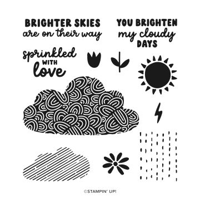
The stamping done is all from the stamp set, with one exception. I stamped the sentiments on the front balloon prior to die cutting and then on the inside where you would sign. That balloon is stamped in a softer Soft Sea Foam for a cute touch. The extra stamp used is the clouds. It is from the Bright Skies stamp set. This is the smaller cloud that has what looks like rain slanted across it. I did not want the rain. And since it is photopolymer, I simply turned it over and stamped with the other side. The softer blue is a stamped off Pool Party to create the clouds.
Papers
The colors came from the DSP of course. It is the Lighter Than Air Designer Series Paper. I chose to use five different patterns for the card layers and balloons. You never see a group of balloons that are the same color or pattern. So I had to make mine different.
The card base is Azure Afternoon, with that being a color of the striped front panel as well as the dotted strips. It also works well with the Pool Party clouds. I completed each balloon with an Opaque Faceted Gems from Sale-A-Bration as the top button of each balloon.
Measurements
This is a Double Z fold. The card base is 4 1/4 X 11 and scored at 2 3/4 and 5 1/2. The small Z is 1 1/2 X 11 and scored at 2 3/4 And 5 1/2. For the DSP, the front panel is 2 1/2 X 4, and the strips are 5 1/4 X 1 1/4 for the largest, and 2 1/2 X 1 1/4 (2) for the short sections. The two white panels are 2 1/2 X 4 for the signature piece and 5 1/4 X 4 for the back panel.
Thank you for stopping by today!!
HOST CODE
My FEBRUARY Host Code is PR4KTFTS. Please use this code for orders under $150.00. I will have a small gift for those with orders over $50.00 in addition to the Perk Rewards Program. You can read all of the information at the top of the page in the Menu Bar under SHOP / Perks.
Thank you for stopping by today. I hope you enjoyed today’s project and will come back. I do read and reply to all of the comments individually. They mean a lot to me. Please reach out if you have a question.
My card to share today is a CASE of the Mini Catalog and the Filled With Happiness stamp set. CASE is to Copy And Share Everything. Although there are variations of the words out there. I try to change up some things on a CASE to make it my own.
Stamps
This is a great card for any level of stamping experience. It is paper, ink, bling, with a couple of dimensionals. This fun stamp set is the Filled With Happiness set. There are a couple of different scenes using different sentiments. This one is a sweet one. And as soon as I saw the bird, I knew it had to be blue. My brain immediately went to the “bluebird of happiness”! Now I may have put that in some of your brains if you are in my age range! LOL!!!
The stamp is one stamp with the sentiment and center area all in one. I stamped it twice. Once on the layer and again on a scrap to only get the center part. After coloring with Stampin’ Blends in Balmy Blue and Old Olive, with flowers of Bubble Bath, it was ready to punch.
Punch
The great Modern Oval Punch is the punch that matches this set. It is a carryover from the last Mini Catalog (YAY!). I think it is a great size for so much. And the centers of these stamps are made to fit it perfectly. The punched out image is then layered over the center of the layer and added with Stampin’ Dimensionals for depth.
Papers
This simple card begins with the Thick Basic White card stock. I had to search for the DSP used in the catalog photo that I cased. The fun pink piece is from the Lighter Than Air Designer Series Paper. I used this card in a class setting. And since these sheets are 6X6, I made the size to maximize my papers. The DSP layer is 3 X 4 1/4. (The White stamped layer is 2 1/2 X 3 1/4).
Finishes
The final touch is bling. Although these are not real shiny, I love them. They are from the Adhesive Backed Solid Gems. The bluebird of happiness needed a touch more of his color added. I have a stepped up version of this stamp set I will share later in the week.
Thank you for stopping in today!!
Online exclusives are here to stay! Click on the photo and be taken directly to them in my online store. If you place an order, please use my Host Code listed just below.
HOST CODE
My JANUARY Host Code is BQEMX92K. Please use this code for orders under $150.00. I will have a small gift for those with orders over $50.00 in addition to the Perk Rewards Program. You can read all of the information at the top of the page in the Menu Bar under SHOP / Perks.
Thank you for stopping by today. I hope you enjoyed today’s project and will come back. I do read and reply to all of the comments individually. They mean a lot to me. Please reach out if you have a question.
Update: I have had a few requests for measurements. This is a CASE of Sue Campfield and she has a video. But I have attached a PDF of directions at the bottom of the post that you can print out.
The card I am sharing today is a fun Pop Up card using the awesome Sending Love Bundle. And it is paired with some great DSP from Sale-A-Bration.
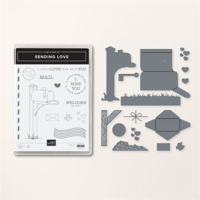
Stamps and Dies
The fun mailbox is what drew me to this stamp bundle. The Sending Love Bundle has the mailbox, letter, bird, and some fun additions to go along. Plus it is a Die Bundle and there are matching dies for it all. I opted to stamp and color the mailbox on the layer. And I went with non traditional mailbox colors so it matched my paper. The addition of the envelope and bird were a add on. I am not sure if the bird is delivering or taking away. LOL!! Either way works for me.
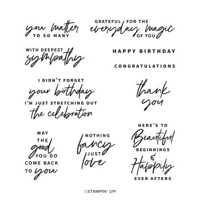
The inside sentiment is from the Something Fancy stamp set. The inside is a Pop Up. This card is a CASE from Susan Campfield. It is pretty simple to do and she explains the mechanism very well. Here is a side view of the card. I really love this fold now that I have it figured out. Attached below is a PDF of directions that I made for this card.
The beautiful paper used on this card is from Sale-A-Bration. This means that it is free with a qualifying order. For this paper, Sunny Days Designer Series Paper, you can choose it FREE with a $50.00 order from either of the Annual or Mini Catalog. Both of the DSP used here are from this pack of paper. I love the green flowers. They are very pretty and a different color. Stampin’ Up! has such gorgeous Greens now.
The card base is Basic White card stock. And just the regular weight, not the Thick. I chose this route because of the layers and the mechanism for the pop up. And I did not add layers between the card base and the DSP. That is not the norm for me either. I did add the Basic Black layer behind the front focal layer. It gives a bit more sturdiness to that layer.
Finishes
To add to more of the unusual, my bling is different as well. Instead of shiny bling, I went with a Black Bling. It really helps the black of the flowers in the DSP to pop. And it highlights the black layer. These are from the Classic Matte Dots in the Annual Catalog. I could have colored the Iridescent Pearls with the Black Stampin’ Blends to get black pearls, but I had these.
Directions
Click on the photo below and you will get a step by step How To.
Thank you for stopping by today! I really appreciate you.
Online exclusives are here to stay! Click on the photo and be taken directly to them in my online store. If you place an order, please use my Host Code listed just below.
HOST CODE
My JANUARY Host Code is BQEMX92K. Please use this code for orders under $150.00. I will have a small gift for those with orders over $50.00 in addition to the Perk Rewards Program. You can read all of the information at the top of the page in the Menu Bar under SHOP / Perks.
Thank you for stopping by today. I hope you enjoyed today’s project and will come back. I do read and reply to all of the comments individually. They mean a lot to me. Please reach out if you have a question.
The content in this blog is the sole responsibility of Jackie Beers as an Independent Stampin' Up! Demonstrator. The use of and content of classes, services or products offered is not endorsed by Stampin' Up!