Today’s card is a fun birthday card using a Christmas set from the new Mini Catalog. Using it for a different occasion is a great bonus!
Stamps
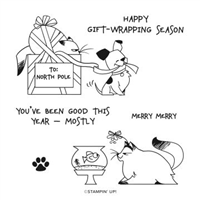
Since I love most animal stamps, and especially cats, it was a surprise to No One that I would purchase this stamp set as soon as possible. A mischief cat is just a fact! So when I needed a birthday card for someone who loves cats as well, I was ready to give this stamp set a try. The name is appropriate as it is North Pole Mischief. It will be such fun to make Christmas cards with these stamps, but this was the first use.
Sentiment
At first glance in looking at the stamp set, this sentiment is for Christmas and the good or naughty list. But I looked at it for a birthday and feel that it fits there as well. Plus the recipient is an adult and would get a kick out of those words! And with the lighter color of the DSP, I took a scrap and used it to stamp the sentiment.
To finish the front sentiment I added a couple of the Solid Faceted Dots. Grounding the little banner was a necessity I thought.
The inside birthday wishes are from the Peaceful Moments stamp set. Here is a look at the inside of the card. It is a gift card holder which adds to fun.
There is still plenty of room to write underneath the card. No worries for you there.
Paper
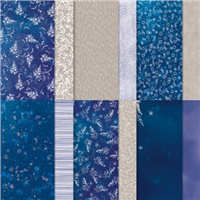
This gorgeous DSP is from the Sun Prints Designer Series paper. Both the stripes and the distressed looking gray work perfectly together and are pretty to boot. Plus they highlight the stamped images. It always surprises me when I think to stamp on the DSP. When the paper is a light enough color it works for images, but this paper was perfect for the sentiment and helps tie everything together.
Measurements
This gift card layout is a good one for multiples. It only requires a half sheet of cardstock cut to 4 1/4 X 11, and then scored at 3 1/2 and 8 3/4. Fold up the smaller scored end for the gift card pocket. There is a White layer under the DSP pieces. It is 4 X 3 1/4 beneath the stripe and 4 X 2 beneath the gray. The Sun Prints striped paper is cut to 3 7/8 X 3 1/8 and the gray is 3 7/8 X 1 7/8.
For the stamped area, the Starry Sky cardstock is cut to 3 1/2 X 2 1/8 with the White at 3 3/8 X 2 1/16. Sorry for the funky measurement there, you can adjust the size to fit your image of course. On the inside of the card, the stamped White is 4 X 2 3/4 with the piece beneath the gray at 4 X 2. And the gray is cut to 3 7/8 X 1 7/8.
HOST CODE
My July Host Code is ZMG9Q7EX. Please use this code for orders under $150.00. I will have a small gift for those with orders over $50.00 in addition to the Perk Rewards Program. You can read all of the information at the top of the page in the Menu Bar under SHOP / Perks.
Thank you for stopping by today. I hope you enjoyed today’s project and will come back. I do read and reply to all of the comments individually. They mean a lot to me. Please reach out if you have a question.
I have another fun whimsical, animal card today. You know how much I love the funny stamp sets. And today’s is another good one! The bonus is that it is a Fun Fold / Gift Card holder.
Stamp Set and Dies
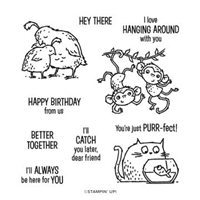
Isn’t the face on the cat just perfect? I love it. And of course the sentiment fits right in as well. These are both from the new set in the Mini Catalog named Catch You Later. The set includes various animals with adorable sentiments to match. I love cats, so that was the first one for me to try out. This is a birthday card for someone who also loves cats. Like I needed a reason to use the cat. LOL!!
For a bit of a different look, I did the angled banner for the sentiment. The positioning is a little bit out of the normal, but that is fine to me. To get the great shapes for the stamped images I went to a favorite of mine. They are the Stitched So Sweetly Dies. I love that the shapes are quite different from any of the other die sets. And they surprisingly fit most sentiments and any of the smaller images.
Papers and Fund Fold
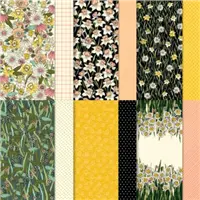
You may not recognize the two DSP patterns I used on this card. They are both the “back” sides of paper in the Sale-A-Bration paper Daffodil Afternoon Designer Series Paper. I love both of these patterns. I paired them with Pale Papaya as the card base. And the unexpected color for a pairing to Pale Papaya is Flirty Flamingo. I would never have put the two together without the plaid pattern using it. Now I am a fan!
As I mentioned, this card is a Fun Fold. And of course, I failed to take a photo of the inside before mailing. However, the measurements are as follows
Card Base is 5 1/2 X 8 1/2 scored on the 8 1/2 side at 2 1/4 from each end.
The Flirty Flamingo layer is 5 1/4 X 2 (x2)
The DSP layer is 5 1/8 X 1 7/8 (x2)
Inside White sentiment layer is 3 3/4 X 4 1/2
Strips for sentiment are 1 X 3 and 3/4 X 2 3/4
To make the Fun Fold, fold on the scoring lines and burnish the folds. The folds are the same size, so it does not matter which is top or bottom. Whichever one you decide is the bottom, add Tear & Tape against the edge on each side and fold up to make the pocket. There is room for the White inside card as well as a gift card. I left the card attached to the little tag they come on and still had room.
Sale-A-Bration is the Best Time of Year!!
HOST CODE
My January Host Code is GR679MMV. Please use this code for orders under $150.00. I will have a small gift for those with orders over $50.00 in addition to the Perk Rewards Program. You can read all of the information at the top of the page in the Menu Bar under SHOP / Perks.
Thank you for stopping by today. I hope you enjoyed today’s project and will come back. I do read and reply to all of the comments individually. They mean a lot to me. Please reach out if you have a question.
Simple and easy to make gift card holders are the best. When they show off beautiful DSP, they are perfect. That is what I have to share with you today.
And here is the good part.
Stamps and Punches
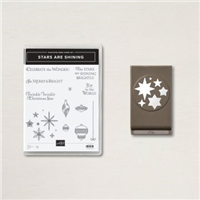
The beautiful stars are punched from DSP using the Starlit Punch which is part of the Stars Are Shining Bundle. I love punch bundles! They are so easy to create multiple cards with. And this one gives multiple stars in one punch. I did not use all of them on the front of this card.
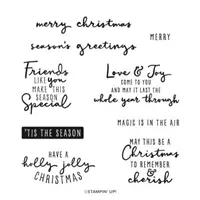
The sentiment is from the Stars Are Shining Stamp Set, the other half of the bundle. There are some great sentiments and stamps in the set. This one fit perfectly with my theme. For the inside sentiment I went to the Christmas To Remember stamp set. This set is all sentiments that are sweet and perfect.
I used the Banner Pick A Punch to cut the sentiment. This may be the first time I have used the single point banner instead of the two point one. Also I used the Label Me Lovely punch to make the finger pocket on the gift card pouch. Although it is not really necessary if you want to skip that step.
Papers
This Whimsy & Wonder Designer Series Paper is one of the prettiest papers this year. I chose the snowflakes because the pink looks beautiful against the Misty Moonlight card base. Afterwards I had the idea to punch the stars from the same paper. The bits of foil in the snowflakes are now in the stars as well. And it was a little scrap of DSP that I used, so no waste. There are a few added Rhinestones for a touch more bling!
Directions and Measurements
The card base is Misty Moonlight cut to 4 1/4 X 5 1/2
The DSP layer is 4 X 5 1/4
The accordion folded White piece is cut 4 1/4 X 9 3/4 and scored at 3 1/4 & 6 1/2
The decorated top Misty Moonlight is cut 4 1/8 X 3 1/8
The gift card pocket Misty Moonlight is cut 4 X 2 and then notched using the Label Me Lovely Punch
The DSP strip across the pocket is cut 4 X 1
HOST CODE
My December Host Code is AVHFJFAU. Please use this code for orders under $150.00. I will have a small gift for those with orders over $50.00 in addition to the Perk Rewards Program. You can read all of the information at the top of the page in the Menu Bar under SHOP / Perks.
Thank you for stopping by today. I hope you enjoyed today’s project and will come back. I do read and reply to all of the comments individually. They mean a lot to me. Please reach out if you have a question.
Today’s card is a gift card holder that I had not seen previously. And since I love gift card holders I was thrilled. I hope you will be as well.
This card is for the Make My Monday challenge which debuts today. I hope you will check out cards from the other designers and maybe add your own card in.
And here is the magic of the Pop Up Gift Card.
The Gift
I saw this design on YouTube from Stamp With TLC. She has a pdf of her directions. The inside holder is two square boxes that are touching with the gift card in between them. By using DSP, it makes the card quite a bit thinner when closed. Another advantage is the paper is more flexible and you need that for these to lay down. I tweaked the inside card holder a bit and loved designing the cover.
Stamps, Dies, and Paper
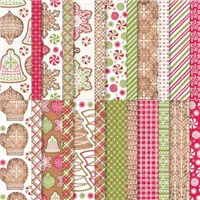
You probably recognized this Frosted Gingerbread Bundle. It is so different from other stamp sets that it is easy to pick out. All of the stamps and dies are from the Bundle. The “ornaments” are from a piece of the DSP, as are the two different pieces on the front of the card. Gingerbread & Peppermint is an apt name for this beautiful Designer Series Paper! I love how it all coordinates.
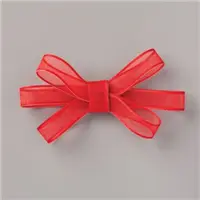
The ornaments are hung using the Real Red Sheer Ribbon. I also added a strip of it around the center of the card to tie the two DSP pieces together. The peppermint pieces at the top of the two hangers are also from the DSP and are die cut. And the inside gift card holder is additional pieces of the DSP. There is also a little peppermint next to the inside sentiment that I punched with a tiny punch.
Here is a PDF of how I made the Pop Up. I changed the dimensions from Stamp With TLC version. Click HERE for the PDF
Thank you for stopping by today.
HOST CODE
My December Host Code is AVHFJFAU. Please use this code for orders under $150.00. I will have a small gift for those with orders over $50.00 in addition to the Perk Rewards Program. You can read all of the information at the top of the page in the Menu Bar under SHOP / Perks.
Thank you for stopping by today. I hope you enjoyed today’s project and will come back. I do read and reply to all of the comments individually. They mean a lot to me. Please reach out if you have a question.
The card I have to share with you today is one of my favorites. It is a gift card holder. I love gift cards more and more I as I get older. I never know what gift to give someone. So I make quite a few cards to enclose gift cards in.
Layout
This card is the one I mentioned on Tuesday’s post. You can see that post here to compare cards. This card led me to make the card from Tuesday. The only differences are the horizontal vs vertical and that this holds a gift card.
Here is a photo of the section opened
I have not added an inside sentiment. I tend to wait until I know who is going to receive the card. The difference between the two cards is the length of this folded piece. This one is 4 X 11, scored at 3, 6, & 9. The 9 fold is folded onto itself and adhered along the sides to hold the gift card.
Paper and Stamps
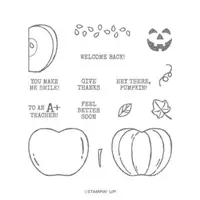
The gorgeous paper that is showing on the base layer and the gift card section is from the Beauty of The Earth Designer Series Paper. And it is one of the DSP Sale packs for 15% off!!!! The stamp set is the Lovely You stamp set. I thought the leaf stamp matched the blue image in the DSP.
The image is stamped using Misty Moonlight Ink and is stamped off before stamping on the cardstock. I did three or four stampings to make the image I wanted. The Just Because is also in the stamp set. Sometimes we do not need a special occasion to think of those we care about and send them a little something!
Finishing
Even though this card is a bit simple, it still requites a bit of a final touch. For me it was deciding how to keep the folded section secure. I debated on a belly band, but finally decided on adding some ribbon. I wanted the blue and the Misty Moonlight ribbon has retired. The little idea bulb popped on though with regard to Stampin’ Blends.
I used the White Crinkle Seam Binding Ribbon and my Silicone Mat. By simply dragging the Light Misty Moonlight Stampin’ Blend across the ribbon, it colored very quickly. The ink spreads a bit. So the coloring , even for a longer length like this one, is very quick. And it dries almost immediately. Plus there is the added bonus that the coloring takes away the static cling that this ribbon tends to have. Win/ Win/ Win!!!
Measurements
Base card is 5 1/2 X 4 1/4
White layer is 5 1/4 X 3
DSP layer is 5 1/8 X 3 7/8
Folded Old Olive is 4 X 11, scored at 3, 6, 9
Small DSP is 3 7/8 X 1 7/8
Front Misty Moonlight is 2 3/4 X 3 3/4
Front White is 2 1/2 X 3 1/2
Inside White is 2 3/4 X 3 3/4
Ribbon is cut to 19″
The picture below shows the Designer Series Papers that are included in the Sale. There are 9 to choose from!!
HOST CODE
My July Host Code is 2GKGF4Q7. Please use this code for orders under $150.00. I will have a small gift for those with orders over $50.00 in addition to the Perk Rewards Program. You can read all of the information at the top of the page in the Menu Bar under SHOP / Perks.
Thank you for stopping by today. I hope you enjoyed today’s project and will come back. I do read and reply to all of the comments individually. They mean a lot to me. Please reach out if you have a question.
Happy Thanksgiving to you and your families. I hope your day is a good one however you choose to spend this holiday. We will be spending the day with friends that are family. But first I have a card to share. It is a really Fun Fold and a Gift Card Holder.
I made this gift card holder as a Thanksgiving card, which may seem a bit odd. This year has definitely made me aware of how much I have to be thankful for. So I thought a gift to someone special is a good way to show how grateful I am for them, or something they have done.
LOL!!! Please forgive my finger…..the card wanted to open instead of cooperating with the picture!
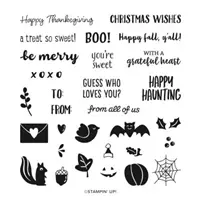
As I said at the top of the post, this is a Fun Fold. But first, I love the simplicity of the look of the front. The pumpkin is from the Harvest Hello stamp set and is stamped on Plaid Tidings Designer Series Paper. The sentiment, which is an all time favorite, is from the Banner Year stamp set.
Here is the next view:
This is with the pumpkin layer lifted up. It reveals a gift card. The gift card is in a pocket on the bottom section. And seeing this picture, I should have stamped something on the underside of the pumpkin layer. Never fear, I will be doing this Fun Fold again!!
Here is the final opening:
Now you can see where the gift card is being held. Yes this card has quite a few layers, but I do love all of the folds. As I said, I will be doing this one again soon!!
Here are all of the measurements and instructions:
The base is Rich Razzleberry and is cut 5 1/2 X 4 1/4
the Crumb Cake layer is cut 4 X 7 1/4 and scored at 5 1/4
For the gift card slot, you need Crumb Cake cut to 1 3/4 X 3 3/4. Put Tear & Tape on each short side and one long side. Adhere with the side without tape and the end. (as shown in last picture)
Center the Crumb Cake layer folded as if it was a 4 X 5 1/4 layer
The Bumblebee layer is cut to 3 3/4 X 5 for the inside layer and 3 3/4 X 1 3/4 for the bottom fold
The Rich Razzleberry layer is cut to 3 1/2 X 4 3/4 for the inside and 3 1/2 X 1 1/2 for the bottom fold
The Top Crumb Cake folded layer is 2 3/4 X 8, folded at 4
The top Bumblebee layer is 2 1/2 X 3 3/4
Thank you for stopping in today! Happy Thanksgiving from my family. Please come back tomorrow for another new project.
HOST CODE
My November Host Code is: 7C63XEUQ Please use this code for orders under $150.00. I will have a small perk for those with orders over $50.00
The content in this blog is the sole responsibility of Jackie Beers as an Independent Stampin' Up! Demonstrator. The use of and content of classes, services or products offered is not endorsed by Stampin' Up!