I had fun playing with Circle Punches today. There was a card similar to this I had saved from a while back. For a Club card I wanted a fun and simple card. This I believe fit the bill.
STAMPS
There are two different stamp sets used on the front of the card. The sentiment is a really fun way to wish a Happy Birthday. It is from a new, and stand alone, stamp set named Encircled With Love. It does coordinate, but not bundled together, with the New Circle Punch that is 1 7/8″. But it is not available yet. I stamped the sentiment in Secret Sea Ink to coordinate with the background DSP.
The second stamp used are the trio of balloons. I have used these balloons several times as they are just perfect for celebrations. They are part of the Spring Corners Bundle that is an Online Exclusive. They are used again on the inside along with a sentiment from that set. Here is a look at the inside.
Dies, Punches, & Embossing
As I mentioned regarding stamps, I have used the matching Die from the Spring Corners Bundle to cut the balloons for the front of the card. The other front layers are from Punches. The circles are created with both the 2″ Circle Punch and the 1 3/4 Circle Punch. Both of these are available as Online Exclusives
To add more texture to the card, I added some dry embossing. The Forever Plaid 3D Embossing Folder is one that goes with almost any project. I was so happy when it carried over to the new catalog.
PAPERS
This color scheme is one I was very happy to have stumbled upon. The Pretty In Pink has become a go to for pink. And pairing it with the new Secret Sea is a great match. This new color is versatile. It looks black, or maybe dark navy, or a little grayish. Definitely there are varying shades depending on what it is paired with. I love it! I did add the new Cloud Cover as a color for one of the balloons as it is the light color in the DSP.
EXTRAS
The last Extra is of course the bling. There have been a lot of extras mentioned, but the bling is always important. For this one I added some that I love and then discovered they have sold out. So Sad. 🙁 These are the 2024-2026 In Color Shimmer Gems. I used the matching ones for Pretty In PInk on the dark circle.
MAY STARTER KIT PROMOTION…….
STAMPIN’ REWARDS
The new Stampin’ Rewards begins on April 15. I think you will Love this new version. You will earn rewards on all orders over $20.00 in products The system will track your rewards for you. And they will be available for use on your next order, or you can save up for a larger purchase. All you need to do is on your first order after April 15th is agree to participate. You will then begin receiving rewards on qualifying orders.
Orders of $50.00 or more you will still receive an appreciation gift from me. I appreciate you choosing me as your demonstrator!
COMMENTS
Please know that I love to hear from you and answer any questions you may have. My responses generally are not done here on the post. They are made using my phone as I have found it is easier to answer a question for you personally. So you will be receiving an email from me if you make a comment.
Thank you for stopping by today. I hope you enjoyed today’s project and will come back. I do read and reply to all of the comments individually. They mean a lot to me. Please reach out if you have a question.
Smile and Keep On Stamping,
Jackie
Online Exclusives
New Online Exclusives drop every other month. These are amazing products and are a supplement to the Annual and Mini Catalogs. This way you have access to even more New and Awesome products!
You can go directly to these in my Online Store by clicking HERE
While cutting my Paper Shares I have found a new love regarding a new DSP. The Kintsugi Inspirations Designer Series Paper. Actually that entire suite of products. I have shared a couple of them today.
STAMPS & DIES
The Inspiring Imperfections Bundle includes both this sweet sentiment, as well as the Die for the sentiment and for the bowl. I kept this card fairly simple and tried to showcase different products within the Suite. The Suite is named Kintsurgi Inspirations, the same as the DSP, and includes the Bundle, DSP, embossing folder , and the embellishments.
The sentiment layer is a Die included in the bundle. And the bowl is cut from a sheet of the DSP using a Die included. This is an amazing set! And I had to add one of the Nested Essentials Dies to display the bowl on.
PAPERS
This banner of gold and blue flowers is probably my favorite of the DSP. This is the Kintsugi Inspirations Designer Series Paper. I paired the Gold Foil to highlight the gold in the DSP as well as the gold in the bowl. To pull the blue from the bowl I added Misty Moonlight cardstock as the embossed layer. A simple Basic White card base allows everything else to stand out.
EXTRAS
There are additional parts of the Suite as Extras. The main one is the embossing folder. It is called Joined Together 3D Embossing Folder. The fragmented designs are showcasing different DSP sheets. And the Bling is the final part of the Suite of products. These re called Flower Accents. And they really stand out. If you zoom in on the photo you can really see the detail.
MAY STARTER KIT PROMOTION…….
STAMPIN’ REWARDS
The new Stampin’ Rewards begins on April 15. I think you will Love this new version. You will earn rewards on all orders over $20.00 in products The system will track your rewards for you. And they will be available for use on your next order, or you can save up for a larger purchase. All you need to do is on your first order after April 15th is agree to participate. You will then begin receiving rewards on qualifying orders.
Orders of $50.00 or more you will still receive an appreciation gift from me. I appreciate you choosing me as your demonstrator!
COMMENTS
Please know that I love to hear from you and answer any questions you may have. My responses generally are not done here on the post. They are made using my phone as I have found it is easier to answer a question for you personally. So you will be receiving an email from me if you make a comment.
Thank you for stopping by today. I hope you enjoyed today’s project and will come back. I do read and reply to all of the comments individually. They mean a lot to me. Please reach out if you have a question.
Smile and Keep On Stamping,
Jackie
Online Exclusives
New Online Exclusives drop every other month. These are amazing products and are a supplement to the Annual and Mini Catalogs. This way you have access to even more New and Awesome products!
You can go directly to these in my Online Store by clicking HERE
I have a very floral card today. The new Impressions Abloom Bundle might have gotten me a little excited. If you like florals then it will be ok. 🙂
STAMPS & DIES
These flowers are so much fun to create. It is two step stamping for the different flowers. Stampin’ Up! has really created a beauty with this Impressions Abloom Bundle. The Dies cut perfectly and are really easy to line up with the image. This Bundle is another reason to please look at the Online Exclusives!!
I wanted to copy the flowers in the paper to hopefully have the appearance of the flowers falling off of the paper. So I used the same colors, or close to it ,to create my flowers. The first image I stamped is the detailed flower. These are all using Strawberry Slush. Next I used Bubble Bath for the solid image. For me, it is easier to see to align properly if I have stamped the darker image first.
The leaves are all Dies although there are stamps as well. I love the detailed cutting of the leaves for some additional texture. And finally the sentiment is also part of the stamp set. It is actually two different stamps. But because they are photopolymer it was very easy to stamp the bottom words beneath the Thanks. I went with Garden Green Ink for this.
PAPERS
This gorgeous floral paper is part of the Suite of products which includes the Bundle above. The Suite is titled the same as the DSP. It is Floral Impressions Designer Series Paper. I only used a strip of the DSP to keep from overloading on the floral print. I wanted the stamped images to pop. Of course the cardstock layers are from the DSP. The base is Strawberry Slush with a layer of the Garden Green. I also added some Strawberry Slush behind the sentiment. Anytime I fussy cut a sentiment and then try to fussy cut a layer, it does not go very well. This time is acceptable. LOL!!
EXTRAS
There are two Extras today. First is the Exposed Brick Embossing Folder. This gives some additional texture to the White layer that I wanted for the flowers. And of course there is Bling. Today I decided on Rhinestones. Since the new colors have embellishments I have been focussing on those lately. So this was a nice change of pace.
MAY STARTER KIT PROMOTION…….
STAMPIN’ REWARDS
The new Stampin’ Rewards begins on April 15. I think you will Love this new version. You will earn rewards on all orders over $20.00 in products The system will track your rewards for you. And they will be available for use on your next order, or you can save up for a larger purchase. All you need to do is on your first order after April 15th is agree to participate. You will then begin receiving rewards on qualifying orders.
Orders of $50.00 or more you will still receive an appreciation gift from me. I appreciate you choosing me as your demonstrator!
COMMENTS
Please know that I love to hear from you and answer any questions you may have. My responses generally are not done here on the post. They are made using my phone as I have found it is easier to answer a question for you personally. So you will be receiving an email from me if you make a comment.
Thank you for stopping by today. I hope you enjoyed today’s project and will come back. I do read and reply to all of the comments individually. They mean a lot to me. Please reach out if you have a question.
Smile and Keep On Stamping,
Jackie
Online Exclusives
New Online Exclusives drop every other month. These are amazing products and are a supplement to the Annual and Mini Catalogs. This way you have access to even more New and Awesome products!
You can go directly to these in my Online Store by clicking HERE
I have another card made using the Coneflower Celebrations Bundle that I used yesterday. This one, in my opinion, is much better! The flower stands out quite a bit today. So yay!
STAMPS& DIES
This coneflower is really showing itself off. I love how it seems to pop off of the paper. Part of that is that I added Stampin’ Dimensionals under the flower itself. But the stem and leaves are glued. The other factor is that I stamped the flower using Memento Tuxedo Black Ink and then Die cut it using the proper Die. This flower for stamping matches one side of the double flower. So it cuts perfectly. I colored the flower using Lemon Lolly Stampin’ Blends for the soft yellow and then highlighted with Darling Duckling Stampin’ Blends. The stem and leaves are colored using Granny Apple Green and the center is Pecan Pie Stampin’ Blends.
To add another dimension to the card, actually there are a couple of dimensions, I stamped the butterfly and Die cut it. For the color, I went with Balmy Blue but highlighted using Cloud Cover Stampin Blends. The sentiment is part of the stamp set also. I was very brave and stamped it directly onto the layer. Thankfully these are photopolymer stamps, so getting the sentiment straight was not really a problem.
PAPERS
The papers today are very simple. They come from the image colors. I went with Granny Apple Green for the card base. Then added the surprisingly perfect Cloud Cover as the layer. And finally I embossed the Soft Sea Foam layer and added the images to that.
EXTRAS
There are Two Extras today. First is the embossed layer. I used the Pressed Flowers Embossing Folder to dry emboss the Soft Sea Foam layer. The embossed flowers are at the bottom like this coneflower grew out of them. And of course Bling! You have seen these before. They are the 2025-2027 In Color Flat Pearls. These are in all of the new In Colors, so I used a trio of the Cloud Cover ones. It helps bring out the butterfly colors and stands out from the Soft Sea Foam.
MAY STARTER KIT PROMOTION…….
STAMPIN’ REWARDS
The new Stampin’ Rewards begins on April 15. I think you will Love this new version. You will earn rewards on all orders over $20.00 in products The system will track your rewards for you. And they will be available for use on your next order, or you can save up for a larger purchase. All you need to do is on your first order after April 15th is agree to participate. You will then begin receiving rewards on qualifying orders.
Orders of $50.00 or more you will still receive an appreciation gift from me. I appreciate you choosing me as your demonstrator!
COMMENTS
Please know that I love to hear from you and answer any questions you may have. My responses generally are not done here on the post. They are made using my phone as I have found it is easier to answer a question for you personally. So you will be receiving an email from me if you make a comment.
Thank you for stopping by today. I hope you enjoyed today’s project and will come back. I do read and reply to all of the comments individually. They mean a lot to me. Please reach out if you have a question.
Smile and Keep On Stamping,
Jackie
Online Exclusives
New Online Exclusives drop every other month. These are amazing products and are a supplement to the Annual and Mini Catalogs. This way you have access to even more New and Awesome products!
You can go directly to these in my Online Store by clicking HERE
I have made a card to share that includes the Belated Birthday sentiment. Sadly I need these more often now adays! Even with all of my calendars showing birthdays. So I was thrilled that the new Coneflower Celebrations stamp set includes this.
STAMPS & DIES
This large flower is wonderful. I thought it was a daisy, but Stampin’ Up! is calling it a Coneflower. And it is part of the Coneflower Celebrations Bundle. As you can see the Dies cut the flower and a large stem. There is a Die that cuts a foldable flower, which matches the stamp. I used the stamp and the single Die. And as you see they do not align properly. Oops on me. But I liked the different detail it shows so went with it.
The sentiment is one I know I will use quite a lot. As I mentioned at the top, I tend to be behind on getting birthday cards out even though I make them all the time. LOL!!! I went with Strawberry Slush to stamp the sentiment as I did the flower. Then I simply fussy cut the sentiment to add over the stem.
PAPERS
This soft background DSP is the Beautiful Bokeh Designer Series Paper. I really love these papers. They cover quite a lot of the SU colors in wonderful soft circles. Even though I used Darling Duckling and Strawberry Slush for the flower, you can see those in the paper. And the stem is stamped with Summer Splash onto Soft Sea Foam cardstock which you see also.
The layers are Strawberry Slush for the card base. And Soft Sea Foam for the layer although it is a bit hard to see. Then the soft bokeh as the layer.
EXTRAS
There are two Extras today. First is the twine bow. This is from the Pack Your Bags Twine 3 pack. I pulled it with the Summer Splash stem to create the bow behind the sentiment. And the Bling is a mixed trio of Strawberry Slush and Darling Duckling from the 2025-2027 In Color Flat Pearls.
MAY STARTER KIT PROMOTION…….
STAMPIN’ REWARDS
The new Stampin’ Rewards begins on April 15. I think you will Love this new version. You will earn rewards on all orders over $20.00 in products The system will track your rewards for you. And they will be available for use on your next order, or you can save up for a larger purchase. All you need to do is on your first order after April 15th is agree to participate. You will then begin receiving rewards on qualifying orders.
Orders of $50.00 or more you will still receive an appreciation gift from me. I appreciate you choosing me as your demonstrator!
COMMENTS
Please know that I love to hear from you and answer any questions you may have. My responses generally are not done here on the post. They are made using my phone as I have found it is easier to answer a question for you personally. So you will be receiving an email from me if you make a comment.
Thank you for stopping by today. I hope you enjoyed today’s project and will come back. I do read and reply to all of the comments individually. They mean a lot to me. Please reach out if you have a question.
Smile and Keep On Stamping,
Jackie
Online Exclusives
New Online Exclusives drop every other month. These are amazing products and are a supplement to the Annual and Mini Catalogs. This way you have access to even more New and Awesome products!
You can go directly to these in my Online Store by clicking HERE
Unfortunately we do need sympathy cards. I thought the new Beautiful Gallery DSP would be great since I have been using, and loving it, lately. And I added a few other extra products.
STAMPS& DIES
This gorgeous peony stamp is from the Gallery Blooms stamp set with the matching Gallery Blooms Dies to cut it out. I paired it with the Impressions Abloom Die for the oval background. It is in two pieces as you can see. I did not realize that when I cut it for the first time. DUH! But I figured a way to add the Mossy Meadow border around the white.
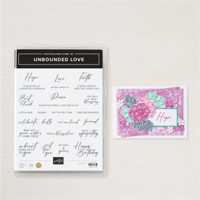
To complete the stamping, I added a simple sympathy statement. This one is from the Unbounded Love stamp set. This set has sentiments for most occasions. Plus it has a matching die set.
PAPERS
The papers are as much the star of the card as the die cut image. There are two sheets , or strips, from the Beautiful Gallery Designer Series Paper. Both are the “back” of the painting type prints. I had the idea to color the flowers on the left side strip. By using Petal Pink Light Stampin’ Blend for the flower and then Flirty Flamingo Light Stampin’ Blend for the detail, I think it looks pretty good. The leaves are colored with Old Olive Stampin’ Blends. That matches fairly well to the right side strip of DSP.
For the card base I went with Gray Granite to pull from the flower outlines. And the layer is Petal Pink again. I rarely use this color and am very surprised how well I like it against the Gray Granite. It reminds me of the pink and gray 50’s / 60’s bathrooms!
EXTRAS
To complete my card I went with a new Bling. These are the Holographic Resin Dots. In person they really pick up the green colors. And since the flower is raised with Stampin’ Dimensionals the dots are not too tall.
MAY STARTER KIT PROMOTION…….
STAMPIN’ REWARDS
The new Stampin’ Rewards begins on April 15. I think you will Love this new version. You will earn rewards on all orders over $20.00 in products The system will track your rewards for you. And they will be available for use on your next order, or you can save up for a larger purchase. All you need to do is on your first order after April 15th is agree to participate. You will then begin receiving rewards on qualifying orders.
Orders of $50.00 or more you will still receive an appreciation gift from me. I appreciate you choosing me as your demonstrator!
COMMENTS
Please know that I love to hear from you and answer any questions you may have. My responses generally are not done here on the post. They are made using my phone as I have found it is easier to answer a question for you personally. So you will be receiving an email from me if you make a comment.
Thank you for stopping by today. I hope you enjoyed today’s project and will come back. I do read and reply to all of the comments individually. They mean a lot to me. Please reach out if you have a question.
Smile and Keep On Stamping,
Jackie
Online Exclusives
New Online Exclusives drop every other month. These are amazing products and are a supplement to the Annual and Mini Catalogs. This way you have access to even more New and Awesome products!
You can go directly to these in my Online Store by clicking HERE
The content in this blog is the sole responsibility of Jackie Beers as an Independent Stampin' Up! Demonstrator. The use of and content of classes, services or products offered is not endorsed by Stampin' Up!