Todays card is a break from Christmas cards and back to birthdays. This one has a mix of products that I hope you will like. Most are from the Modern Garden Suite.
Papers
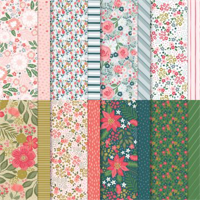
The paper is where the color choices were chosen from so starting there is a good point. The two pieces you see of DSP, the left side and the area behind the sentiment, are from the Garden Walk Designer Series Paper. Actually they are opposite sides of one piece of the paper. And did you notice the torn edge? That is something I have not done in forever. Another old technique that is always in style!
The card base is pulled form the DSP and is Poppy Parade. And even though I know that blue flowers are very rare, I had to pull the Boho Blue from the paper for the thin layer as well as a few flowers. The boughs behind the sentiment are punched from Pretty Peacock card stock. **The Bough Punch is back in stock as of yesterday!!!!
Stamp Bundle
This stamp set is a Punch Bundle and I love it. There are several different sentiments and flowers, even a poinsettia. It is the Modern Garden Bundle. And the Punch is the Modern Oval Punch. It is a great size for medium to larger sentiments. All of the floral stamps I used, and I used several, are in the stamp set. I could have gone a bit overboard, but just loved trying the different ones and adding colors from the DSP piece. The flowers on the sentiment layer are probably supposed to be definitions for the larger flowers. But I thought they were cute enough to be their own flower.
Finishes
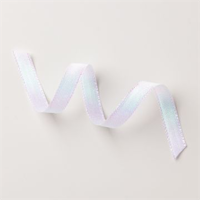
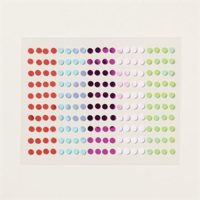
To complete the card I need bling of course. But first I added some loops of the White Iridescent Ribbon under the sentiment layer. It does not show up well in the photo but does add texture in person. And the final touch is the addition of the Adhesive Backed Sequin Trio. There are more than my normal three here. I added one to the center of each stamped flower! This is a happy birthday card after all.
Thank you for stopping by today!!
Online exclusives are here to stay! Click on the photo and be taken directly to them in my online store. If you place an order, please use my Host Code listed just below.
HOST CODE
My September Host Code is 7BSV39GV. Please use this code for orders under $150.00. I will have a small gift for those with orders over $50.00 in addition to the Perk Rewards Program. You can read all of the information at the top of the page in the Menu Bar under SHOP / Perks.
Thank you for stopping by today. I hope you enjoyed today’s project and will come back. I do read and reply to all of the comments individually. They mean a lot to me. Please reach out if you have a question.
The card I have to share today is a beautiful Flip Front Fun Fold that is a sympathy card. I hate making these, but they are necessary. And with the All About Autumn DSP it gives you a warm feeling.
Papers
The intention of this card was to focus on the stamp / punch bundle. But the paper really stole the show. This piece of the All About Autumn Designer Series Paper is a fabulous one. The walking through the woods is beautiful and perfect for a sympathy card. For the side panel I used the reverse of the front piece of paper. And the Wild Wheat really highlights the gold of the scene.
Stamps and Punches
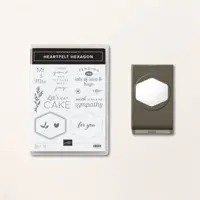
The Heartfelt Hexagon is a new Online Exclusive bundle that I really like. It has stamps for a few different occasions which is great. The punch is the hexagon with the sentiment stamped on it. It reminds me of the Tailored Tag Punch, just a bit taller and fatter. The size is perfect for larger sentiments!
The hexagon is layered on the 2 3/8″ Circle. It needed something else and that circle seemed to do the trick. To give it a touch of bling, I added two of the Adhesive Backed Sparkle Gems. And for the inside sentiment I went to another stamp set. This one is the So Sincere from the Mini Catalog. It also is a multi-purpose sentiment set. Here is a view of the open card.
Fun Fold
This Fun Fold is a twist to what I call a “shortened” card. The card base is 7 1/2, instead of 8 1/2 wide with the height of 5 1/2. Score at 1″ and 4 1/4″ on the long side. As you can see from the inside view, the 1″ side is on the right and folds backwards to allow the card to open. The real trick is placing your sentiment layer with Stampin’ Dimensionals only on that 1″ panel. But I love how this keeps the card closed.
The layers are Very Vanilla cut to 3 X 5 1/4 and 3/4 X 5 1/4. Then the DSP is 2 7/8 X 5 1/8 and 5/8 X 5 1/8. I almost did only DSP instead of adding the Very Vanilla layer, but I like the lightness it adds. And it is aligned with the inside layer when open.
Thank you for visiting today!!
Online exclusives are here to stay! Click on the photo and be taken directly to them in my online store. If you place an order, please use my Host Code listed just below.
HOST CODE
My September Host Code is 7BSV39GV. Please use this code for orders under $150.00. I will have a small gift for those with orders over $50.00 in addition to the Perk Rewards Program. You can read all of the information at the top of the page in the Menu Bar under SHOP / Perks.
Thank you for stopping by today. I hope you enjoyed today’s project and will come back. I do read and reply to all of the comments individually. They mean a lot to me. Please reach out if you have a question.
The card I am sharing today is a really Fun, Fun Fold that is a tri-fold card. Say that a few times! LOL!! I cased this from my sweet friend Julie DiMatteo, The Paper Pixie.
There are two stars of this card. The papers and the stamps are equally wonderful. But the paper is the beginning. It is the Merry Bold & Bright Designer Series Paper. I love that you can see both sides of this great sheet. And actually, that is what you need to make this fun fold is a double sided paper that is complimentary to each other.
The card base is a quarter sheet of Poppy Parade. And it is also the layer behind the front focal area. This paper would allow for any number of different card stock colors as the bases with the brightness of those lights. I love it.
Stamps
This is also a one stamp set card! Those are my favorite and with the number of stamps used, it is surprising. The front tree is my favorite. Using the words to create a tree reminds me of a SU stamp from probably 20 years ago that was a larger version of this. I added the star to insure it was recognized as a tree also.
For the inside I used the stamp that is the “definition” image for the large tree. I thought it was just enough. And what is stamped is not all of the tree, that would be too large for the space to include a written note. The sentiment on the inside is also from the set. Woohoo!
Finishes
The thickness of this card is maybe a bit more that a normal card due to the multiple folds. So I kept the bling to a minimum. However the front tree was crying for some decorations. The problem was solved with the Iridescent Discs. They are flat and similar to sequins with a shine. There are two showing and after the photo I added a third for more symmetry.
Thank you for stopping by today!!!
Online exclusives are here to stay! Click on the photo and be taken directly to them in my online store. If you place an order, please use my Host Code listed just below.
HOST CODE
My September Host Code is 7BSV39GV. Please use this code for orders under $150.00. I will have a small gift for those with orders over $50.00 in addition to the Perk Rewards Program. You can read all of the information at the top of the page in the Menu Bar under SHOP / Perks.
Thank you for stopping by today. I hope you enjoyed today’s project and will come back. I do read and reply to all of the comments individually. They mean a lot to me. Please reach out if you have a question.
Today’s card is a fun Christmas Card starring the Rocky Horse stamp set. An Old Fashioned Christmas warms my heart!
Stamps
The Rocky Horse stamp set is a mix of fun, and retro, little Christmas pieces around the larger Rocky Horse. The sentiment is included in the stamp set and I loved it as soon as I saw it. It was the reason I purchased the bundle. And yes, there is a bundle! I just did not use the dies for this card.
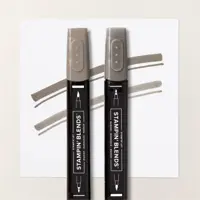
The horse is stamped and then colored with Stampin’ Blends. I left Rocky white more for time than for a white horse. The bow was stamped on scrap Basic White, colored and fussy cut out. It became my “bling” for this card.
Punch
The punch used for the sentiment is a new one in the Online Exclusives. And I really love the shape. It can be used for larger sentiments than most of the punches. This one is the Heartfelt Hexagon Punch. It pairs with the Heartfelt Hexagon stamp set as a bundle. They are available now and will be used for the World Card Making Day that is open to everyone and is FREE!!
Papers
The papers I chose for this card were chosen for the “old fashioned” look. So a Crumb Cake base and a touch of red of course. The red became Poppy Parade for a little brighter look. Then the DSP is from the Merry, Bold & Bright Designer Series Paper. I knew the stars were perfect from the beginning. And played perfectly for the old fashioned theme. These colors all are repeated in coloring the horse and the bow. An addition you do not see is on the inside of the card. This card was made for my Stamp Club. After cutting all of the papers I had a couple of small strips of the DSP. So a narrow strip goes across the bottom of the inside White.
Thank you for stopping by today!!
Online exclusives are here to stay! Click on the photo and be taken directly to them in my online store. If you place an order, please use my Host Code listed just below.
HOST CODE
My September Host Code is 7BSV39GV. Please use this code for orders under $150.00. I will have a small gift for those with orders over $50.00 in addition to the Perk Rewards Program. You can read all of the information at the top of the page in the Menu Bar under SHOP / Perks.
Thank you for stopping by today. I hope you enjoyed today’s project and will come back. I do read and reply to all of the comments individually. They mean a lot to me. Please reach out if you have a question.
The Beary Cute Bundle is a favorite from the Mini Catalog. Those bears are just precious and are so easy to use with a variety of products. Today I have paired it with the tag from Merriest Trees Dies.
Stamp Bundle and Dies
The stamp bundle is the Beary Cute Punch Bundle. The bear is stamped using Smoky Slate Ink and then punched out. There are two other bears but the punch only fits this walking bear. Not only is it a great stamp set, but the punch pairing is a great value as well as makes for easy cards. The sentiment is also from the stamp set.
The tag is from the Merriest Trees Dies. I love the size of the tag. It is similar to the Tailored Design Tags just a big taller and wider than those. And it is a perfect size to fit on a regular size card proportionally.
Papers
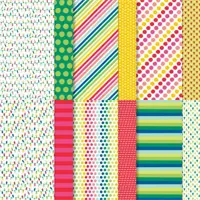
There are two different packs of designer paper used on this card. The first is the trees background. It is from the Merry, Bold & Bright Designer Series Paper. And the snow piece the tag is cut from is part of the A Walk In The Forest Designer Series Paper.
The card layers were pulled from the tree paper. The base is Granny Apple Green and the thin layer is Shaded Spruce. They really help the trees to pop from behind the bear and tag. To help ground the sentiment, I used a thin strip of Granny Apple Green behind it and overhanging the tag. This is a little unusual for me, but I love how it worked.
Finishes
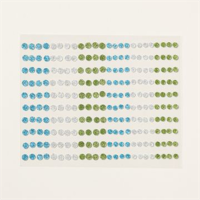
To finish the card I added a ribbon using the Parakeet Party Metallic Ribbon as the tag pull. A little metallic shine is perfect as some bling! But there is also a little normal bling. One of the Adhesive Backed Glitter Sequins is adorning the sentiment layer. That pop of blue adds a little more blue than only the tag paper.
Thank you for visiting today!!!
Online exclusives are here to stay! Click on the photo and be taken directly to them in my online store. If you place an order, please use my Host Code listed just below.
HOST CODE
My September Host Code is 7BSV39GV. Please use this code for orders under $150.00. I will have a small gift for those with orders over $50.00 in addition to the Perk Rewards Program. You can read all of the information at the top of the page in the Menu Bar under SHOP / Perks.
Thank you for stopping by today. I hope you enjoyed today’s project and will come back. I do read and reply to all of the comments individually. They mean a lot to me. Please reach out if you have a question.
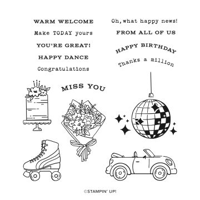
The card I have to share today is a really simple birthday card. It stars the Curved Occasions stamp set. This is one that comes with the arched punch as a bundle.
Stamps
The card I made is a very simple and somewhat plain one. I love quick and easy cards and this is one that is simple, may be considered plain, but is pretty. And that is my main goal, a pretty card. The Curved Occasions Stamp set is a mix of single images that are perfect as stand alone focal layers. This card could be a birthday, wedding shower, or any special occasion that requires cake! I stamped the cake with Memento Tuxedo Black and colored the leaves and flowers with Stampin’ Blends. I also added a touch of the Sea Foam Green on the cake to not have it totally white.
Papers
The colors of the card came from the DSP choice of course. That is pretty much my norm. This one is from the Bright & Beautiful Designer Series Paper. It is a mix of Bubble Bath and Fresh Freesia. A perfect combination for a sweet birthday. To further carry those colors I used Fresh Freesia as the card base and then a layer of Bubble Bath behind the cake layer. The finishing touch is a scattering of Iridescent Pearls that I colored with both the Fresh Freesia and Bubble Bath Stampin’ Blends.
Thanks for stopping by today!!
Online exclusives are here to stay! Click on the photo and be taken directly to them in my online store. If you place an order, please use my Host Code listed just below.
HOST CODE
My September Host Code is 7BSV39GV. Please use this code for orders under $150.00. I will have a small gift for those with orders over $50.00 in addition to the Perk Rewards Program. You can read all of the information at the top of the page in the Menu Bar under SHOP / Perks.
Thank you for stopping by today. I hope you enjoyed today’s project and will come back. I do read and reply to all of the comments individually. They mean a lot to me. Please reach out if you have a question.
The content in this blog is the sole responsibility of Jackie Beers as an Independent Stampin' Up! Demonstrator. The use of and content of classes, services or products offered is not endorsed by Stampin' Up!