I love playing around with different colors. Since I find myself getting into a color rut sometimes by using the same colors pretty regularly. Today’s card is about breaking out of that rut. And going simple!
Color
I use Bermuda Bay as an accent color occasionally, but rarely use it as a main color. It is way past due. I love this color! It pairs well with quite a few other colors, and I have added just two for today. The dark brown is Early Espresso and the light is Sahara Sand. Sahara Sand is one that is overlooked. It pairs well with most colors, but is rarely used as a focal point. I believe it as the stand alone dandelion is great.
Tools
To pair with the Bermuda Bay, I went with clean and simple. First is the gorgeous Star-crossed Embossing Folder. I definitely overlooked this one early in the Mini Catalog release. And now I am so sorry. This mix of design is unique and fun! It really shows well with the Bermuda Bay.
The Die I used is from the Dandy Wishes Dies. I apparently should have run the head of the dandelion through the Cut & Emboss Machine again. The paper did not want to release from the die. However, as I was pulling it loose, I saw how it sort of bent. What a great unexpected detail. It may not mail well, But I love the flutter look of the stamens.
Finishing
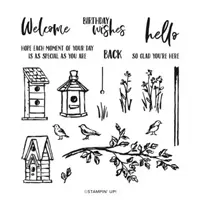
To layer the dandelion and have it grounded, I added the Early Espresso strip across the card. Even though I hated covering up some of the embossed area. The sentiment is from the Garden Birdhouse stamp set and fit perfectly on a scrap of Sahara Sand cardstock the same size as the strip of Early Espresso. Instead of using a die or punch for the sentiment, I just used my Paper Snips and cut each end at different angles.
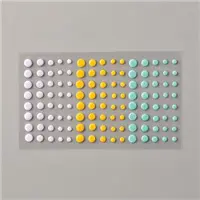
The final touch to the card is some of the Playing With Pattern Enamel Dots. I love the colors and even though this is actually Coastal Cabana it is the same color family as Bermuda Bay.
The 2nd Sale-A-Bration Is Winding Down !!
There are only about two weeks left to the final Sale-A-Bration of the year. There are some really great products in this little catalog. And you can earn them at No Cost. They are Free with a qualifying order. Don’t miss out on this!!
Join My Team Promotion During Sale-A-Bration!!
HOST CODE
My September Host Code is NWZNBFH2. Please use this code for orders under $150.00. I will have a small gift for those with orders over $50.00 in addition to the Perk Rewards Program. You can read all of the information at the top of the page in the Menu Bar under SHOP / Perks.
Thank you for stopping by today. I hope you enjoyed today’s project and will come back. I do read and reply to all of the comments individually. They mean a lot to me. Please reach out if you have a question.
Pumpkins are popping up everywhere now. So I have a pumpkin card to share. It is a second look at the Corner Tuck Card I shared a few weeks ago.
You can click HERE to see the earlier version of this fun fold.
Stamps
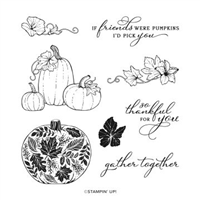
I truly Love the stamps in the Pretty Pumpkins stamp set. The matching Dies are awesome as well, but I did not use them today. I stamped the three pumpkins, which is one stamp, and then colored with Stampin’ Blends. The pumpkins are colored using Both Pumpkin Pie , Light Cinnamon Cider, and Light Old Olive. I stamped the pumpkins with Soft Suede Ink.
Everyone seems to have their own way of coloring with the Stampin’ Blends. When I want some shading, like with these guys, I start with an all over using the Light Blend. I then come back and add the Dark where needed. I finish with the light again and only drag the dark colors into the lighter area. By not going all over with the Light the second time, I get the really light in the center of the larger pumpkin. However, if you have a method that works for you, then stick with it!
Paper
I used the Host Rewards Paper Pack of Pattern Party Designer Series Paper. This pack of paper is awesome! The colors are great, as are the patterns. Plus you get a lot of paper for a very inexpensive price. The only downside is that you can only purchase it with Host Rewards. Anyone interested in a Party???
Measurements and Folds
The base card of Pumpkin PIe is cut 4 1/4 X 8 and scored at the 2 1/2 mark, fold and burnish
The left side strip layer of Old Olive is 1 X 4
The left side strip of DSP is 7/8 X 3 7/8
The focal layer is Old Olive cut 3 X 3
The stamped White is cut 2 7/8 X 2 7/8
The upper right corner that is the Tuck, is a piece of Pumpkin Pie and a DSP piece both cut to 2 7/8 X 2 7/8. they are each placed at a diagonal on the Paper Trimmer and cut in half to form triangles. Then glue the two together for thickness. you only use half, so save one for the next card.
The inside White, that you do not see, is cut 2 3/4 X 2 3/4
Assembly:
Place Stampin’ Dimensionals in each of the corners of the triangle double thick piece and place in the upper right corner.
Adhere the DSP and Old Olive strips together and place on the left side of the flap. Align the left edge, top and bottom.
Layer the Old Olive and Focal Layer together. Place it, centered, up against the strip on the left .
Add the inside White for the sentiment, place it further left than normal so it doesn’t show when the card is closed.
Close the card by tucking the focal layer underneath the raised upper corner
I hope you enjoy this card. Please let me know if you have any questions!
The 2nd Sale-A-Bration Is Here!!
Join My Team Promotion During Sale-A-Bration!!
HOST CODE
My September Host Code is NWZNBFH2. Please use this code for orders under $150.00. I will have a small gift for those with orders over $50.00 in addition to the Perk Rewards Program. You can read all of the information at the top of the page in the Menu Bar under SHOP / Perks.
Thank you for stopping by today. I hope you enjoyed today’s project and will come back. I do read and reply to all of the comments individually. They mean a lot to me. Please reach out if you have a question.
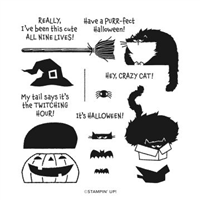
If you are a regular follower of my blog, then you know I have Cats. And I love Cats! So me purchasing the Clever Cat stamp set was a given as soon as I saw it. Then when it was in my hands, I really fell in love with the images and sentiments. I hope you enjoy today’s card.
Stamps
That black cat is just the cutest guy to me. But then I have always had a black cat, or two. My beginning idea for this card was going to be a Halloween card. That is the reason for the broom. But then I saw the sentiment and couldn’t resist using it.
Paper
The DSP piece is from the Cute Halloween Designer Series Paper. As I said, my original thought was Halloween. LOL!! However, these black stripes would work for any card. As does most of the “Other Side” of the papers. The card base is Thick Basic White and a layer of Basic Black. This is a very quick and easy card.
Sentiment Layer
I wanted the sentient to stand out a little, but did not want more layers. After looking through punches, I landed on the Tailored Tag Punch. (If you saw yesterday’s post, I used this punch to make the banner on my tag layer. It is a very versatile punch) After punching out the sentiment, I wanted to give it some depth. A little trick I found several years ago was to edge a punched image with a Stampin’ Write Marker. In this instance I used the Basic Black Stampin’ Write Marker. A Bonus is that it is the only marker that can be purchased individually.
All it takes to give the black edge is a steady hand. I hold the paper at a little bit of an angle, and using the brush tip of the marker, run the marker around the paper. Just don’t have the tip too far onto the front of the paper or you have way too much edge. I suggest practicing on a scrap piece of paper. But I think you will like the results.
The 2nd Sale-A-Bration Is Here!!
Join My Team Promotion During Sale-A-Bration!!
HOST CODE
My September Host Code is NWZNBFH2. Please use this code for orders under $150.00. I will have a small gift for those with orders over $50.00 in addition to the Perk Rewards Program. You can read all of the information at the top of the page in the Menu Bar under SHOP / Perks.
Thank you for stopping by today. I hope you enjoyed today’s project and will come back. I do read and reply to all of the comments individually. They mean a lot to me. Please reach out if you have a question.
Welcome to the Stampin’ Pretty Pals’ Blog Hop! This month, the theme is “Sentiment as a focal point.” We really hope that you enjoy and will be inspired by them! As you hop from blog to blog, don’t forget to leave comments because we love hearing from you. You will find the lineup at the end of my post to help you “hop” along from Pal to Pal.
My first idea for this challenge sadly does not photograph as well as I had hoped. It really sparkles in person, but not in the picture. As a result of that, I have two cards to share with you. They are the same layout, and same stamps, but totally different in color. Even though the photo is not great, I still wanted you to see the first version.
Here is the colorful version.
And here is the more subdued, but shiny, version. There are sparkles in the DSP, they just do not show here.
Stamps
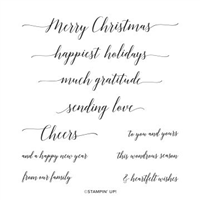
The star of the show is the sentiment, so I wanted one that really stood out. This Merry Christmas from the Heartfelt Wishes stamp set definitely does that. I used shades of a red for both cards. The first card is stamped using Real Red Ink. The second is stamped using Merry Merlot Ink. I added the small sentiment onto the base of the card using the same ink on each version. I like the unexpected position of that second sentiment.
Paper
The colorful version of the card is made using one piece of the Heartwarming Hugs Designer Series Paper. This is one of the Returning Favorites from last year’s Holiday paper. The polka dot is the reverse side of the red. For the second card I used two different sheets of the Peaceful Place Designer Series Paper. I love the softness of the gray. And the sparkle in the larger piece is very pretty in person.
Finishing Touches
Both cards have the banner and I bet you were wondering how that was made since the Banner Triple Punch retired. I marked the center point and used the Tailor Tag Punch to make that point. It is actually very easy to achieve. Both cards needed a bit of bling. I think that is usually the case. The first has Basic Pearls that I colored using the Light Old Olive Stampin’ Blend. For the second one, and to go along with the silver foil that is in the DSP, I added Rhinestones.
Measurements
The measurements are exactly the same for both cards.
the base cards are 5 1/2 X 8 1/2, scored at 4 1/4 and folded
the tag layer is 3 X 4 7/8 prior to punching the end
the large DSP layer is 3 X 4 7/8 (the bright card has a white layer that is 3 1/8 X 5)
the sentiment strip is 7/8 X 4 7/8
More inspiration awaits, so use the lineup below to visit the rest of the Design Team. The Pals are excited to show you what they’ve created! Then, please mark your calendars for our next blog hop on October 13th. Our theme will be Fantastic Fun Folds and 3D Projects when participants showcase fun fold cards or 3D items that will be great for any occasion. Until then, have fun in your craft space.
Thank you for stopping by today. I hope you enjoyed today’s project and will come back. I do read and reply to all of the comments individually. They mean a lot to me. Please reach out if you have a question.
It is the time of year for Gift Tags. I enjoy making different ones for my Christmas Gifts. I should do it all year long. And the joy I find in making tags can be turned into a really cute card. That is what I have to share today. A Tag Card duo!
Dies
I do not normally begin the narrative with the Dies used in projects. But since they are really the star of the show I will make an exception for you. The tag is from the Tailor Made Tags Dies. It is a stand alone die set and has two different designs of tags with a 4 sizes of each design. The one I used is the largest of one design. I believe the stitching is perfect and adds Just Enough!
To carry on with more dies, the second set of Dies is from the Frosted Gingerbread Bundle. The bundle includes the sentiment on the tag also. The dies are various cookies with an intricate top layer and solid base layer. It may not show in the photo but the intricate red top portion is die cut using the Red Foil. (The Red and Green Foil was a Returning Favorite in the Mini Catalog.) I know the white base is supposed to be a cookie. But I thought a Cinnamon Cider cookie would get lost in the paper. So please pretend for me that you think it is a cookie!!
Stamps and Paper
The sentiment is from the Frosted Gingerbread Bundle as well. I love when there is a mix of fonts included in one sentiment. It is stamped in Early Espresso, as that is one of the colors in the DSP. The inside sentiment is from the set also. To carry on the cookie theme it is a perfect match. Because who doesn’t like icing on their cookie….or on anything!!
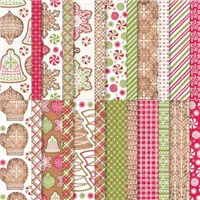
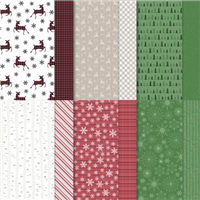
The DSP on the front and the inside are both from the Gingerbread & Peppermint 6X6 Designer Series Paper pack. Actually the inside is the strip I cut off of the front. This is the reverse side of the cookie print. So naturally it coordinates perfectly. The final touch is a little ribbon pull made with the Real Red Sheer Ribbon.
The 2nd Sale-A-Bration Is Here!!
Join My Team Promotion During Sale-A-Bration!!
HOST CODE
My September Host Code is NWZNBFH2. Please use this code for orders under $150.00. I will have a small gift for those with orders over $50.00 in addition to the Perk Rewards Program. You can read all of the information at the top of the page in the Menu Bar under SHOP / Perks.
Thank you for stopping by today. I hope you enjoyed today’s project and will come back. I do read and reply to all of the comments individually. They mean a lot to me. Please reach out if you have a question.
For today’s card I have joined together a few different products. I love using dies with other stamps and paper than the ones they are designed with. It is another great benefit of Stampin’ Up! products to play mix and match.
Stamps
My Rudolph is from the Peaceful Deer Bundle. It is a punch bundle, so one I had to have. Rudolph is stamped using Cinnamon Cider Ink, punched with the matching punch, and then gone over with Wink of Stella for some shine to his coat. And surprisingly it really brought the words out more than they were without it. That’s a Win/Win. His antlers are punched as well and are added with a single glue dot. It is placed at the top of his head and then both are pressed onto it. And I had to give him a Red Rhinestone nose!!
Dies and Paper
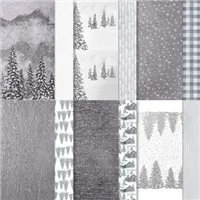
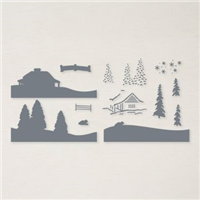
The trees are from the Cabin Dies from the Peaceful Cabin Bundle. They are one long piece that fits perfectly to the size of the card. Of course in the woods with Rudolph I needed some snow. This gorgeous piece of DSP is from the Peaceful Prints Designer Series Paper. It is one of the FREE items (with a $50.00 purchase) in the Sale-A-Bration catalog. To match the brightness of the colors of the DSP, I chose Shaded Spruce for the trees and card base. I haven’t used it in a bit and here it was the perfect choice.
Measurements
card base of Shaded Spruce is cut 5 1/2 X 8 1/2
White layer is cut 5 1/4 X 4
DSP is cut 5 1/8 X 3 7/8
For trees scrap is 5 1/4 X 2 1/2
Deer scrap is 4 X 2 3/4
scrap of Soft Suede for antlers.
The 2nd Sale-A-Bration Is Here!!
Join My Team Promotion During Sale-A-Bration!!
HOST CODE
My September Host Code is NWZNBFH2. Please use this code for orders under $150.00. I will have a small gift for those with orders over $50.00 in addition to the Perk Rewards Program. You can read all of the information at the top of the page in the Menu Bar under SHOP / Perks.
Thank you for stopping by today. I hope you enjoyed today’s project and will come back. I do read and reply to all of the comments individually. They mean a lot to me. Please reach out if you have a question.
The content in this blog is the sole responsibility of Jackie Beers as an Independent Stampin' Up! Demonstrator. The use of and content of classes, services or products offered is not endorsed by Stampin' Up!