I have another quick and easy card where a single Stamp set and the Designer Paper are all you need. Well, this one has another item or two added in!
Stamps
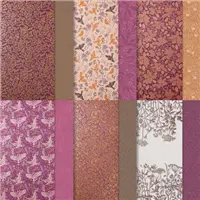
I began this card with the Hand Penned Petals stamp set in mind as the star of the card. That changed a little bit, but I still used the stamp set as a focal point. The flower is stamped directly on the DSP using Memento Tuxedo Black Ink. For some people, I know that stamping on the DSP seems a bit odd. Personally, I love it.
The sentiment is also from the Hand Penned Petals. It is stamped and then layered using the Layering Circles and the smallest of the plain and scalloped circles. The only bling is a larger pearl on the stamped flower image.
Paper
These beautiful papers are both from the Hand Penned Designer Series Paper. I love the softness of these two. Actually the strip is the opposite side of the peach polka dot. Using it in place of a piece of ribbon or cardstock seemed a sort of daring thing to do. LOL!!
The layers are Garden Green, to pull the green from the floral strip and Basic White. I tend to use a White layer as a way to break up the DSP and the base color. It works especially well if the two are mostly of the same color.
Fabulous Stampin’ Up! Join Promotion
Join my team by purchasing the Starter Kit for $75.00 and receive $125.00 of products totally of your choosing! That is a fabulous deal at a $24.00 discount off of the regular Starter Kit price. This is always the Ultimate Bundle of products, and now it is even better! You can simply click on the picture below and Join.
HOST CODE
My November Host Code is M4GF9KZ7. Please use this code for orders under $150.00. I will have a small gift for those with orders over $50.00 in addition to the Perk Rewards Program. You can read all of the information at the top of the page in the Menu Bar under SHOP / Perks.
Thank you for stopping by today. I hope you enjoyed today’s project and will come back. I do read and reply to all of the comments individually. They mean a lot to me. Please reach out if you have a question.
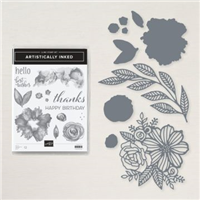
My project for today is a quick Birthday card using the beautiful Expressions In Ink DSP along with the equally wonderful Artistically Inked stamp set. It is a quick and gorgeous birthday card.
Paper
My saying simply Paper is like saying Oh Well. This Expressions In Ink Designer Series Paper is one of Stampin’ Up!’s best ever. The gorgeous colors with the fine touch of Gold is exquisite! So my apologies for making it sound plain. Obviously the DSP is the star of this show by far. What is not to love about it?
Saying that, I went a bit of a different direction with the base color. Generally I would pick the pink or peach, but instead wanted to use one of the greens. I settled on Shaded Spruce. This is such a vibrant green that it really works wonderfully with the paper. To continue the green, I used the Shaded Spruce Ink to stamp the sentiment on a plain piece of White paper. Leaving just the white breaks up the printed DSP more than layering it would have.
Stamps and Finishes
This group of products is actually a Suite of products. It is the Expressions In Ink Suite. The stamps and dies are a Bundle that you can purchase without the entire suite. It is aptly named Artistically Inked Bundle. I did not use much of the Bundle however. The sentiment is from the stamp set, and the dies creating the flowers at the end of the sentiment are from the die set. That was from a scrap I had to trim for the paper size and decided to use it.
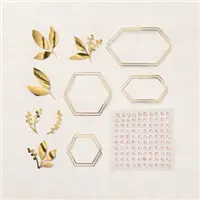
For the finishing touches, I added a few of the Gold Metallic Pearls to the flowers and the sentiment banner. And for the first time, I used the Expressions In Ink Ephemera Pack. It is a little hard to see in the photo. The gold leaves behind the left side of the sentiment layer are from the pack. I placed them above and below the sentiment for some added bling! The only part of the Suite that I did not use is the ribbon. Maybe next time it will be included.
Fabulous Stampin’ Up! Join Promotion
Join my team by purchasing the Starter Kit for $75.00 and receive $125.00 of products totally of your choosing! That is a fabulous deal at a $24.00 discount off of the regular Starter Kit price. This is always the Ultimate Bundle of products, and now it is even better! You can simply click on the picture below and Join.
HOST CODE
My November Host Code is M4GF9KZ7. Please use this code for orders under $150.00. I will have a small gift for those with orders over $50.00 in addition to the Perk Rewards Program. You can read all of the information at the top of the page in the Menu Bar under SHOP / Perks.
Thank you for stopping by today. I hope you enjoyed today’s project and will come back. I do read and reply to all of the comments individually. They mean a lot to me. Please reach out if you have a question.
Today’s project is an ornament card using leftover bits and pieces to make a great project with wonderful colors. My projects for this month are going to be a happy mix of holidays and any time cards. Let’s begin with a Christmas card.
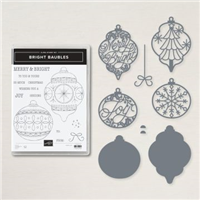
Bright Baubles Bundle
This ornament from the Delicate Baubles Die set is a leftover from an earlier project. The Glimmer Paper on the Red Foil ornament is from Sale-A-Bration, that shows that it is from earlier. However, you could easily substitute any of the Metallic Specialty Papers that you have on hand or are still available.
For the sentiment, I chose to go with the softness of the Soft Succulent Ink on Basic White cardstock. This sentiment is included in the Bright Baubles stamp set, but is an all on one line setting. I chose to cut it apart and layer a bit haphazardly for a different look.
Paper and Finishes
The base of today’s card is Cherry Cobbler with a narrow border of Soft Succulent behind the gorgeous DSP. My favorite DSP of the Annual Catalog is the Tidings of Christmas Designer Series Paper. It is a 6X6 paper stack and has the addition of Misty Moonlight in it. I love that unexpected color and the freshness it brings. I will add that the layer of DSP behind the top piece is actually two smaller strips. As I said earlier, this was leftover parts! By cutting those and the top piece to the same height, it doesn’t show that it’s two pieces.
The final touch of this card is the Evening Evergreen Open Weave Ribbon. With the bling and shine on the ornament, I didn’t need any additional of my normal blings.
Fabulous Stampin’ Up! Join Promotion
Join my team by purchasing the Starter Kit for $75.00 and receive $125.00 of products totally of your choosing! That is a fabulous deal at a $24.00 discount off of the regular Starter Kit price. This is always the Ultimate Bundle of products, and now it is even better! I would really love to have you on my team and to share my love of Stampin’ Up! with you. For many years I was a Hobby Demonstrator, just to get the discount, and do not regret one minute of that. Now I have a community of Stamping Friends that you could be a part of. You can simply click on the picture below and Join.
HOST CODE
My November Host Code is M4GF9KZ7. Please use this code for orders under $150.00. I will have a small gift for those with orders over $50.00 in addition to the Perk Rewards Program. You can read all of the information at the top of the page in the Menu Bar under SHOP / Perks.
Thank you for stopping by today. I hope you enjoyed today’s project and will come back. I do read and reply to all of the comments individually. They mean a lot to me. Please reach out if you have a question.
Beginning today through November 30th, Stampin’ Up! has an awesome Join Promotion. The everyday price of the Starter Kit is an awesome deal at $99.00 for $125.00 worth of Stampin’ Up! products.
However, for this month, the deal is even sweeter! The price of the Starter Kit is dropped to only $75.00for the same great $125.00 of products.
When you purchase the Starter Kit, there is no requirement to ever make another purchase. I would love to have you join my team and give Stampin’ Up! a try.
In the event you do decide to make a purchase after the Starter Kit, you will receive a 20% discount on the products. Also, by joining now you will see the upcoming January Mini Catalog early as well as being able to purchase items from it during the pre-order period. A Win/Win situation!
I would love to talk with you about this awesome offer. Or you can click HERE to be taken to my Join page.
HOST CODE
My November Host Code is M4GF9KZ7. Please use this code for orders under $150.00. I will have a small gift for those with orders over $50.00 in addition to the Perk Rewards Program. You can read all of the information at the top of the page in the Menu Bar under SHOP / Perks.
Thank you for stopping by today. I hope you enjoyed today’s project and will come back. I do read and reply to all of the comments individually. They mean a lot to me. Please reach out if you have a question.
Expressing our Gratitude to someone is always a good thing to do. This time of year makes me especially aware of that. Today’s project is a perfect way to show someone they are appreciated.
Stamp Set
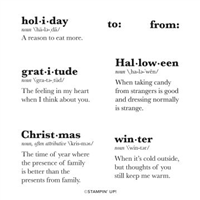
This stamp set is aptly named Well Defined. There are various holidays and similar sentiments that are one word and their definition. These definitions make a wonderful clean and sweet card that is made quickly. The Gratitude was chosen as a nod to Thanksgiving. It is stamped using Cinnamon Cider Ink. As I have stated before, this ink looks a bit metallic when paired with embossed or metallic paper.
Paper
To pair the Cinnamon Cider with this beautiful paper was a given. This is the Blackberry Beauty Designer Series paper. It has been difficult for Stampin’ Up! to keep in stock for that very reason. But I looked and it is in stock now! This paper is paired with Cinnamon Cider cardstock and a layer of Very Vanilla.
There was a piece of the DSP previously cut. So I just needed a tiny adjustment. That piece I cut off was only 1/4″. Of course I couldn’t bring myself to throw it away. As I was looking for a way to finish the card, I saw that little strip. A bow is born! All it took was a few folds, snips, and several glue dots. This little bow should be called a glue dot bow! I love the little different look to the card.
HOST CODE
My November Host Code is M4GF9KZ7. Please use this code for orders under $150.00. I will have a small gift for those with orders over $50.00 in addition to the Perk Rewards Program. You can read all of the information at the top of the page in the Menu Bar under SHOP / Perks.
Thank you for stopping by today. I hope you enjoyed today’s project and will come back. I do read and reply to all of the comments individually. They mean a lot to me. Please reach out if you have a question.
Today’s project is a gift card holder. The Fun Fold inside is a way to make any card a Gift Card holder. What a fun idea!!
Stamps
The fun stamp set with the name of Party Puffins is exactly what the name implies. They are really party animals. And I love them!! At first glance I thought they may be more for younger recipients. But the more I play with them, I now know they are perfect for anyone. And they bring a Smile to my face!
All of the stamps I used are from the one stamp set. Here is the inside of the card.
Inside Fun Fold
I cased the inside fold from Dawn Griffith. It is really simple to do and makes such a Wow for your card. The “fold” is a piece of 4 1/4 X 11. (It looks much smaller because the card itself is a regular 5 1/2 X 8 1/2 folded in half) Fold and score the White piece at 5 1/2. Then fold each end back on itself and score. This gives you the accordion fold. You want the mountain to be in the center. For the gift card slot, mark 2″ up from the bottom of the right end and then cut from the mark to the score line.
Finishing Card
Adhere the folded piece to the inside by having it in the accordion fold, apply adhesive to the left end piece. Place it evenly spaced , top to bottom, and with a narrow border on the end of the inside front of the card. Lay it down and then close the back of the card over the folded piece. Open the card and apply glue to the angle cut end, but only the bottom and the short side. Do the same alignment and close the front of the card over it to adhere.
The inside panels are 2 1/4 X 3 1/2 (3) and 2 X 3 1/4 (3). Be sure to adhere the panels prior to adding the accordion fold to the inside of the card. It is Much Easier to do the panels first. Ask me how I know this 🙂 LOL!!
Thank you for visiting today! If you have any questions about today’s card or any products, please reach out to me. I would love to assist you.
HOST CODE
My November Host Code is M4GF9KZ7. Please use this code for orders under $150.00. I will have a small gift for those with orders over $50.00 in addition to the Perk Rewards Program. You can read all of the information at the top of the page in the Menu Bar under SHOP / Perks.
Thank you for stopping by today. I hope you enjoyed today’s project and will come back. I do read and reply to all of the comments individually. They mean a lot to me. Please reach out if you have a question.
The content in this blog is the sole responsibility of Jackie Beers as an Independent Stampin' Up! Demonstrator. The use of and content of classes, services or products offered is not endorsed by Stampin' Up!