I have made a #simplestamping card to share today. This is a challenge that Sara Douglass made at our November OnStage to share more cards for the beginner stamper or those with limited supplies. I really love the idea. These cards are the kind I really enjoy making. I think of the #simplestamping as a basic card that can then be “stepped up” by just adding a few embellishments or add layers and it is a more involved card. It makes me go back to when I first began stamping.
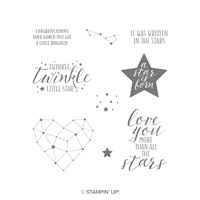
Little Twinkle, 146452
I used Thick Whisper White card stock as the base of my card and two ink pads. The square in the center is done by using the Clear Block D as a stamp. I just placed the Clear Block on the Balmy Blue Ink Pad and then stamped it onto the card stock. The star backgrounds are also stamped with the Balmy Blue. The star and sentiment are stamped with Pacific Point. I fussy cut, although it was very simple cutting, the star and adhered it with Stampin’ Dimensional to raise it. I added the Metallic Pearls for just a touch of bling.
Next week I will show a Stepped Up version of this same card. I hope you will try some SimpleStamping and share your projects.
I know I sound like a broken record, but remember that Sale-A-Bration ends on the 31st!!
Join Promotion:
The Ultimate Shopping Experience is to purchase the Starter Kit. Please read through the next items and think about it. If you love paper crafting as much as I do, I believe you will want to talk with me. I hope you will consider it.
There are 2 Starter Kit choices:
You create your own kit. You get to choose ANY Stampin’ Up! products (includes bundles) However, SAB and Host stamps are excluded from the Starter Kit (but not your next order)!
You will receive a 20% discount on all future purchases through July 31, 2019. But there is no obligation to ever order anything else.
It’s a great way to Get Your Feet Wet, so to speak. Just see if you like being a demonstrator.
Hobby Demonstrators are welcome. I was one for about ten years, and really still am!
You will be the first ones to see the new catalog when it debuts in June, plus preorder from it.
There are NO OBLIGATIONS to continue or ever place another order.
The First Bonus is that you become part of my Team. I would love to have you and enjoy sharing my love for stamping and paper crafting with you.
You become a member of my Upline, Brian King, and his InKing Royalty group. There are great ideas and thoughts shared on our Facebook page.
Now for the 2 options and the Bonuses:
The first option costs $99.00 and you get the usual $125.00 worth of products (of your choice) PLUS an additional $50.00 of product for a total of $175.00 at a cost of only $99.00 to you. And did I mention FREE shipping on that order? That is another 10% off.
The second option costs $129.00. You get the same amount of products as the first choice, ($125.00 worth of your choice of products, Plus the additional $50.00 of Free Products, FREE Shipping) and the AWESOME new Craft & Carry Tote which is valued at $50.00. Basically you are paying an added $30.00 for the Craft & Carry Tote.
(I had the option to purchase, and of course I did. It is well worth the $50.00 and is a Fabulous deal for $30.00)
Here is the Tote. It is a great size, has dividers that can be moved for whatever products you are carrying each use. There are two outside pockets that are large enough to hold punches, and much more. There is a zipper outside pocket. It has regular straps as well as a shoulder strap. It has the Stampin’ Up! logo. It is made of a great heavy weight canvas. And it is so Pretty!!
Today’s card is a 3 X 3 Gift Tag with the cutest little critter and fold around. The fold is from my very sweet friend Julie DiMatteo from The Paper Pixie. She did both the 3 X 3 and a box it fits into. You can see her wonderful video HERE. She explains projects wonderfully and it would be a mistake for me to try to do better!!
I needed a baby card and ended up with a card and a gift tag all in one. Plus it was so much fun to make that I made several of the Napkin ‘folds using different DSP.
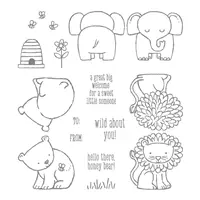
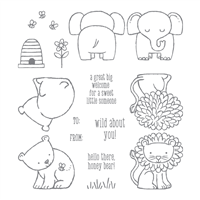
A Little Wild, 144344
I truly adore the cute animal tags in the A Little Wild set and matching dies. I have used them several times as just individual animals, and am really thrilled with the great tag it makes. Who knew? A tag works as a tag!!! Silly me!!
And here is the Napkin Fold part. It is very easy, really cute, and as a classic Julie DiMatteo project, it is much easier than it looks!!
.
The inside sentiment and little flower are from the A Little Wild stamp set as well. I really love the idea of this being a tag and card. It is a great way to add a little something extra with the fold. As I said earlier, I got carried away making these folds and now have several ready to be made into cards for easy Thank You type hand outs.
Thank you for stopping by today. I greatly appreciate you visiting and your comments. The animal tags are carrying over into the new catalog. But alas, the DSP is retiring. Now is the perfect time to grab up the retiring DSP while it is still available and a bit discounted.
All of the supplies I used are listed at the bottom of the page.
Another Paper Pumpkin Special: The March PP was so popular due to the special gift that it sold out. So Stampin’ Up! has offered a great deal to replace that. New Subscribers who sign up before April 10, will receive April and May for half price. So 2 months for the price of 1. A great deal. Use my link HERE, and enter the code: SAVEFIFTY0418
It is still a great time to become a Stampin’ Up! Demonstrator. I would love to have you join my team. A great perk for demonstrators this time of year is getting to see the new catalog first. Then we get to order and play with the new products a month early. For me, that is one of the best parts of being a SU Demonstrator. Of course, the discount helps! If you are interested, please contact me and let’s talk.
As part of the Stamping Event I am enjoying today, we are doing a Shoebox Swap tonight. I decided to make a versatile card. My card is designed for a baby/Mom & Dad card. However, by simply changing one stamp it would be changed for almost any occasion. The Designer Series Paper would work for almost any reason as well.
Better Together, 141736
I know you have seen this card before either from me or others. It is such a useful and pretty card that it needs repeating periodically I do believe!
With using this beautiful Naturally Eclectic Designer Series Paper, I really did not want to cover it up. So I went with simplicity in the focal point on the front which allows the DSP to shine.
And here is a view of the inside and the gift card slot.
Now you see the gift card slot and will understand the directions listed under Measurements below. Be sure and add the Tear & Tape close to the edge so you have plenty of room for your gift card. Although if you do make it too tight, it is not the end of the world….. There is plenty of room for the card to slide in long way also. Not planned, but a nice unexpected find!!
NOTE: If you are like me and really love this paper, buy morel now!!! As it gets closer to the new catalog this, and other items, may sell out. And they will definitely be retired when the current catalog ends. Sad, but happy to see what new papers are revealed!
Thank you so much for visiting today! If you have any questions or comments, I would love to hear from you. And if you do not currently have a SU Demonstrator, I would love to send you a catalog and help you with any future purchases.
The measurements and the supplies are listed further down. I hope you have an awesome weekend!!
Fold and burnish the score lines. Fold the smallest section to the inside.
Place Tear & Tape on each side of the small section close to the edges. Your gift card slides in here.
Cut 2 Whisper White pieces at 3 3/4 X 4 (1 is the inside layer)
Cut 1 Whisper White piece at 1 1/4 X 4 for the side piece
Cut DSP at 3 1/2 X 3 3/4 and 1 X 3 3/4
Sentiment layers are: Soft Sky = 1 3/4 X 2 1/4, and Whisper White = 1 5/8 X 2 1/8
Another Paper Pumpkin Special: The March PP was so popular due to the special gift that it sold out. So Stampin’ Up! has offered a great deal to replace that. New Subscribers who sign up before April 10, will receive April and May for half price. So 2 months for the price of 1. A great deal. Use my link HERE, and enter the code: SAVEFIFTY0418
It is still a great time to become a Stampin’ Up! Demonstrator. I would love to have you join my team. A great perk for demonstrators this time of year is getting to see the new catalog first. Then we get to order and play with the new products a month early. For me, that is one of the best parts of being a SU Demonstrator. Of course, the discount helps! If you are interested, please contact me and let’s talk.
I am playing along with the Global Design Project challenge again ,GDP123, and this time I will submit it within the time period. This challenge is New Beginnings. The set I immediately thought of is one that I have not used but a few times. It is the super cute “A Little Wild” set. The adorable animals make tags or can be used as front/back on a card. I just used the front of the precious elephant for my card.
A Little Wild, 144344
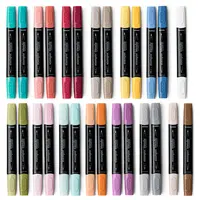
I used the blends to color again. I told you I am hooked on those pens. That aside, I love the elephant holding the balloon. I think it is a cute Welcome Baby type card. The other animals in the set would be just as adorable.
To get just the front of the elephant, I used my Momento Tuxedo Black Ink Pad and just tapped it on the one side of the stamp. I have found that from using the Absorber cloth to clean my stamps that I do not have the light color left. Before I would have a pale pinkish residue that would stamp when I didn’t want it to!
The balloon is from the Balloon Bouquet Punch and is the larger of the two. I then took the Sweet Sugarplum marker and went around the edge of the white balloon to give it some depth. This is a great trick to use when you do not have the layering of card stock.
Thank you for visiting today. The supplies I used are listed at the bottom of the page.
Have you ever thought about becoming a Stampin’ Up! Demonstrator? During Sale-A-Bration is the perfect time to join. Not only are you getting the Ultimate Bundle ($125.00 worth of product for $99.00) but you also get to choose 2 additional stamp sets, up to $25.00 each. Additionally you will receive a 20% discount on any future purchases. Or, if you are just wanting to test drive the idea, you would not be required to make another purchase until July! There is no pressure for you to continue as a demonstrator. And there is no penalty if you decide not to continue. Please contact me and let’s talk about it. You can review the documents by clicking on the picture below.
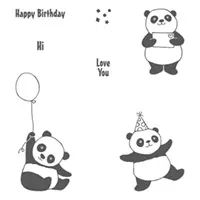
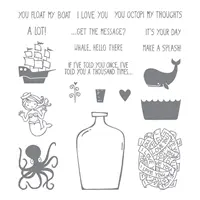
When I saw the little panda holding the balloon, in the Sale-A-Bration catalog, it made me think of a baby. But I could not find a “welcome” sentiment that I liked in my collection. So I started thinking……Have you noticed all of the special ways that expectant parents are doing their pregnancy announcements or baby gender reveals? I love the “thinking outside the box” that goes into some of these reveals. This thought led me down a different road and I did find in the “Message In A Bottle” set what I think is the perfect sentiment.
Party Pandas, 147221
I believe a card like this could be used for pretty much any occasion. But I like to think it would be great for a pregnancy announcement or (in the case of my color choices) a little girl reveal.
I got my color choices from this beautiful Painted With Love Specialty Designer Series Paper. The gold foil on these sheets are beautiful, but hard to photograph. I added the extra layers to emphasize the coordination of Stampin’ Up! colors and the DSP.
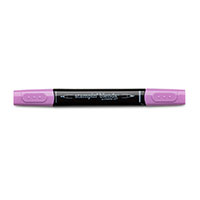
The balloon is colored using the Stampin’ Blends in Rich Razzleberry. I used the color lifter to lighten the center just a bit. Can you see the way the eyes are lit up in the photograph? I used the Glitter and Clear Epoxy Shapes again. The clear, small, round ones are perfect to put over the little dot of an eye. It seems to really highlight the precious eyes of this baby panda. The sentiment is on a strip of paper that I placed the end into the Classic Label Punch going the wrong way to make the banner tips.
Thank you so much for visiting today! I hope you enjoyed this little girl and her surprise. The supplies I used are listed at the bottom of the page.
MEASUREMENTS:
The base card is Melon Mambo cut to 11 X 4 1/4 and folded in half
The first layer is Powder Pink and cut to 5 1/4 X 4
The content in this blog is the sole responsibility of Jackie Beers as an Independent Stampin' Up! Demonstrator. The use of and content of classes, services or products offered is not endorsed by Stampin' Up!