Before we get to today’s card, I have a question for you. Have you checked out the prices on the January – June Mini Catalog Sale list? They are awesome!! I have a link further down in the post for you to click on. That will take you to a 4 page PDF of the sale items. A reminder that it may in some cases be cheaper to buy the die and stamp set individually rather than as a bundle. Some of the dies are discounted 50% on their own, but the bundle price is still the catalog price. So double check before you choose!
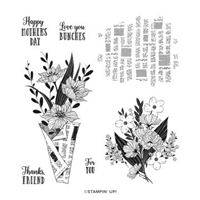
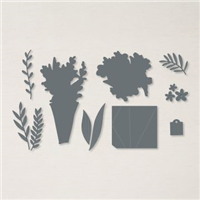
Today’s card is one of the retiring items. It is the Wrapped Bouquet Bundle. I love this Bundle. It is one I have used several times. And with many different colors. Today’s colors are more subdued, but with a bit of sparkle.
Colors
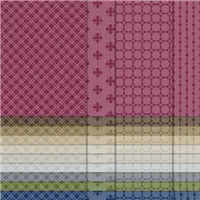
I chose to pair one of my favorites, Highland Heather, with the Basic Gray. I chose the gray because of the newsprint the flowers are wrapped in. The DSP is the Naturals Designer Series paper and it is one of the Basic Gray designs. There are a couple of different designs in each color. You can also get a pack in each of the color families, as well as the In Color families.
The flower image is stamped using Smoky Slate. I then colored the images, with the exception of the newsprint, with Stampin’ Blends. Highland Heather for the flowers and Mossy Meadow for the stems and leaves. The flowers also each got a touch of Wink of Stella to give them some sparkle. Instead of trying to add color to the centers of the flowers with Stampin’ Blends, I chose to go with some Bling. I used the Champagne Rhinestones, which have a bit of a gold / yellow tint.
Finishing Touches
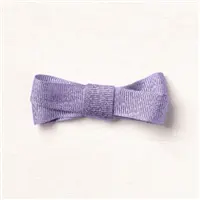
Did you notice the sparkle of the ribbon? This is the new Highland Heather Grosgrain Ribbon. It looks as if it has some silver mixed in. Whatever the case is, I love it! It seems to add some elegance to the focal layer.
The sentiment is from the stamp set also. The “Love You Bunches” just seems like a southern saying to me. I die cut it using the Stitched So Sweetly Dies. And added some Stampin’ Dimensionals to give it some depth. I forgot to mention that the Basic Gray layer is also cut using the Stitched So Sweetly Dies.
Last Chance Sale
Click on the image to get to the pdf of the sale items. Also keep in mind that I have a Rewards Program. For every $50.00 of product you purchase, you earn 1 Blue Star. When you have collected 10 Blue Stars, you get a $50.00 shopping certificate on me! So please use my Host code if you place an order. I also add in a little extra every time you place a $50.00 and up order. 🙂
Thank you for stopping by today. I hope you enjoyed today’s project and will come back. I do read and reply to all of the comments individually. They mean a lot to me. Please reach out if you have a question.
Keep Calm and Keep On Stamping,
Jackie
HOST CODE
My June Host Code is HCX2WT2A Please use this code for orders under $150.00. I will have a small perk for those with orders over $50.00
I hope you had a good Holiday. I relaxed at home but was able to hear parts of the parade from my driveway as well as see the flyover.
Yesterday I shared the Picture This Dies in a cute card. You can see that by choosing Gallery in the Menu Bar. Today’s card is using the circles that were die cut out of the frame from yesterday. I love that they also have the stitching on the inside edges.
Today’s card is using the Basic White Notecards and Envelopes. I believe these circles would work just as well on a full size card. The choice was more that I needed some notecards to send out.
Designer Series Paper
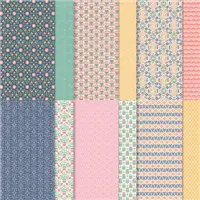
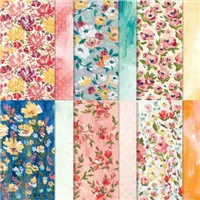
The gorgeous DSP sheets that are paired with the Picture This circles are from the Sweet Symmetry DSP. They are great colors with a touch of a “country” look in the floral sides. The other side of each sheet is more tone on tone colors.
I used three different sheets from the DSP pack. They all coordinate well and each have the Soft Succulent color. I chose the Flirty Flamingo for the heart. That Die is from the Snail Dies. It is the perfect size for the small circle.
Finishing Touches
The For You sentiment is from the Wrapped Bouquet stamp set. I love this type sentiment as it works for pretty much any reason. I will admit to using a retired 3/4″ Circle Punch for the sentiment. I held on to this one as it is great for the finger slot on boxes and small sentiments. Even though it is retired, this is one that can be found at most craft stores. The other circles are the Layering Circles dies.
For the finishing touch I used the Holiday Rhinestones. I chose three different colors that matched the DSP. It is a tad bit unusual, but I liked it.
Thank you for stopping by today. I hope you enjoyed today’s project and will come back. I do read and reply to all of the comments individually. They mean a lot to me. Please reach out if you have a question.
Keep On Stamping,
Jackie
HOST CODE
My June Host Code is HCX2WT2A Please use this code for orders under $150.00. I will have a small perk for those with orders over $50.00
Before I get to the project for today, I want to remind you that Today is the last chance to Join My Team with the Extra $30.00 of product in the Starter Kit. I have all of the information at the bottom of the post. And you can simply choose the Join button in the Menu bar.
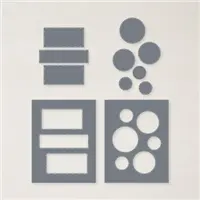
The main product I am sharing today may be one that you have overlooked in the Annual Catalog. It is one of the Stand Alone Die sets. This one has two main pieces that are like little windows. The name is the Picture This Dies.
Dies
This die set has this die, all of the circles are attached as one die, and another with three attached rectangles. This one makes me think of a Peek-A-Boo! The example in the catalog shows different barn animals in each window.
The die cut circles also have stitching around them like the negative here does. I have used those in a card that will be tomorrow’s post.
Designer Series paper
All of the Stampin’ Up! DSP is beautiful, but this Hand-Penned is one of my, actually one of many, favorites. I love pairing the lovely paper with this Peek-a-boo look. It is like looking through an old fashioned camera lense and seeing the garden on the other side. Remember the old cameras with the tiny area you could see through the lense?
For the pairing on this card I cut the DSP sheet a bit smaller than the circle layer. It is glued to the base card. The circle layer is then added with dimensionals underneath to add to the window look.
Sentiment
The sentiment I used is from Free As A Bird. It is punched using the Rectangle Postage Stamp Punch. I hated to cover up the DSP, but wanted it to float on top as well. Hopefully it looks appropriate. And I love the sentiment.
The finishing touch is to add a few of the Metallic Pearls. I chose the gold ones to match the Pale Papaya in the DSP.
Thank you for stopping by today. I hope you enjoyed today’s project and will come back. I do read and reply to all of the comments individually. They mean a lot to me. Please reach out if you have a question.
Keep Calm and Keep On Stamping,
Jackie
Now Is A Great Time To Join My Team!
It’s a fabulous time to JOIN MY STAMPIN’ UP! TEAM. You get even MORE FREE products in the customizable Starter Kit. From 4–31 May, new team members can get $125 USD $155 USD worth of products for only $99 USD + free business supplies + free shipping + all the fun being a part of Stampin’ Up! If you have an interest I would LOVE to talk with you about all of the Fun!!
HOST CODE
My May Host Code is SGHBX62J Please use this code for orders under $150.00. I will have a small perk for those with orders over $50.00
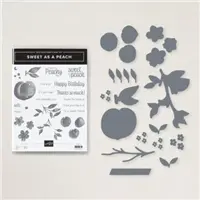
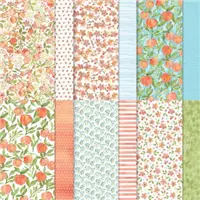
I know on some mobile viewing you do not see the title I place on each post. Today’s post is titled A Peachy Day. We all need more Peachy Days!!! This is the first time I have used the Sweet As A Peach Bundle. I must say it is a good one! Living in Georgia, getting this set was almost a requirement. LOL!!
The DSP is the You’re A Peach Designer Series Paper. It has a couple of different Peachy pieces, as well as some coordinating pages. All of the stamped images are part of the stamp set and the branches & peaches are die cut using the matching dies.
As always, all of the colors were chosen from the DSP. I stamped the leaves in Pear Pizzaz and the peaches in Pale Papaya. I also added a touch to the edge of each peach with the Calypso Coral Stampin’ Write Marker to show some shading. (The photo appears a bit on the too light side, but in person the peaches are darker)
The Balmy Blue layer is die cut using the Scalloped Contours Dies. I believe this was the middle size die. With the stitching and scallops the piece did not need another layer. The sentiment is from the stamp set as well.
Thank you for stopping by today. I hope you enjoyed today’s project and will come back. I do read and reply to all of the comments individually. They mean a lot to me. Please reach out if you have a question.
Keep Calm and Keep On Stamping,
Jackie
Now Is A Great Time To Join My Team!
It’s a fabulous time to JOIN MY STAMPIN’ UP! TEAM. You get even MORE FREE products in the customizable Starter Kit. From 4–31 May, new team members can get $125 USD $155 USD worth of products for only $99 USD + free business supplies + free shipping + all the fun being a part of Stampin’ Up! If you have an interest I would LOVE to talk with you about all of the Fun!!
HOST CODE
My May Host Code is SGHBX62J Please use this code for orders under $150.00. I will have a small perk for those with orders over $50.00
The Pretty Perennials stamp set and Dies has been a favorite of mine for this Spring. It reminds me of the Flower Power of the 60’s and 70’s. Plus the flowers are just so darn cute!! They classify as Happy Flowers to me. So here is another card using this sweet Bundle.
I believe this is a Smile card for sure! There are a few extra products used, as well as some bright color choices. I wanted the flowers to be the star, along with the Happy sentiment.
The colors I chose come from the Fine Art Floral Designer Series Paper. It may be a bit difficult to see in the picture, but there is a piece of it directly behind the stamped flowers. After stamping the flowers, I decided the card base should be Flirty Flamingo with a layer of White to give some definition to the layers.
The flowers are Flirty Flamingo and Pumpkin Pie. The small flower centers are Calypso Coral. For the larger flowers they not only got the large black centers, but a Rhinestone as well.
The sentiment was a bit difficult to place. I finally decided on the odd angle, like a sash. The Sending Lots Of is White Heat Embossed. The Happy is stamped and then fussy cut. It really was not difficult and did not take very long to do . I think they pair well together.
Measurements
Card base is 5 1/2 X 8 1/2, scored and folded at 4 1/4
White layer is 5 1/4 X 4
DSP layer is 5 1/8 X 3 7/8
Stamped layer is 4 7/8 X 3 3/8
Thank you for stopping by today. I hope you enjoyed today’s project and will come back. I do read and reply to all of the comments individually. They mean a lot to me. Please reach out if you have a question.
Happy Stamping,
Jackie
Now Is A Great Time To Join My Team!
It’s a fabulous time to JOIN MY STAMPIN’ UP! TEAM. You get even MORE FREE products in the customizable Starter Kit. From 4–31 May, new team members can get $125 USD $155 USD worth of products for only $99 USD + free business supplies + free shipping + all the fun being a part of Stampin’ Up! If you have an interest I would LOVE to talk with you about all of the Fun!!
HOST CODE
My May Host Code is SGHBX62J Please use this code for orders under $150.00. I will have a small perk for those with orders over $50.00
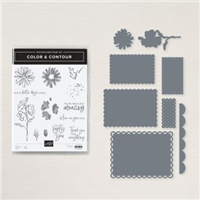
Today’s card is another Fun Fold, but a common and easy one. It has the added bonus of assisting the card is standing up. I am showcasing the Color & Contour Bundle for the first time as well.
The Color & Contour Bundle is a great combination of flowers, filler for the flowers, awesome sentiments, along with floral and scalloped dies. It is on page 98 of the Annual Catalog in case you have missed it.
I love the clean look of this card. Have you seen the Hand-Penned Designer Series Paper? it is a “pen and ink look ” that has been watercolored. That is how I think of it anyway. I pulled the Night of Navy card base from the paper, as I did for the other colors.
The stamped flower is colored using Pale Papaya and Just Jade Stampin’ Blends. The scalloped White layer is cut using the matching Dies from the Bundle. I backed that with a piece of Just Jade cardstock.
Here is a view of the open card.
From the standing view, you can see that the DSP pieces are on the left front and then on the inside right. The piece is cut 4 X 5 1/2 and then cut into 2 pieces that are 2 X 5 1/2. The front of the card is scored in half and “Z” Folded. The front folded back section could be adhered to the other side. But I like how the card easily stands as a “Z” Fold.
Measurements:
Card base is Night of Navy cut 5 1/2 X 8 1/2, scored at 4 1/4 and 6 3/8.
Fold on the score lines and make a Z fold.
DSP is 4 X 5 1/2, and cut into 2 pieces that are 2 X 5 1/2
Adhere one to the folded back section of the front and one to the right edge of the inside section.
Just Jade is cut 4 3/4 X 3 1/2 and adhered only to the front section
The front flower is stamped in the center of a White piece cut 4 3/4 X 3 1/2
Die cut the White piece using the 2nd largest of the Dies
Adhere to the Just Jade layer
The inside sentiment layer is White cut to 4 X 2 1/2.
The sentiment is from the stamp set, as is the flower bud.
Adhere close to the folded edge on the inside layer.
Thank you for stopping by today. I hope you enjoyed today’s project and will come back. I do read and reply to all of the comments individually. They mean a lot to me. Please reach out if you have a question.
Keep Calm and Keep On Stamping,
Jackie
Now Is A Great Time To Join My Team!
It’s a fabulous time to JOIN MY STAMPIN’ UP! TEAM. You get even MORE FREE products in the customizable Starter Kit. From 4–31 May, new team members can get $125 USD $155 USD worth of products for only $99 USD + free business supplies + free shipping + all the fun being a part of Stampin’ Up! If you have an interest I would LOVE to talk with you about all of the Fun!!
HOST CODE
My May Host Code is SGHBX62J Please use this code for orders under $150.00. I will have a small perk for those with orders over $50.00
The content in this blog is the sole responsibility of Jackie Beers as an Independent Stampin' Up! Demonstrator. The use of and content of classes, services or products offered is not endorsed by Stampin' Up!