There are two amazing things I have to share with you today. The first is the 24 Hour Sale that I mentioned yesterday. It includes every stamp set in the Annual Catalog at 15% off! (Note: If it is part of a Bundle, it may still be less expensive to purchase the bundle!). Plus, if you have been thinking of joining my Stampin’ Up! Team, it is a perfect day to do so. You can add stamp sets to your Starter Kit with this discount. That adds more stamps for your money. Please let me know if you have any questions regarding that.
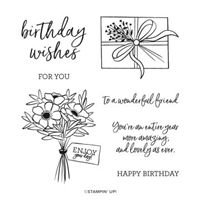
The second Amazing I have to share with you is the Amazing Year stamp set. This set is small, flexible, and has sweet sentiments. Those are things I love.
Stamps
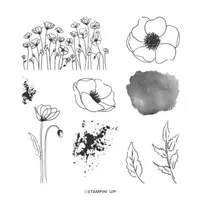
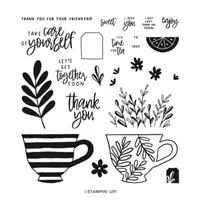
The fun package and the sweet sentiment are from the Amazing Year stamp set. This little package is a favorite of mine because it can be used for so many different purposes. And we should always celebrate our “Wonderful Friends”! To pair with the other pieces used, I have added “splatter” from the Painted Poppy stamp set. Plus the flower in the center of the package is from the Cup of Tea stamp set. It matches the embellishment on the sentiment layer.
Layers
Layers are something I tend to use in my cards. And this one needed some stamping or texture on the layer due to the open space. By using the Painted Texture Embossing Folder, it got quite a lot of texture and some definition as well. Going along with this is the two layers of the sentiment. Those are simply banner cut using my Paper Snips for a fast added look. Then the addition of the raised flower on the gift box and the Fun Flowers Resin shapes on the sentiment were the final touches.
HOST CODE
My September Host Code is KVGNY4TA. Please use this code for orders under $150.00. I will have a small gift for those with orders over $50.00 in addition to the Perk Rewards Program. You can read all of the information at the top of the page in the Menu Bar under SHOP / Perks.
Thank you for stopping by today. I hope you enjoyed today’s project and will come back. I do read and reply to all of the comments individually. They mean a lot to me. Please reach out if you have a question.
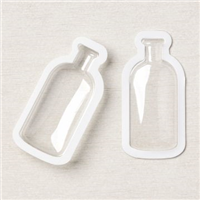
A touch of 3D is a fun addition to a card. For today’s project I have added one of the Vintage Bottle Shaker Domes for a “bubbly” 3D look.
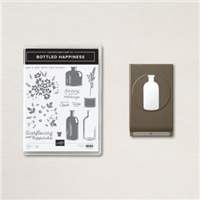
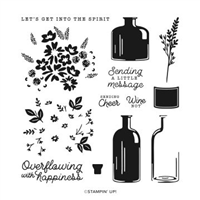
Bottled Happiness
The Bottled Happiness Bundle includes a wonderful stamp set with a variation for bottles along with floral and sweet sentiments. It also includes the Vintage Bottle Punch. Punch Bundles are a wonderful deal in my opinion as they are less expensive than Die Bundles. And to complete this Bundle, you can get the Vintage Bottle Shaker Domes to make a 3D look using the punch and stamps.
For this card I did not use a bottle stamp, but did use the punch and shaker dome. After layering the two DSP pieces on the Basic White, I used the punch and cut the bottle. The shaker domes have adhesive already applied to the front rim and the back. Simply remove the front adhesive cover and slide the dome into place. Mine is filled with the Effervescent Elements. These little bubbles are adorable!. After filling as you wish, just remove the back adhesive covering to close the dome. (For my card I added a scrap of Basic White a bit larger than the shaker dome to stick to the back.) That ensured the bubbles were contained while I added these layers to the card base.
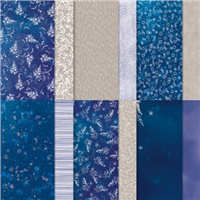
Sun Prints
These two gorgeous DSP pieces are from the Sun Prints Designer Series Paper pack. By using both the Night of Navy and the Sahara Sand pieces it softens the look a bit. They compliment each other perfectly and still allow the bottle of bubbles to star. You may prefer to have the DSP showing through the bottle, but I was afraid that would be too much. However I did save the punched out bottle. It is applied to the inside of the card for a little extra touch.
Finishes
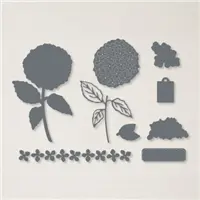
Between the beautiful DSP and the bottle it did not take much to complete this card. Besides, I did not want to cover the pretty Sun Prints DSP. So I went with a small tag which perfectly fit the nice sentiment. The tag is from the Hydrangea Dies. And the sentiment is from the Bottled Happiness stamp set. To finish the tag I added a bow using the Starry Sky Woven Metallic Ribbon.
Thank you for visiting!
HOST CODE
My September Host Code is KVGNY4TA. Please use this code for orders under $150.00. I will have a small gift for those with orders over $50.00 in addition to the Perk Rewards Program. You can read all of the information at the top of the page in the Menu Bar under SHOP / Perks.
Thank you for stopping by today. I hope you enjoyed today’s project and will come back. I do read and reply to all of the comments individually. They mean a lot to me. Please reach out if you have a question.
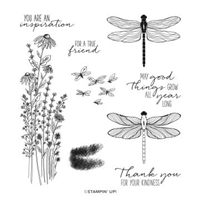
An easy technique and a Make My Monday Challenge are the basis of today’s card. And a Dragonfly Garden image completes the card.
Make My Monday Challenge
The new challenge on Make My Monday is to have “Friend” in the sentiment. That is a fairly easy one to accomplish. And you can submit cards to this challenge as well. Simply click on the icon below and you will be taken to the blog post. Check out what the other design team members created for their Friend card.
Background
This fun background was equally fun to make. It was made using the Blending Brushes. This is not something I do regularly but am enjoying more and more. But first I have to mention the outline of the blended area. As has happened a few times previously, I found the piece on my messy desk! It was the negative from having cut one of the Deckled Rectangles Dies. So I added some removable tape and placed it on top of the White layer.
The two colors I used are Balmy Blue and Highland Heather for the blending. Balmy Blue was added to about two thirds of the area. Then beginning at the opposite end I started the Highland Heather. There is not a lot of overlap, but there must be a little bit. The Deckle edge still shows fairly clearly and I love that!
Stamps
Another thing I like about this card is the simplicity. The stamped image from Dragonfly Garden is done with Memento Tuxedo Black Ink. It gives the illusion of a shadow. The sentiment was stamped with Memento as well and left with no layers. That was a little hard to do since I love layers!
Finishing
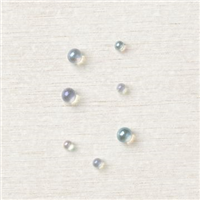
To complete the card I went with a little darker card base. By using Gorgeous Grape it seems to draw out more of the Highland Heather color. And the final touch was adding a single Heart Pearl next to the sentiment. This was a fun and fairly quick card to make. Now I am looking at my stamps for other “shadow” images!
Hope you have a wonderful day!
HOST CODE
My September Host Code is KVGNY4TA. Please use this code for orders under $150.00. I will have a small gift for those with orders over $50.00 in addition to the Perk Rewards Program. You can read all of the information at the top of the page in the Menu Bar under SHOP / Perks.
Thank you for stopping by today. I hope you enjoyed today’s project and will come back. I do read and reply to all of the comments individually. They mean a lot to me. Please reach out if you have a question.
Making Fun Fold cards is one of the techniques I love! Today’s fun fold stars the Cheerful Basket stamp set.
Stamps
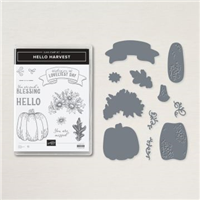
There are a variety of stamp sets used on this card. It is definitely a mix and match card! And that is one of the things I love about stamping. With fall colors in mind, I wanted a Fall look. The first step is the basket. It is from the Cheerful Basket stamp set. The floral inside the basket is from the Hello Harvest stamp set. By using a little masking at the rim of the basket I was able to cover the open area. Plus an extra sunflower that is raised up gives detail and completes the covering.
More Stamps Punch
The sentiment is from the Very Best Occasions stamp set. Sentiment sets are wonderful and especially when they have a good variety! To help the sentiment pop on the basket, I used the smaller cut out of the Double Oval Punch. By adding a couple of the Rustic Metallic Dots the sentiment looks like a sign on the basket. And was a perfect fit.
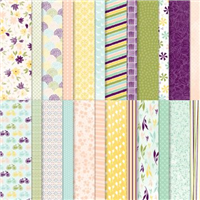
Papers and Colors
Choosing the colors normally comes from the papers. But this one came more from the floral arrangement. The card base is Calypso Coral with a layer of Granny Apple Green. Luckily I found a matching DSP piece in the Design A Daydream Designer Series Paper pack. This huge pack is part of the Annual Catalog Host Rewards.
Fun Fold
This card was cased from Connie Stewart. She has a great video of how to make it, so I am not going to duplicate. It is pretty easy though and I love that. Here is a view of how it opens.
There are similar cards with the three strips that I have made previously. This one has additional folds and a tight closure.
I hope you have a great day!
HOST CODE
My September Host Code is KVGNY4TA. Please use this code for orders under $150.00. I will have a small gift for those with orders over $50.00 in addition to the Perk Rewards Program. You can read all of the information at the top of the page in the Menu Bar under SHOP / Perks.
Thank you for stopping by today. I hope you enjoyed today’s project and will come back. I do read and reply to all of the comments individually. They mean a lot to me. Please reach out if you have a question.
Making cards can be fun and challenging! Occasionally it takes a paper a little while to speak to me. This Rustic Harvest finally spoke out!
Papers
The star of this card is this piece from the Rustic Harvest Designer Series paper. This pack of papers is beautiful and has great colors, but this one was a bit more difficult. It was the yellow pumpkins and gourds that were stalling me in deciding which direction to go. Finally my little brain picked up on the gorgeous leaves. And the card was finished! Well, almost finished. By using the Merry Merlot, which is a color I rarely use, it brought the leaves out from that dark background. Of course the larger layer of Basic White helped with that.
Stamps
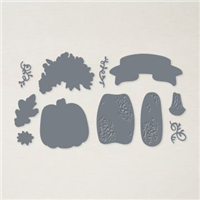
The Hello Harvest Bundle, Hello Harvest stamps and Rustic Pumpkin Dies, is a match for this DSP. But after finally getting the paper idea worked out, I did not want to cover it up! The banner sentiment is a stamp with a matching die. So using Mossy Meadow Ink and then die cutting the banner I was almost finished. There was quite a lot of debate about a background layer for the banner. But finally I decided it could stand alone. However, I did notice the small leaf stamp and matching die. So I used Merry Merlot Ink and added the little die cut leaf to the top edge of the card. With that leaf and a few of the Brushed Metallic Dots placed around, I declared it good to go.
Thank you for looking today!
HOST CODE
My September Host Code is KVGNY4TA. Please use this code for orders under $150.00. I will have a small gift for those with orders over $50.00 in addition to the Perk Rewards Program. You can read all of the information at the top of the page in the Menu Bar under SHOP / Perks.
Thank you for stopping by today. I hope you enjoyed today’s project and will come back. I do read and reply to all of the comments individually. They mean a lot to me. Please reach out if you have a question.
Stampin’ Up! has Two great specials for the month of September. The first is that Each week will be a different set of discounted products! For this week it is a mixture of Dies, DSP, and embellishments. The second is that Dies have been added for some of the Annual Catalog stamp sets. These are available individually or as a bundle with the set. My favorite is one for This Birthday Piggy! Click on my button saying “Shop” and go to “Specials”. You will see both the Weekly Deals and the Perfect Partners special.
The Beach
My project for you today is a fun Beachy card. The Beach is on my mind and this one turned out as I envisioned. SunKissed stamp set is not just a Christmas set.
Stamping
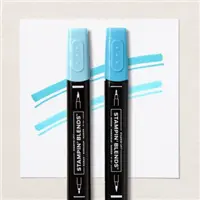
The Sunkissed stamp set is a simple beachy theme with both regular and Christmas sentiments. This little scene is what I plan on doing next week. That is doing nothing but sitting on the beach!! Until then I will share this beach with you. The stamping is the beach scene. It is stamped onto Sahara Sand cardstock with Memento Tuxedo Black Ink and colored using Stampin’ Blends. The darker “sand” area is a Crumb Cake Stampin’ Blend to create more depth.
The beach scene was torn along the water edge to give the beach and sand look. However the umbrella required a bit more finesse and was cut around. Then the beach scene is added to the DSP piece to give more of the 3D look. For the final stamping, I used Memento Black again and stamped the simple “Enjoy” from the Cup of Tea stamp set. That is definitely what I plan on doing.
Paper
Sadly I am a day late on sharing this card regarding the paper. The DSP piece is a reverse side of a piece from the Rings of Love Sale-A-Bration Designer Series Paper. But if you are lucky enough to have some, then you are ready. There is a similar piece in the Awash In Beauty DSP. To pull out the bit of Soft Sea Foam that is in the upper edge of the paper, I went with a Soft Sea Foam card base. That is an ocean color as well and fits in perfectly.
HOST CODE
My September Host Code is KVGNY4TA. Please use this code for orders under $150.00. I will have a small gift for those with orders over $50.00 in addition to the Perk Rewards Program. You can read all of the information at the top of the page in the Menu Bar under SHOP / Perks.
Thank you for stopping by today. I hope you enjoyed today’s project and will come back. I do read and reply to all of the comments individually. They mean a lot to me. Please reach out if you have a question.
The content in this blog is the sole responsibility of Jackie Beers as an Independent Stampin' Up! Demonstrator. The use of and content of classes, services or products offered is not endorsed by Stampin' Up!