Update: I have had a few requests for measurements. This is a CASE of Sue Campfield and she has a video. But I have attached a PDF of directions at the bottom of the post that you can print out.
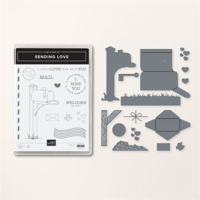
The card I am sharing today is a fun Pop Up card using the awesome Sending Love Bundle. And it is paired with some great DSP from Sale-A-Bration.
Stamps and Dies
The fun mailbox is what drew me to this stamp bundle. The Sending Love Bundle has the mailbox, letter, bird, and some fun additions to go along. Plus it is a Die Bundle and there are matching dies for it all. I opted to stamp and color the mailbox on the layer. And I went with non traditional mailbox colors so it matched my paper. The addition of the envelope and bird were a add on. I am not sure if the bird is delivering or taking away. LOL!! Either way works for me.
The inside sentiment is from the Something Fancy stamp set. The inside is a Pop Up. This card is a CASE from Susan Campfield. It is pretty simple to do and she explains the mechanism very well. Here is a side view of the card. I really love this fold now that I have it figured out. Attached below is a PDF of directions that I made for this card.
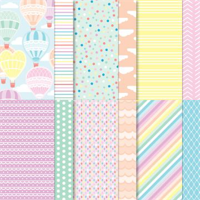
The beautiful paper used on this card is from Sale-A-Bration. This means that it is free with a qualifying order. For this paper, Sunny Days Designer Series Paper, you can choose it FREE with a $50.00 order from either of the Annual or Mini Catalog. Both of the DSP used here are from this pack of paper. I love the green flowers. They are very pretty and a different color. Stampin’ Up! has such gorgeous Greens now.
The card base is Basic White card stock. And just the regular weight, not the Thick. I chose this route because of the layers and the mechanism for the pop up. And I did not add layers between the card base and the DSP. That is not the norm for me either. I did add the Basic Black layer behind the front focal layer. It gives a bit more sturdiness to that layer.
Finishes
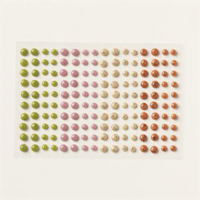
To add to more of the unusual, my bling is different as well. Instead of shiny bling, I went with a Black Bling. It really helps the black of the flowers in the DSP to pop. And it highlights the black layer. These are from the Classic Matte Dots in the Annual Catalog. I could have colored the Iridescent Pearls with the Black Stampin’ Blends to get black pearls, but I had these.
Directions
Click on the photo below and you will get a step by step How To.
Thank you for stopping by today! I really appreciate you.
Online exclusives are here to stay! Click on the photo and be taken directly to them in my online store. If you place an order, please use my Host Code listed just below.
HOST CODE
My JANUARY Host Code is BQEMX92K. Please use this code for orders under $150.00. I will have a small gift for those with orders over $50.00 in addition to the Perk Rewards Program. You can read all of the information at the top of the page in the Menu Bar under SHOP / Perks.
Thank you for stopping by today. I hope you enjoyed today’s project and will come back. I do read and reply to all of the comments individually. They mean a lot to me. Please reach out if you have a question.
Good Morning everyone. I am late posting today and I apologize to my early morning followers. The post that I thought I scheduled last night did not post. That is because I put the wrong date! DUH!!! And then the internet was out. So here we are.
Today’s card is a really quick and easy one. It is all about the Flight & Airy DSP from Sale-A-Bration. I love sharing how to make quick and simple cards.
Papers
This card is all about the papers for sure. The focal bird piece is fussy cut from a piece of DSP from the Flight & Airy Designer Series Paper. There are a couple of sheets with bird images as well as several more general pieces on the back. I do not mind fussy cutting and this one was pretty quick to do. There are two important things about fussy cutting. First is to have sharp scissors. And our Paper Snips from SU are awesome. The second tip is to turn the paper and not your scissors. This keeps the line going smoothly without the stop and start marks.
There are only two sheets of the DSP used here. The bird is the also the opposite side of the greenery layer. And I love the Pecan Pie hexagonish design. That may not be correct, or even a word. But I love that design! It brings out the branch beneath the bird. And the Pecan Pie card base really helps to pull out that brown.
Stamping
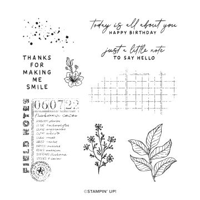
This being a very quick card, there is only the sentiment that is stamped on the front of the card. This sweet “just a little note” seemed to fit with the bird. I hope you catch the humor there. The sentiment is from the Notes of Nature stamp set. It is another great set, and bundle, in the Mini Catalog. There are wonderful background builder stamps with that set.
Finishes
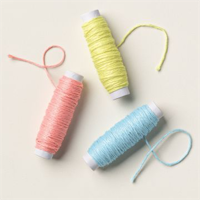
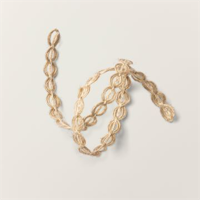
To finish this card I added some of the Lemon Lolly Bakers Twine from the Bakers Twine Three Color Pack, also in the Mini Catalog. I wanted to bring out a bright color and the chest of the bird with that pop of yellow seemed perfect. And I love Bakers Twine for creating small bows. To add to that, I added a trio of Adhesive Backed Solid Gems from the Annual Catalog.
I appreciate you stopping by today!!
Online exclusives are here to stay! Click on the photo and be taken directly to them in my online store. If you place an order, please use my Host Code listed just below.
HOST CODE
My JANUARY Host Code is BQEMX92K. Please use this code for orders under $150.00. I will have a small gift for those with orders over $50.00 in addition to the Perk Rewards Program. You can read all of the information at the top of the page in the Menu Bar under SHOP / Perks.
Thank you for stopping by today. I hope you enjoyed today’s project and will come back. I do read and reply to all of the comments individually. They mean a lot to me. Please reach out if you have a question.
The card I have for you today is another mix of products. I love this and a adding my new favorite, the new Perennial Postage Dies. They are such a fun addition.
Stamps and Bundles
The star of this card is hard to choose. I love the different aspects of it. But to begin with the stamps make sense. I will say the cake was the inspiration. It is from the new Hooray For Surprises Bundle. This set has pull tab openings for a real Surprise to the recipient. I did not go that route today and went much simpler. I stamped the cake, which has a matching die, and then added the candle and flame, which do not have dies.
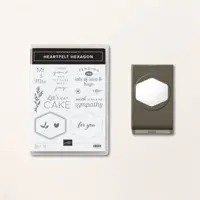
The sentiment matches the cake, but is from a different set. It is from the Heartfelt Hexagon Bundle. I loved the boldness of this one. And let’s face it, eating the cake is the star attraction! The fun opening is the Heartfelt Hexagon Punch. I really love punches and this is a good one. It is a great size for most of our sentiments and I like the shape. Plus using it as an opening like this is an added bonus!
Papers
The papers I chose for this card are much more subtle than my normal colors. Of course the DSP was the color decider. This is a piece from the Lighter Than Air Designer Series Paper. It has such great colors that it was difficult to choose only a couple. I decided on highlighting the flame from the candle and went with Lemon Lolly for the card base. Surprising to myself, I did not add a layer between the base and the DSP. That is also very different for me. And then the Postage layer in White. Wow! But I did use the bright Azure Afternoon for the sentiment and the cake to make up for the less layers.
More Dies and Finishes
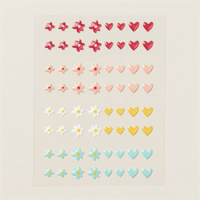
The fun outline of the layer is the Perennial Postage Stamp Dies. This is the 2nd largest of the dies. I love the Scalloped Contours Dies that are similar sizes, but this gives a unique and different shape. You will be seeing more of the these guys for sure. To finish the card I went with fun shapes instead of bling. The flowers and heart on the cake and card are from the Adhesive Backed Hearts & Flowers embellishments. They add a Fun look and I though went well with the colors of the papers.
I appreciate you stopping by today!!
Online exclusives are here to stay! Click on the photo and be taken directly to them in my online store. If you place an order, please use my Host Code listed just below.
HOST CODE
My JANUARY Host Code is BQEMX92K. Please use this code for orders under $150.00. I will have a small gift for those with orders over $50.00 in addition to the Perk Rewards Program. You can read all of the information at the top of the page in the Menu Bar under SHOP / Perks.
Thank you for stopping by today. I hope you enjoyed today’s project and will come back. I do read and reply to all of the comments individually. They mean a lot to me. Please reach out if you have a question.
The card I have to share today is starring the Perennial Lavender DSP. This paper is so gorgeous!! It made the card all by itself almost. I see many future cards starring this paper.
Paper
The focus of this card is easy to see. The beautiful Perennial Lavender Designer Series Paper is a gorgeous mix of the Stampin’ Up! purples with a bit of Shaded Spruce and Lost Lagoon thrown in. And the background of Crumb Cake is a perfect base. I pulled the Crumb Cake as the card base. Then added the brightest of the purples to the mix. That is Gorgeous Grape. I cut the layers to fit normally, but after trying the slanted layering I had to go that direction.
Stamps
The simple sentiment is from the Perennial Postage stamp set. This sweet sentiment would work for so many occasions. I tend to leave the inside of cards blank until ready to send. With this sentiment I can use this card for a variety of reasons when needed.
Die and Finishes
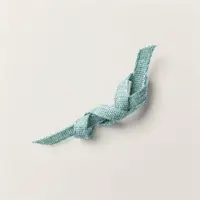
The lovely shape for the sentiment is from the matching Perennial Postage Die set. There are several different sized “postage” edged dies. This is one of the smaller rectangle ones. With the paper being so overwhelming, it adds a little extra touch for the sentiment to stand out. And to complete the card, I added the Lost Lagoon Bordered Ribbon wrapped around the two layers. Of course there must be bling! So the final touch is a trio of the Purple Fine Shimmer Gems. These are gorgeous in three shades of the purples!
Thank you for stopping in today!!!
Online exclusives are here to stay! Click on the photo and be taken directly to them in my online store. If you place an order, please use my Host Code listed just below.
HOST CODE
My JANUARY Host Code is BQEMX92K. Please use this code for orders under $150.00. I will have a small gift for those with orders over $50.00 in addition to the Perk Rewards Program. You can read all of the information at the top of the page in the Menu Bar under SHOP / Perks.
Thank you for stopping by today. I hope you enjoyed today’s project and will come back. I do read and reply to all of the comments individually. They mean a lot to me. Please reach out if you have a question.
Welcome to InKing Royalty’s December Blog Hop! Trees are such a central image in card making (Spring, Summer, Fall or Winter, trees are gorgeous), so we have designed projects with trees to share with you today. We are excited to share our creations and hope you love them! After you read my post, I hope you’ll hop over to the next person on the list at the base of this post.
To make an “other than Christmas” card, but with Trees, I have moved to the upcoming Mini Catalog. This catalog and the Bundle I am using will be available to you on January 4, 2024. I love giving you a sneak peek at new products.
Bundle
This wonderful Die Cut focal area is from a new Bundle in the upcoming January – April 2024 Mini Catalog. It is the Delicate Forest Bundle. The die cut is one solid piece that has cut outs, but also little partially cut pieces that stand up a little. When I received my preorder and was looking at this die , I was amazed at how pretty it is. Now I am in love with it. To add to the “tree” theme, I went with a natural paper in Crumb Cake for this die cut.
The ,short but sweet, sentiment I used is also included in the stamp set that is part of the Bundle. These simple words are small enough that I was able to tuck the strip behind the die cut. I did not really want it to stand out very much. It is stamped with Early Espresso Ink to bring out the darkest of the trees in the background. And it is both good and bad that the only stamping on this card is the sentiment!
Papers
The calm and beautiful scene behind the die cut is the One Horse Open Sleigh Designer Series Paper. This is one that is an Online Exclusive and is still available. I love the snow and woodsy images these papers have. So I believe they are great for other than Christmas.
To continue on with the thought of “trees”, I added a green to the papers. It is a sort of green. I chose Lost Lagoon as the card base. It is in the background of the DSP along with Pool Party. And with all of the business of the die cut and the paper, it did not require much of an embellishment. But if you know me, I had to add some bling. There is a single Blooming Pearl in the green shade at the base of the little tree.
Thank you for stopping by today. I hope you’ll hop along to the next stop on the blog hop, Lynn Kolcun at Avery’s Owlery. There’s lots of inspiration to be found in this group – and you don’t want to miss it!
Thank you for hopping along with us. If you get stuck during the Blog Hop, please use this line-up as a guide:
Online exclusives are here to stay! Click on the photo and be taken directly to them in my online store. If you place an order, please use my Host Code listed just below.
HOST CODE
My DECEMBER Host Code is YJUB2G6X. Please use this code for orders under $150.00. I will have a small gift for those with orders over $50.00 in addition to the Perk Rewards Program. You can read all of the information at the top of the page in the Menu Bar under SHOP / Perks.
Thank you for stopping by today. I hope you enjoyed today’s project and will come back. I do read and reply to all of the comments individually. They mean a lot to me. Please reach out if you have a question.
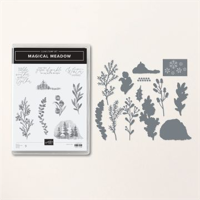
The card I have to share today is using the Magical Meadow Bundle. The scenes in this set remind me more of mountains than meadows. And I love them!
Stamps and Dies
This beautiful tree image is from the Magical Meadows stamp set. The fun shape is actually the shape of the image and it’s matching Die. I really like the rugged look it gives. The sentiment is from the, in my opinion, must have stamp set titled Go To Greetings. This set has a few regularly used sentiment in a couple of sizes. I really love it and use it quite often. The sentiment was stamped and then the edges were angle cut with Paper Snips.
Papers
This beautiful greenery paper is from the Joy of Christmas Designer Series Paper. It is definitely not just Christmas paper! These leaves have such beautiful shades of green that I was able to use Shaded Spruce card stock and Old Olive ink for a perfect pairing.
Details
This is a fairly simple card but has several different texture details. The strip behind the focal area is embossed using the Distressed Tile Embossing Folder. That is definitely a favorite folder. I also added a strip of the Wavy Trim to carry more of the Mountain theme. And the thin ribbon behind the trim is actually Soft Sea Foam Seam Binding. I was looking for a soft green and this was perfect. Sadly it is a retired ribbon, but it worked for me. I am sure you have ribbon in your stash that would work as well. The final touch is a scattering of the green Adhesive Backed Speckled Dots.
Last Chance Products
This Magical Meadow Bundle is on the retiring list. Click on the photo and you will be taken to the complete PDF.
Online exclusives are here to stay! Click on the photo and be taken directly to them in my online store. If you place an order, please use my Host Code listed just below.
HOST CODE
My NOVEMBER Host Code is 626NJVKN. Please use this code for orders under $150.00. I will have a small gift for those with orders over $50.00 in addition to the Perk Rewards Program. You can read all of the information at the top of the page in the Menu Bar under SHOP / Perks.
Thank you for stopping by today. I hope you enjoyed today’s project and will come back. I do read and reply to all of the comments individually. They mean a lot to me. Please reach out if you have a question.
The content in this blog is the sole responsibility of Jackie Beers as an Independent Stampin' Up! Demonstrator. The use of and content of classes, services or products offered is not endorsed by Stampin' Up!