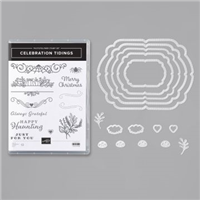
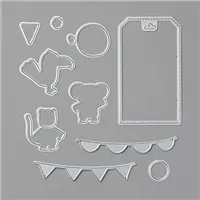
I have another Sneak Peek today. I immediately noticed these awesome dies in the upcoming Mini Catalog. They are a bundle called Celebration Tidings. But the dies are the star of the show in my opinion.
When I first began stamping many, many years ago, there was a heavy die named Top Note that was used as a bag topper quite often. We really have not had anything similar until this. When I saw this set of dies, I thought of that and had to make a bag topper. This is the 2nd largest of the dies, so they are more designed as a card layer. But how adorable is this on these Printed Gusseted Cello Bags?
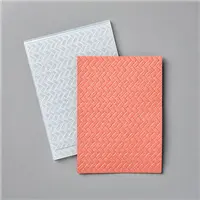
I die cut the piece first and then embossed it with the Wrapped In Texture 3D Embossing Folder. There are two in the package and this is the “less tight” texture one.
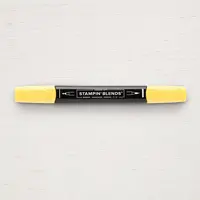
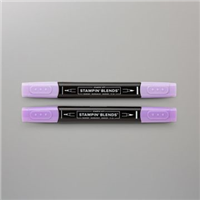
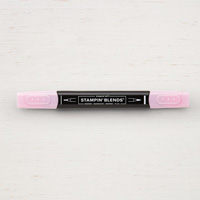
I cut my Whisper White to fit inside the shapes of the topper and stamped the sentiment and the floral. I colored the floral with Stampin’ Blends. The idea I had for it sticking up is like from a place card holder. I marked where the top of the topper hit on the Whisper White and then fussy cut just the upper section. I like the look of this.
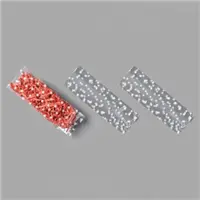
The sentiment and the floral are from the bundle, the Celebration Tidings Stamp set. There are a variety of sentiments included. The cello bag is actually 3 X 9 in size. So I just cut off about 3″ from the top and folded it over. When I was looking for a treat to use, I ran across a bag of these hand sanitizer that I bought “who knows when” to use in projects. I wish I had found them sooner! LOL!!!
Thank you for stopping by today. I hope you have an enjoyable weekend and will check back on Monday for another new project. And don’t forget about bonus days! Read below. Also if you do not have a current demonstrator I would love to assist you with your Stampin’ Up! products and send you the upcoming Mini Catalog. It debuts in August.
Bonus Days is back and that means it’s time for you to start earning coupon codes to redeem in August! If you need a refresher on this promotion, here’s how it works: For every $50 USD you spend 1 July–3 August 2020 (before shipping and tax), you earn a $5 USD Bonus Days coupon code that can be redeemed 4–31 August 2020. When you place a qualifying order, you will receive an email containing the code. SAVE the email!!! There is no way to retrieve it later. So print it and put it with your catalog or on your calendar to redeem in August. There is no limit to the number of coupon codes you can get. WooHoo!
HOST CODE
My July Host Code is AHTQERJB. Please use this code for orders under $150.00. I will have a small perk for those with orders over $50.00
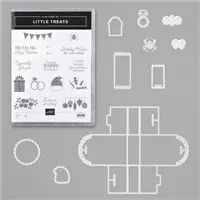
I have a new project to share today. And I am totally in Love with this bundle of products. Handing out little treats and Random Act of Kindness cards is a pleasure for me. This new bundle makes this So Easy!!! This is a Sneak Peek from the upcoming August – December Mini Catalog.
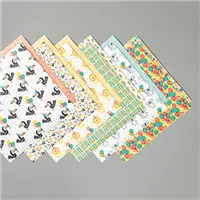
These cuties are made using the Little Treats Bundle. Aren’t they adorable? I used the 2020-2022 In Color Designer Series Paper. I am already in love with these new colors. What makes these extra special ,is that there are colors for feminine and masculine. They may be a tad on the “sweet” side for some guys, but Hey they contain chocolate!!
Here is a view of the inside:
These little holders will comfortably hold two Ghirardelli chocolates in regular size. I chose to go with two of the Mini Chirardelli chocolates. They fit just below the top of the little pocket, so it allows the top to pull together without a bit of a bump.
There is nothing extra that I needed to do to make these other than just run the die through the cutting machine. It cuts and scores, as well as has the little tab and slot on the pocket. No adhesive is needed at all for this little cutie. I used the ribbon with the bookmark type tie to hold the tops together.
The sentiment die is also included in the die set. I love the scallop with the stitching. The sentiment is included in the stamp set. There are sweet sayings for most occasions included in the set.
Thank you for stopping in today. If you do not currently have a demonstrator, I would love to assist you and get catalogs into your hands. Just reach out to me from the Contact Me button at the top of the page.
Bonus Days is back and that means it’s time for you to start earning coupon codes to redeem in August! If you need a refresher on this promotion, here’s how it works: For every $50 USD you spend 1 July–3 August 2020 (before shipping and tax), you earn a $5 USD Bonus Days coupon code that can be redeemed 4–31 August 2020. When you place a qualifying order, you will receive an email containing the code. SAVE the email!!! There is no way to retrieve it later. So print it and put it with your catalog or on your calendar to redeem in August. There is no limit to the number of coupon codes you can get. WooHoo!
HOST CODE
My July Host Code is AHTQERJB. Please use this code for orders under $150.00. I will have a small perk for those with orders over $50.00
I do not normally post on the weekends. But I had a cute idea that was appropriate to share for a little Easter project. I had the idea to use the Delightful Tag Topper Punch to make a little basket to hold 3 X 3 cards and envelopes. After I made it, I thought it would make an adorable Easter Basket. I did a video and hopefully you could make some of these for your little ones.
If you get my blog posts through an email, you may need to open it into a web browser to see the video. I haven’t got all of the kinks out of the process yet. They say practice makes perfect…..I sure hope so!!
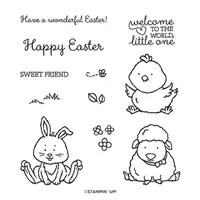
I decorated the basket with the Welcome Easter little chick stamp. I stamped it on a piece of Thick Whisper White card stock and die cut with the Stitched So Sweetly Dies. The chick is stamped a little above half way on the die cut. I used the design of the die , where you can see the chick’s top knot, as a line. I scored across there and then secured it to the bottom of the basket and to the side. You could also simply cut off that section and adhere the piece flush with the bottom of the basket.
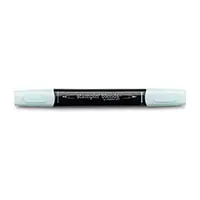
The chick is stamped in Gray Granite Ink and colored using the Stampin’ Blends. The yellow is both of the Daffodil Delight Blends. The feet and beak are colored with the Light Mango Melody Blend. I went around the chick with the Light Pool Party Blend.
The DSP is from the Dinoroar Designer Series Paper and is one of my famous “back side” of the paper. I have a tip in constructing the basket. Put the DSP on while the box is laying flat. I messed up in the video and forgot to do that!! Of course I would make a mistake 🙂
Here is a picture of the 3X3 holder that I made originally
I hope you can use this idea to spread some extra cheer this Easter. It will be different for all of us. Take care!!
HOST CODE
My April Host Code is HKP6K3Z4. Please use this code for orders under $150.00. I will have a small perk for those with orders over $50.00.
I have fallen into the not knowing what day it is. I have been working on projects the last few weeks and have several ready to go. They are just not blogged about. So sorry for being late on this early Monday morning.
I have had some different treats in mind for the sweet Printed Gusseted Cello Bags. These bags are adorable and are part of the Birthday Bonanza Suite of Products. A large variety of items will fit in them. For me it was all about the tag. Here is my Sweet Treat for you.
And here is a closer look at the tag.
This was a very quick project, which I love! But it is also great for leftover designer paper. I have used the Birthday Bonanza Designer Series Paper. For the flap, I used Terracotta Tile Card Stock to fold over the top of the bag and secured with a hand held stapler. Any desk stapler will do for this. I then layered a piece of the DSP over top of the card stock and secured it with multipurpose glue.
The tag is from the Bonanza Dies. I cut the tag itself from Thick Whisper White card stock. I placed a strip of the DSP ,that had been cut from sizing the flap layer, across the center of the tag. I used the dies to cut a sweet koala bear from the DSP and added him with some dimensionals.
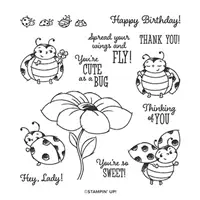
The sentiment is from the Little LadyBug stamp set from Sale-A-Bration. The word bubbles are from the Bonanza Dies as well.
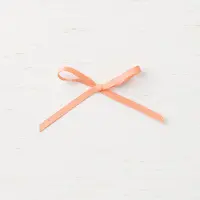
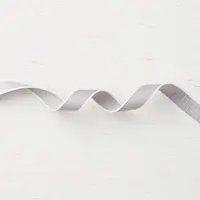
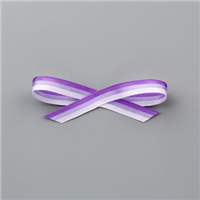
To finish the tag, I added Gray Granite Textile Weave Ribbon through the tag hole . I wanted a little extra, so added a piece of the Grapefruit Grove 1/8″ ribbon and tied a bow around the larger ribbon. The tag is secured to the bag topper with a couple of dimensionals. I thought the tag itself could be a cute little bookmark as well. I have used this tag previously and folded it for a gift tag. You can see that project HERE
Thank you for stopping in today. I hope you can smile from this cute little koala. I wish I could send one to all of you. As an old Stampin’ Up! stamp said “Keep Calm and Stamp On” !
HOST CODE
My April Host Code is HKP6K3Z4. Please use this code for orders under $150.00. I will have a small perk for those with orders over $50.00.
Welcome to InKing Royalty’s March Blog Hop! During this year’s blog hops, we are enjoying a year of celebrations. Hop, hop! This month’s projects celebrate Easter, so prepare yourself for a variety of gorgeous, Easter-themed projects. We are excited to share our creations with you today! After you read my post, I hope you’ll hop over to the next person on the list at the base of this post.
I have once again matched the color of the Hop Banner, without knowing ahead of time what it is. Hopefully that is a good sign for my projects I have to share. I rarely do two projects, but I have broken that today.
First here is my card for the Easter theme.
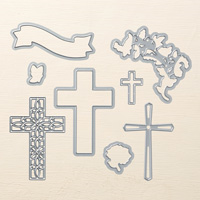
I paired the Cross of Hope Dies, from the Annual Catalog, with the Welcome Easter stamp set . I really love that particular cross from the dies. Those dies are definitely a keeper. My color choices for the card along with the bunny and lamb, come from childhood memories. My Mom loved any shade of purple. So all of my Easter dresses growing up, at least while I was younger, were shades of purple. I knew that had to be the base of my Easter card.
My second project is a little variation of a recent project from The Paper Pixie. Julie’s Easter Mini Gift Bag, you can see her post HERE, was my idea for an Easter basket. The only problem was I didn’t have candy that fit that size. However, I found something that fit perfectly without shortening the size of the basket, which is now a bag.
Can you tell what is inside? Yes, it is a Bath & Body Hand Sanitizer. I know they cannot be found right now. But as a crafter, I had several in my craft room for projects. Now you know that they fit perfectly inside this bag.
I used the Coastal Weave embossing folder and the card stock measurements Julie gives fit perfectly inside the embossing folder. The handle I is the Braided Linen Trim. I have included in my supply list the items used for both projects.
Thank you for stopping by today. I hope you’ll hop along to the next stop on the blog hop, Ann Murray at Murray Stamps Ink. There’s lots of inspiration to be found in this group – and you don’t want to miss it!
Thank you for hopping along with us. If you get stuck during the Blog Hop, please use this line-up as a guide:
My March Host Code is YZH2VG6Y. Please use this code for orders under $150.00. I will have a small perk for those with orders over $50.00.
Join Promotion …… The Ultimate Shopping Spree !!
The Ultimate Bundle is the Stampin’ Up! Starter Kit. During Sale-A-Bration you get the extra value for your $99.00. If you have a wish list or are ready to place an order and it totals close to 99.00, please read this first.
There is NO OBLIGATIONS to do anything beyond ordering the kit. You pay $99.00 + tax and receive $125.00 of your choice of products + any stamp set from the annual or mini catalog (the most expensive one is the Well Said set with a $45.00 price) + the Mini Paper Cutter, a $26.50 value + the 6X6 DSP sampler pack (48 sheets of DSP) an $11.50 value + a Paper Pumpkin Kit with a value of $22.00 + FREE Shipping which is usually 10% of the order and would add another $23.00 value here. This equals over $230.00 value + business supplies added in at no cost. That is an awesome deal!! And you never have to purchase another thing. But while you are trying it out, and you have until the end of July before your trial period runs out, you are part of my Team! As well as my upline’s team. We have Facebook groups to share our projects and assist each other. I would love to talk with you about this opportunity.
For today’s project I am channeling my friend Julie DiMatteo , The Paper Pixie. I have put my spin on her adorable 3 X 3 card box.
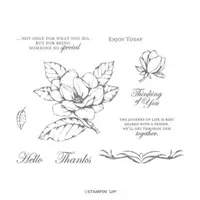
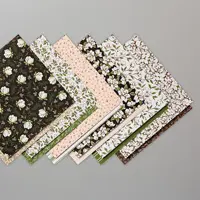
For my box, I used the Good Morning Magnolia stamp set and matching Magnolia Lane Designer Series Paper. Since Julie used dinosaurs for her box, it should look totally different ! LOL!!
And here it is with the lid off.
This is the link to Julie’s video on how to make the box. Click HERE. It is a super video, as always, and extremely easy to make.
My version of the box is made with the Magnolia Suite as I mentioned in the beginning. I paired it with colors from the DSP. I used Mossy Meadow as the box base. My circle layers are from the Layering Circles Dies. I used the same ones that Julie did in her video I believe.
The Magnolia Lane DSP has quite a bit of white to pair with the Mossy Meadow. It also has a hint of the Petal Pink. I stayed with those colors for the layers. I like the scalloped circle for the center, and the white shows up very well against the pink. I stamped the flower with the Petal Pink and then the sentiment over top with Mossy Meadow. The finishing touch was the Champagne Rhinestone, from the Mini Catalog, as the “O” in Today.
I will share with you tomorrow the matching cards I made for the inside. I stuck with the Magnolia theme. I have listed all of the products I used in the Supply List at the bottom of the page. Thank you for stopping in today. I hope you will come back to see the inside cards tomorrow.
REMINDER:
The Ultimate Bundle is the Stampin’ Up! Starter Kit. During Sale-A-Bration you get the extra value for your $99.00. If you have a wish list or are ready to place an order and it totals close to 99.00, please read this first.
There is NO OBLIGATIONS to do anything beyond ordering the kit. You pay $99.00 + tax and receive $125.00 of your choice of products + any stamp set from the annual or mini catalog (the most expensive one is the Well Said set with a $45.00 price) + the Mini Paper Cutter, a $26.50 value + the 6X6 DSP sampler pack (48 sheets of DSP) an $11.50 value + a Paper Pumpkin Kit with a value of $22.00 + FREE Shipping which is usually 10% of the order and would add another $23.00 value here. This equals over $230.00 value + business supplies added in at no cost. That is an awesome deal!! And you never have to purchase another thing. But while you are trying it out, and you have until the end of July before your trial period runs out, you are part of my Team! As well as my upline’s team. We have Facebook groups to share our projects and assist each other. I would love to talk with you about this opportunity.
HOST CODE
My February Host Code is 66YQVJQC. Please use this code for orders under $150.00. I will have a small perk for those with orders over $50.00.
The content in this blog is the sole responsibility of Jackie Beers as an Independent Stampin' Up! Demonstrator. The use of and content of classes, services or products offered is not endorsed by Stampin' Up!