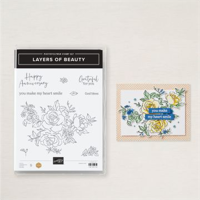
The new Layers of Beauty Bundle is one I am finding myself drawn to. Having not used stencils / masks before, I find these to be so easy to use. I think you will as well.
Stamps
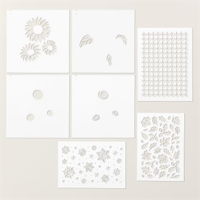
The Layers of Beauty Bundle includes the Stamp set, Dies, and 5 masks. On this card I did not utilize the Dies. I previously used the entire bundle. If you want to see it again you can click HERE. This card was created for a class and I wanted the focus to be on getting the blending done more than die cutting and layers. So I kept everything very simple.
The stamp set also includes a few special sentiments. This one is so sweet. If it looks familiar, I taped off the “for you” and only used the grateful on the Memorial Day card from Monday. You can see that card HERE.
Colors
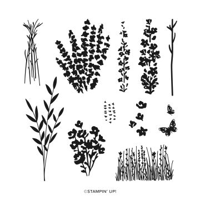
The lack of DSP is probably a shock to several of you. As I tend to use it on almost every card. But as I mentioned above, I wanted this card to be simple and all about creating the flowers. That said it took several colors to create these flowers. For me as a relatively new student of masks, I find it easier to stamp the outline of the image. This allows me to use the outline to aline the masks properly.
The first step was stamping the image with Memento Tuxedo Black Ink. Next came the first mask, and they are numbered clearly, using Fresh Freesia Ink. The second mask uses Petunia Pop Ink. And the third floral mask uses Berry Burst Ink. Then come the greenery. For the fourth mask I used Granny Apple Green and then finally Garden Green. The variation in colors does not need to be perfect. I love that it is lighter in some places than others. Nature is not perfectly even in colors either.
The card base is Berry Burst with Granny Apple Green as the layer. And to add a touch of bling, as always, I kept that simple as well. There is one of the large Basic Rhinestone Jewels.
Thank you for stopping in today!!! I hope you will give this bundle and masking / blending a try.
May Join Promotion
New demonstrators who join during the month of May will receive the following products in their Starter Kit at no additional cost:
2024–2026 In Color Classic Stampin’ Pad Bundle
2024–2026 In Color 8-1/2″ x 11″ (21.6 x 27.9 cm) Cardstock
2024–2026 In Color 6″ x 6″ (15.2 x 15.2 cm) Designer Series Paper
2024–2026 In Color Stampin’ Write Markers
HOST CODE
My MAY Host Code is 96AT2UNW. Please use this code for orders under $150.00. I will have a small gift for those with orders over $50.00 in addition to the Perk Rewards Program. You can read all of the information at the top of the page in the Menu Bar under SHOP / Perks.
Thank you for stopping by today. I hope you enjoyed today’s project and will come back. I do read and reply to all of the comments individually. They mean a lot to me. Please reach out if you have a question.
I have become obsessed with the Attention Shoppers Bundle. Today I have another similar with just one bag and a surprise gift inside.
Stamp Bundle
The Attention Shoppers Bundle has become a go to for me lately. I think I could make cards for a week or more using this bundle! In fact I made a similar card last week using the shopping bag. If you missed that one you can see it HERE.
The stamps used on this card are all from the stamp set, with one exception. The “background” of the bag is from the Wild Fern stamp set. That is stamped multiple times using Soft Sea Foam Ink. The bag is stamped onto 2024-2026 In Color Designer Series Paper and Die cut. The tissue paper is colored over with the Dark Summer Splash Stampin’ Blend to help hide the circles. Or at least downplay them. It was a quick and easy way to only stamp one time and still have the DSP.
The bottle of bubbly was also stamped and colored using Stampin’ Blends. And the sentiment is from the stamp set also. It is stamped using Memento Tuxedo Black Ink. I love the boldness of these words and the mixed size and font. Both the bottle and gift bag have matching dies to cut them out.
Layers
To keep this a quick card, I went with Thick Basic White card stock as the base and a layer of Summer Splash to tie into the bag. This color is becoming a quick favorite of the new In Colors. I still think Petunia Pop is number one, but this is edging closer every time I use it! The layer of Summer Splash plays perfectly with the gift bag.
Surprises and Finishes
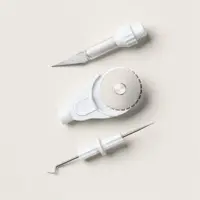
The surprise to this bag is the bottle of bubbly. When this set was demonstrated for us at OnStage in Houston, the demonstrator did my surprise. Using the Take Your Pick Tool Crafter Tips, one of which is a craft blade, I cut a slit in the tissue paper. I pushed the bottle up through the slit from behind as it is wider at the bottom. And this trick gives a very realistic look with a simple technique. Another of the reasons this set is growing on me every day!
To keep the simplicity of the layout, I did not go overboard with the bling. I wanted the bag and sentiment to be the stars. So I restrained my normal zest with the bling and only added one piece. I chose the Summer Splash of the 2024-2026 Shimmer Gems.
Thank you for stopping in today!!!!
May Join Promotion
New demonstrators who join during the month of May will receive the following products in their Starter Kit at no additional cost:
2024–2026 In Color Classic Stampin’ Pad Bundle
2024–2026 In Color 8-1/2″ x 11″ (21.6 x 27.9 cm) Cardstock
2024–2026 In Color 6″ x 6″ (15.2 x 15.2 cm) Designer Series Paper
2024–2026 In Color Stampin’ Write Markers
HOST CODE
My MAY Host Code is 96AT2UNW. Please use this code for orders under $150.00. I will have a small gift for those with orders over $50.00 in addition to the Perk Rewards Program. You can read all of the information at the top of the page in the Menu Bar under SHOP / Perks.
Thank you for stopping by today. I hope you enjoyed today’s project and will come back. I do read and reply to all of the comments individually. They mean a lot to me. Please reach out if you have a question.
I have a stand up easel Birthday card to share today. It is a mix of stamp sets with the Wildly Flowering DSP. Plus it is a quick Fun Fold to try.
.
Card Views
Three card views begin with the standing easel. Next is the closed for mailing view. The top section would not lay flat. You should be seeing the blue card base at the top section as well. And then the totally opened inside so you can see the inside sentiment
Papers and Measurements
The paper is as much the star as the Fun Fold I believe. I was amazed, when I cut paper for my paper share, as I got to the Wildly Flowering Designer Series Paper. These sheets are fabulous. Part of it may be that they include my most favorite colors. But I think they are really special floral sheets. The paper I used is probably my favorite. Although they are difficult to choose in this package.
The card base is Misty Moonlight with a layer of Crumb Cake. And the layer to the focal piece is Mossy Meadow. The base layer is 4 1/4 X 11 and scored at 5 1/2 and 8 1/2. The Crumb Cake layers are 4 X 5 1/4 and the “stop” section is 4 X 2 1/2. For the front DSP it is cut 3 3/4 X 5 with the “stop” layer at 3 3/4 X 2 1/4. And the Basic White inside is 4 X 2 1/2 also.
To create the card, the largest section of the card base is flat on the table with the fold at the rear and the second fold standing up. Adhere the large front DSP to the large Crumb Cake. Then adhere the Crumb Cake to ONLY THE last small section. (from the 8 1/2 score line to the end) This allows the card to stand up. I used the butterfly as my “Stop” by adding Stampin’ Dimensionals. See how simple that is!
Stamps
There are a variety of stamp sets used on this card, mostly for the sentiments. The main set is the Spotlight On Nature stamp set. I used Stampin’ Write Markers in Mossy Meadow and Moody Mauve for the flowers. The butterfly is from this set as well. I stamped it in Early Espresso and colored with Misty Moonlight and Petunia Pop Stampin’ Blends.
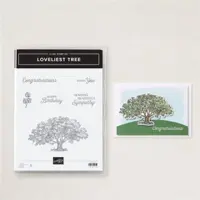
The front sentiment is from the Loveliest Tree stamp set. I wanted a simple Happy Birthday and this fit perfectly. The inside sentiment is a favorite that I use often. It is from the So Sincere stamp set. This is a sentiment that is good for any happy occasion in my book.
Dies and Punches
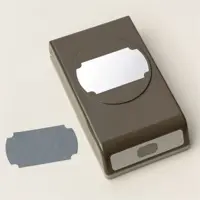
The detailed circles for the focal layer flowers are from the matching, and bundled, Spotlight On Nature Dies. These are now my go to for layering Circles. I love the choice of edging detail to choose from. And the sentiment was punched using the Happy Labels Punch. With so many of the punches retiring, I was thrilled that this one stayed. Those two sizes of scallops/ticket edge compliment almost anything.
Finishes
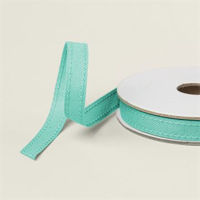
The finishes for this card were to add a bit of the Moody Mauve by way of the 2023-2025 In Color Jute Trim. I wrapped a couple of strands around just to have some texture and the color. To add a touch of bling, although it is not shiny bling, I used the Dappled Dots in a couple of places.
Thank you for stopping in today!!!
May Join Promotion
New demonstrators who join during the month of May will receive the following products in their Starter Kit at no additional cost:
2024–2026 In Color Classic Stampin’ Pad Bundle
2024–2026 In Color 8-1/2″ x 11″ (21.6 x 27.9 cm) Cardstock
2024–2026 In Color 6″ x 6″ (15.2 x 15.2 cm) Designer Series Paper
2024–2026 In Color Stampin’ Write Markers
HOST CODE
My MAY Host Code is 96AT2UNW. Please use this code for orders under $150.00. I will have a small gift for those with orders over $50.00 in addition to the Perk Rewards Program. You can read all of the information at the top of the page in the Menu Bar under SHOP / Perks.
Thank you for stopping by today. I hope you enjoyed today’s project and will come back. I do read and reply to all of the comments individually. They mean a lot to me. Please reach out if you have a question.
Happy Memorial Day!! And in honor of those who this day is for, I have a simple Gratitude card. My city holds a Memorial Day Parade every year. And my card sort of reflects the Hometown feel of that.
Stamps
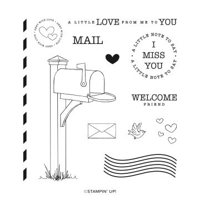
There is a real mix of stamp sets for this card. My first idea was for a flag. The only thing I could find was the Sending Love stamp set and the post mark wavy lines. I got creative and made a flag from that. I added the stars square and cut out just a section of the lines. My stars are dabs of White Craft Ink dotted on the blue with the tip of the smallest scoring ball from the Take Your Pick tool. It is not perfect, but I thought it was pretty good.
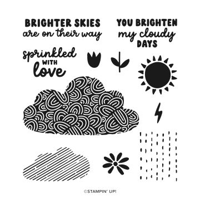
Then it was figuring out what to place the flag on. With the Sending Love set out, I thought why not a mailbox. And so the card was born. The mailbox is from the same set. I added flowers, sun, and clouds from the Bright Skies stamp set. And the Grateful is from the Layers of Beauty set. I masked of the “for you” which is underneath grateful, inked, removed the tape, and stamped only the one word. Not sure about you, but I always hold my breath for that stamping, afraid more than what I want will stamp!
Colors
The colors used are the traditional Red, White, and Blue. But with the added green grass and yellow sun. Real Red and Night of Navy are beautiful traditional colors and help this card to pop. And you know I love to color, so the red and blue mailbox was an easy choice for me.
Thank you for stopping in today! I hope you can have an enjoyable family and friends gathering.
May Join Promotion
New demonstrators who join during the month of May will receive the following products in their Starter Kit at no additional cost:
2024–2026 In Color Classic Stampin’ Pad Bundle
2024–2026 In Color 8-1/2″ x 11″ (21.6 x 27.9 cm) Cardstock
2024–2026 In Color 6″ x 6″ (15.2 x 15.2 cm) Designer Series Paper
2024–2026 In Color Stampin’ Write Markers
HOST CODE
My MAY Host Code is 96AT2UNW. Please use this code for orders under $150.00. I will have a small gift for those with orders over $50.00 in addition to the Perk Rewards Program. You can read all of the information at the top of the page in the Menu Bar under SHOP / Perks.
Thank you for stopping by today. I hope you enjoyed today’s project and will come back. I do read and reply to all of the comments individually. They mean a lot to me. Please reach out if you have a question.
I have a simple Fun Fold that is perfect for a 6X6 piece of DSP, and the Spotlight On Nature Dies. Actually it takes less than a 6X6 size. With Paper Shares having just gone out, this is a great use for new and older DSP. I believe we all have a stash of DSP!! LOL!!!
Paper
The Perennial Lavender Designer Series Paper has definitely been a favorite for me to use. I am partial to purples and this fits that bill for sure. But the mix of greens for the leaves are fabulous as well. Shaded Spruce, Lost Lagoon, Pretty Peacock, You cannot beat those colors and especially when mixed together. Plus the background of the papers is a lean towards Basic Beige and Crumb Cake. So either works well. For today’s card I went with Basic Beige as the card base and then layers of Basic Beige and Pretty Peacock. I have all of the measurements listed further down in the post.
Dies
The DSP is beautiful but the Dies may actually take the “spotlight” on this card. Did you catch the double meaning there? Spotlight On Nature Dies are what I used. They are layering circles that have a couple of different details around the edges. I chose to use all the same edge details. There are quite a few sizes and I simply layed out a few on top of each other to see what sizes I wanted to use. No heavy debating was used, just what seemed to fit. Here is a look at the open card and the large inside Die.
Stamps
The card is fairly simple but I did go a bit overboard on my sentiments. I have So Sincere and Loveliest Tree sentiments. The front Happy Birthday is from Loveliest Tree and the inside one is from So Sincere. Then to add yet another, I used the floral stamp from Painted Lavender for the front sentiment piece to add some of the purple flowers. Mixing and matching sentiments helps me get more use of my stamps. They do not always have to be used as a set. It took me a while to learn that!
Measurements
The Basic Beige card stock base is 4 1/4 X 5 1/2. And the DSP is 6 X 5 1/4 then scored at 2″. You need to decide ahead of time which side you want as the front flap before scoring. Especially f it is directional paper, you could end up with an upside down pattern. I did add a strip of Pretty Peacock at 1/2 X 5 1/4. But this could be a ribbon as well.
Thank you for stopping in today. I hope you have a fun and crafty weekend!
May Join Promotion
New demonstrators joining during the month of May will receive the following products in their Starter Kit at no additional cost. This is over $80.00 of additional products!!
2024–2026 In Color Classic Stampin’ Pad Bundle
2024–2026 In Color 8-1/2″ x 11″ (21.6 x 27.9 cm) Cardstock
2024–2026 In Color 6″ x 6″ (15.2 x 15.2 cm) Designer Series Paper
2024–2026 In Color Stampin’ Write Markers
HOST CODE
My MAY Host Code is 96AT2UNW. Please use this code for orders under $150.00. I will have a small gift for those with orders over $50.00 in addition to the Perk Rewards Program. You can read all of the information at the top of the page in the Menu Bar under SHOP / Perks.
Thank you for stopping by today. I hope you enjoyed today’s project and will come back. I do read and reply to all of the comments individually. They mean a lot to me. Please reach out if you have a question.
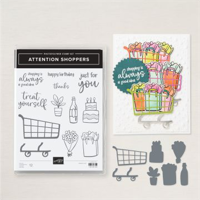
I have a quick card showcasing the Attention Shoppers Bundle. This is such a fun set and has pieces that can be used for almost any occasion. I have added some paper piecing to my card, but it is a really simple layout still.
Stamps
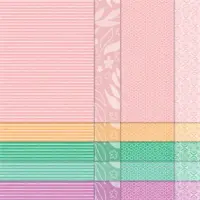
The stamps used are all from the Attention Shoppers set. There are some fun images as well as great sentiments. This sentiment is so perfect!! And the shopping bags can be made and used in a variety of ways. I stamped them onto the 2024-2026 In Color DSP in Shy Shamrock and Summer Splash. Plus I stamped the upper half on a scrap of Basic White card stock. I went monochromatic with the colors and made the tissue the same color as the bags. To do that I colored the tissue paper and the handles and then fussy cut them. They are then layered over top of the bag stamped on the DSP. A pretty easy and simple way to add different tissue to the bags.
Papers
The 2024-2026 In Color Designer Series Paper is an easy way to get coordinating bags in fun colors. I opted for the Summer Splash and Shy Shamrock to keep the green going. By using Thick Basic White as the card base and then a layer of Basic White, the card really pops with the bags and ribbon. I did add a scrap of Shy Shamrock as the background tag to help the tag stand out a little.
Extras
There are a few extras to help complete this card. First is the tag. This is the new Labeled With Love Punch. That stamp set gives you the choice of either a Die set or a Punch for the bundle. I opted for the punch. To help the tag stand out, I punched the sentiment and then punched a second one in Shy Shamrock. I then cut the Shy Shamrock tag in half. By adding the two halves just to each end, it helps ground the tag.
The colors used on the bags was also used for the ribbon and another focal point, and to ground the tag. I wrapped both Shy Shamrock and Summer Splash ribbon around the card and tied a knot. Again they really pop against the Basic White, And to finish, I added a trio of the 2024-2026 In Color Shimmer Gems. I used both of the greens once again with the gems.
Thank you for visiting today!!!
May Join Promotion
New demonstrators who join during the month of May will receive the following products in their Starter Kit at no additional cost:
2024–2026 In Color Classic Stampin’ Pad Bundle
2024–2026 In Color 8-1/2″ x 11″ (21.6 x 27.9 cm) Cardstock
2024–2026 In Color 6″ x 6″ (15.2 x 15.2 cm) Designer Series Paper
2024–2026 In Color Stampin’ Write Markers
HOST CODE
My MAY Host Code is 96AT2UNW. Please use this code for orders under $150.00. I will have a small gift for those with orders over $50.00 in addition to the Perk Rewards Program. You can read all of the information at the top of the page in the Menu Bar under SHOP / Perks.
Thank you for stopping by today. I hope you enjoyed today’s project and will come back. I do read and reply to all of the comments individually. They mean a lot to me. Please reach out if you have a question.
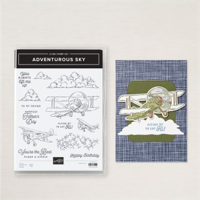
My card today stars the new Take To The Sky Suite of products. It is on page 37 of the Annual Catalog. I loved the samples shown at OnStage but was hesitant to get the set. Would I really use it. I have to say the answer to that is a definite YES. This is an awesome suite!
Paper
The paper is really the star of this card. It is the most used and a variety of the pieces are used, so I had to begin here. First the airplane is fussy cut from a piece of the DSP. All of the DSP is from the Take To The Sky Designer Series Paper. There are planes, clouds, scenery, and then sort of industrial on the opposite sides. The two pieces you see as the layer are both sides of one piece. I cut a 3 5/8 X 4 7/8 piece and then cut 2″ off the top. The clouds are the 2″ piece. Then I flipped over to the other side for the Gray Granite grid.
The card base and the tag are both Boho Blue. This is my favorite of all of the beautiful blues we carry. It reminds me of a Country Blue. I think it is the perfect color to pair with an airplane. The layer of Basic White was to break up things a bit and to help the grid of the bottom DSP to pop a little more.
Stamps
The Happy Birthday is from the Adventurous Sky stamp set. There are several great sentiments but I needed one for a birthday and it fit the best on my tag. 🙂 I stamped on a scrap of Basic White then cut one side straight to fit the edge. The other was angled. Then I decided that it needed a backing. And Gray Granite seemed a great fit as it is in the grid design. There were no precise cuts here, just eyeballing. I apologize to those of you who like exact measurements. For the inside I used another sentiment that says “You’re The Best Plane & Simple”. Isn’t that perfect for an airplane suite!
Tag and Embossing
The tag seemed the right addition for this card. It holds the little airplane and helps it to stand out a bit. Plus it could be used as a bookmark or even a gift tag as well. This tag Die is from the Merriest Trees Dies. I love the size of it.
To give the tag some added dimension, I embossed it. The new So Swirly 3D Embossing Folder is wonderful. These swirls would work for a variety of scenes, like air or waves. Plus it is simply different and very pretty.
Finishes
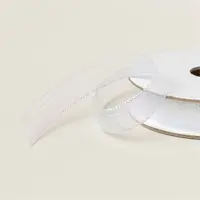
To complete the tag, I added some of the Iridescent Striped Trim. Even though this is 1/2″ wide, it is very soft and flexible. So no problems with using it as a tag pull. To complete the tag, I used the Industrial Trinkets that are part of the Take To The Sky Suite. They are fairly thick and fit a glue dot perfectly on the base to adhere them. I am not mailing this card so no worries on the thickness. But you might want to keep that in mind. And it would be ok except that I had raised the tag as well.
Thank you for stopping by today!!
May Join Promotion
New demonstrators who join during the month of May will receive the following products in their Starter Kit at no additional cost:
2024–2026 In Color Classic Stampin’ Pad Bundle
2024–2026 In Color 8-1/2″ x 11″ (21.6 x 27.9 cm) Cardstock
2024–2026 In Color 6″ x 6″ (15.2 x 15.2 cm) Designer Series Paper
2024–2026 In Color Stampin’ Write Markers
HOST CODE
My MAY Host Code is 96AT2UNW. Please use this code for orders under $150.00. I will have a small gift for those with orders over $50.00 in addition to the Perk Rewards Program. You can read all of the information at the top of the page in the Menu Bar under SHOP / Perks.
Thank you for stopping by today. I hope you enjoyed today’s project and will come back. I do read and reply to all of the comments individually. They mean a lot to me. Please reach out if you have a question.
Today is Free Shipping!!! I will probably have already placed my order by the time you are reading this. Free Shipping can save enough for an extra pack of DSP.
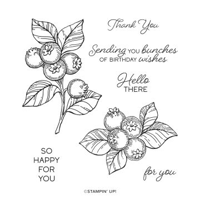
Today’s card is a Fun Fold featuring the Blueberry Bunches stamp set. This set carried over and I love it. It is an easy set to work with and to color.
Stamp Set
The Blueberry Bunches set contains two different bunches of blueberries. This is the smaller bunch. The other also has a stem attached. I wanted this one to go across the front of the card, so opted for the smaller ones. The berries are stamped using Memento Tuxedo Black Ink and then colored with Stampin’ Blends. I used Boho Blue, Balmy Blue and Night of Navy on the berries. And Granny Apple Green was used for the leaves. The inside sentiment is also from the set. I think it is just right on the “sweetness” level!
Papers
The beautiful tile DSP is from the Mediterranean Blooms Designer Series Paper. Each of the sheets has citrus plants on one side and different blue tiles on the other. I chose to go with the blue tiles for today. The card base is Night of Navy. For the inside card, I used a Basic White half card that I cut down just a little. At the 4″ wide it made the card to “full” and difficult to keep closed. You can see from the second view that I edged it over to the right more than the left. This keeps the closed borders equal.
Finishes
There is no sentiment on the front of this card. I was being a little different. But it needed a bit of something extra. So I added a bow wrapped around the blueberry layer made with the Iridescent Striped Trim. This is a great ribbon to work with and adds shine! For the final touch my Bling is blue to match the card. These are from the new Opal Rounds.
Measurements
The card base is 6 1/4 X 5 1/2, scored at 2″ on the 6 1/4″ side. For the inside card the Basic White is cut to 3 3/4 X 11 and folded at 5 1/4. It is placed towards the outer edge to keep the borders even with the card closed. The front DSP is 1 3/4 X 5 1/4. I totally covered the inside White card so the DSP is cut 3 3/4 X 5 1/4. I failed to measure the White on the blueberries. But the Night of Navy base is 4 7/8 in width. It goes from the DSP on the flap to the right edge DSP. The height can be adjusted to fit your choice of focal image.
Thank you for stopping by today!!
May Join Promotion
New demonstrators who join during the month of May will receive the following products in their Starter Kit at no additional cost:
2024–2026 In Color Classic Stampin’ Pad Bundle
2024–2026 In Color 8-1/2″ x 11″ (21.6 x 27.9 cm) Cardstock
2024–2026 In Color 6″ x 6″ (15.2 x 15.2 cm) Designer Series Paper
2024–2026 In Color Stampin’ Write Markers
HOST CODE
My MAY Host Code is 96AT2UNW. Please use this code for orders under $150.00. I will have a small gift for those with orders over $50.00 in addition to the Perk Rewards Program. You can read all of the information at the top of the page in the Menu Bar under SHOP / Perks.
Thank you for stopping by today. I hope you enjoyed today’s project and will come back. I do read and reply to all of the comments individually. They mean a lot to me. Please reach out if you have a question.
I wanted to remind you all that tomorrow is Free Shipping day!! Woohoo!!
I have my order ready to go. If you have a Wish List (and who doesn’t!) bring it out and see what can be crossed off that list.
May Join Promotion
New demonstrators who join during the month of May will receive the following products in their Starter Kit at no additional cost:
2024–2026 In Color Classic Stampin’ Pad Bundle
2024–2026 In Color 8-1/2″ x 11″ (21.6 x 27.9 cm) Cardstock
2024–2026 In Color 6″ x 6″ (15.2 x 15.2 cm) Designer Series Paper
2024–2026 In Color Stampin’ Write Markers
HOST CODE
My MAY Host Code is 96AT2UNW. Please use this code for orders under $150.00. I will have a small gift for those with orders over $50.00 in addition to the Perk Rewards Program. You can read all of the information at the top of the page in the Menu Bar under SHOP / Perks.
Thank you for stopping by today. I hope you enjoyed today’s project and will come back. I do read and reply to all of the comments individually. They mean a lot to me. Please reach out if you have a question.
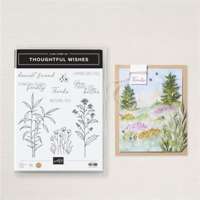
The card I have today is one I cased from a stamped focal point card I saw. To CASE is to take the idea and make it your own. That is what I did with the Thoughtful Journey DSP. This paper is so fabulous!! I hope you get as excited as I did.
*** In case you missed yesterday’s post including printables of all of the DSP and Punches in the Annual Catalog, I have them listed again at the bottom of the post.
Papers
The focal layer looks like a painting to me. And it probably is as it came from the Stampin’ Up! artists and they do paint some of our papers. Whatever the origin of this piece is, I am thankful and love it. The Thoughtful Journey Designer Series Paper is a 6 X 6 pack. To spread the paper as far as possible, I made this focal piece a 3 X 3. That way I can get four cards from one 6 X 6 piece. And I pulled the last color I saw in the paper as the, now I think perfect piece, which is Wild Wheat for the background.
The card base is Lost Lagoon, which is also in the DSP. Even though I see a lot of cards with the same color as the layer, I rarely do that. But for this one it just called to me. Except I went a step further and embossed it for more texture and to help it stand out a bit. I used the Exposed Brick 3D Embossing Folder
Stamp
To not detract from the scene, I almost did not add a front sentiment. However I found this small and delicate looking Thanks included in the Thoughtful Wishes stamp set. The set is a match to the DSP and also has matching Dies. To keep things small I stamped on Very Vanilla and then fussy cut the sentiment. It took the Mini Stampin’ Dimensionals to fit on the mini word. And tucking it over to the side was a great way to not detract from the scene.
Finishes
This card did not really require much of a finish so to speak. So I added a simple wrap of Linen Thread around the scene. It is wrapped a couple of times and secured on the back. I took a second double strand and simply tied a knot on the front. This adds a bit more texture without overwhelming anything. And the final touch is a small Bling! I added one of the smaller 2024-2026 In Color Shimmer Gems in Pretty In PInk. Just a soft pink touch to match the flower.
Click on each photo to get the complete PDF of paper or punches included in the Annual Catalog.
Free Shipping coming soon…..
May Join Promotion
New demonstrators who join during the month of May will receive the following products in their Starter Kit at no additional cost:
2024–2026 In Color Classic Stampin’ Pad Bundle
2024–2026 In Color 8-1/2″ x 11″ (21.6 x 27.9 cm) Cardstock
2024–2026 In Color 6″ x 6″ (15.2 x 15.2 cm) Designer Series Paper
2024–2026 In Color Stampin’ Write Markers
HOST CODE
My MAY Host Code is 96AT2UNW. Please use this code for orders under $150.00. I will have a small gift for those with orders over $50.00 in addition to the Perk Rewards Program. You can read all of the information at the top of the page in the Menu Bar under SHOP / Perks.
Thank you for stopping by today. I hope you enjoyed today’s project and will come back. I do read and reply to all of the comments individually. They mean a lot to me. Please reach out if you have a question.
The content in this blog is the sole responsibility of Jackie Beers as an Independent Stampin' Up! Demonstrator. The use of and content of classes, services or products offered is not endorsed by Stampin' Up!