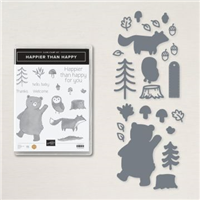
I have gone back to the Annual Catalog for some fun and non-holiday cards. Today’s is from the Happier Than Happy Bundle. It is a happy Thank you card!
Bundle
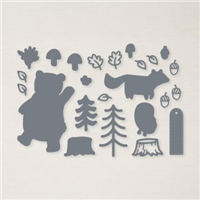
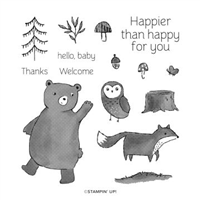
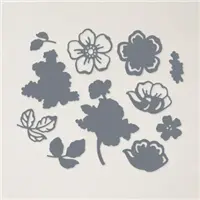
My original thought when starting this card was for a Happy card. This cute bear definitely gives off the Happy and Smile vibe I was looking for. And the fact he is part of a bundle with dies is a huge bonus. This is the Happier Than Happy Bundle that includes the Happy Forest Dies. I will say that my first opinions of this suite of products was that it was for children. But after seeing the pieces and playing with them, I totally changed that opinion. They make great SMILE cards!
The bear was stamped with Soft Suede ink and then die cut. He is raised using Stampin’ Dimensionals to give some depth to the card and make it look more like he walking in front of those cute flowers. And the sentiment frame is adorable! I have begun making a list of cute frames like this one to use with different sentiments. Sometimes I forget to look further than what I am currently working with and that is sad. So to finish this card I added the tag and sort of “attached” it to the bears hand with one of the Rustic Metallic Dots.
Paper
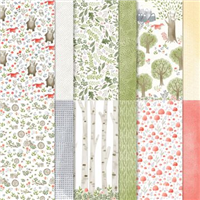
This paper is so pretty and saved me from having to decide on a stamped background. The little woodsy scene is perfect as is. And to compliment the color of the flowers, I went with a second sheet from the Happy Forest Friends Designer Series paper. I love the colors and the small hearts.
I hope you have an awesome weekend!
Birthday Organizer Kit
DETAILS
Kit includes one 8″ x 10″ (20.3 x 25.4 cm) monthly planner with space to record birthdays each month as well as a pocket sleeve to hold birthday cards.
Includes 12 full-size birthday cards, 6 of 2 designs, and 12 coordinating envelopes.
Includes Glue Dots, Stampin’ Dimensionals, Adhesive-Backed Embellishments, and Tear & Tape Adhesive
Includes die-cut florals and pieces ready for you to use—no prep work required!
Includes sticker sentiments and die-cut labels in Dutch, English, French, and German
My November Host Code is XUE6MDFV. Please use this code for orders under $150.00. I will have a small gift for those with orders over $50.00 in addition to the Perk Rewards Program. You can read all of the information at the top of the page in the Menu Bar under SHOP / Perks.
Thank you for stopping by today. I hope you enjoyed today’s project and will come back. I do read and reply to all of the comments individually. They mean a lot to me. Please reach out if you have a question.
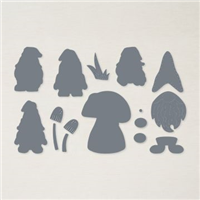
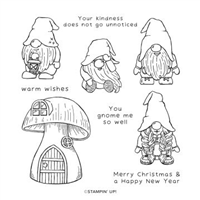
The Kindest Gnomes Bundle has grown on me since the Mini Catalog debuted. So today’s card is a CASE of the catalog to share how much fun these stamps are. Plus I just love to color!
Stamps and Dies
The Kindest Gnomes Bundle includes the stamp set and the Gnomes Dies. There are four images, the little house, and some sweet sentiments in the stamp set. The Die set includes some additional pieces for layering on the people for a 3D effect. My card is the more simple stamp, color, die cut. And I had so much fun coloring these images. As I mentioned at the top of the post, I cased page 43 of the Mini Catalog for this layout. My version is a little simpler though.
Additional Pieces
From doing the CASE of the catalog, I used the notebook look at the top of the Pear Pizzaz. This is from the Blossoming Happiness Dies. In the catalog they used the more regular round holed notebook look. My choice was the rectangle holes, but it is the same look. There needed to be something else besides my three images on the card. So I added a little brick walkway. It is probably not something you would see in the woods. But I loved how well it played against the Sweet Sorbet card and the red hair of the lady gnome.
The sentiment is from the stamp set and was the exact one I was looking for to thank a dear friend. But trying to find a place for it was a little difficult. In the end I placed it as it is now and was happy. By cutting the edge to match the Pear Pizzaz edge it almost looks like another pathway. And it is finished off with a 2022-2024 Matte Dot to match the blues in the coloring.
Starter Kit
Now is definitely the time to join my team and Stampin’ Up!. This is a great chance for you to give it a try, see into the background on being a demonstrator, and get quite a lot of merchandise for a wonderful price! I would love to talk with you about this opportunity!
HOST CODE
My October Host Code is R26UJTTW. Please use this code for orders under $150.00. I will have a small gift for those with orders over $50.00 in addition to the Perk Rewards Program. You can read all of the information at the top of the page in the Menu Bar under SHOP / Perks.
Thank you for stopping by today. I hope you enjoyed today’s project and will come back. I do read and reply to all of the comments individually. They mean a lot to me. Please reach out if you have a question.
Reminder that today is the day for FREE Shipping with qualifying orders. This is always a welcome event, and I am ordering supplies for my Christmas cards. It is time to get those cuties set up to make. And if you shop with me, you will earn 1 Blue Star Rewards for each $50.00 you spend. So a doubly good thing.
Today’s card is a Thank You that I made for a class. It is quick and easy with a little bit of gate fold to go with it.
Stamps
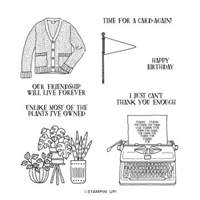
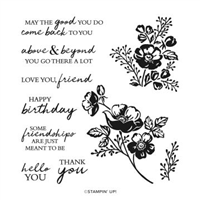
The Forever Friendship stamp set is a simple set that I love. It is a little bit on the “Pun” side, with fun images to go along with those sentiments. But this typewriter is my favorite. There is something about the simplicity, or maybe the old fashion idea, of a typed note. And the Thank You included in the image is perfect for me. It is a one stamp and done focal layer.
Background
For a bit of a different look, I used the Clear Block D inked with Soft Sea Foam ink to create the background for the typewriter. Personally I like the mottled look that this gives. And the imperfections of the image are fine for me. If you prefer a more solid look, you can add more ink with a sponge or blending brush. By stamping the image in Black, it still pops from the light green.
Papers
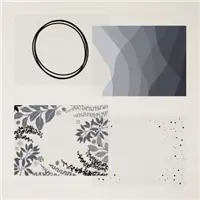
The card base is Bermuda Bay with a layer of Soft Sea Foam. These colors were pulled from the DSP. It is the Pretty Prints Designer Series Paper. This print is a soft mix of a few colors and is a calm print. There are other colors mixed in if my choices do not suit you.
Fold
The fold used on this card is an offset gate fold card. It is one that I use occasionally and in both portrait or horizontal layout. This one is the Bermuda Bay cut to 5 1/2 X 8 1/2 and scored at 1 1/2 and 5 3/4. You could score them equally, but I like the different sizes for this horizontal look.
The Soft Sea Foam layers are cut to 5 1/4 X 2 1/2 and 5 1/4 X 1 1/4. And the DSP layers are cut to 5 X 2 1/4 and 5 x 1. The focal layers are square with the Bermuda Bay being 3 3/8 X 3 3/8 and White at 3 1/4 X 3 1/4.
HOST CODE
My October Host Code is R26UJTTW. Please use this code for orders under $150.00. I will have a small gift for those with orders over $50.00 in addition to the Perk Rewards Program. You can read all of the information at the top of the page in the Menu Bar under SHOP / Perks.
Thank you for stopping by today. I hope you enjoyed today’s project and will come back. I do read and reply to all of the comments individually. They mean a lot to me. Please reach out if you have a question.
One of the main things I love about Stampin’ Up! is the friendships I have made. And the products are a close second. Today’s card is a fun and quirky way of saying Thank You and showing Love using one of the Funny and Whimsical stamp sets.
Stamps
This adorable typewriter is from the Forever Friendship stamp set. It has fun images with witty sentiments as well as this Thank You shared with Love in the shape of the heart. Here is a closer view of the typewriter.
Is that not the sweetest little included sentiment? Sadly the typewriter may seem antique to the younger generations now. (Maybe even to ones who are middle aged now! YIKES!!) Regardless, it is a fun image and a very sweet way of saying Thank You to someone.
Paper
If you noticed the paper the typewriter is stamped on is a bit darker than usual, that is because it is a piece of DSP. Sometimes I remember that it is OK to stamp on the DSP, and I always love the results. This is a piece from the Sun Prints Designer Series paper. As is the Navy and White speckled piece. Night of Navy and Basic White are a combination that you cannot go wrong with. They give a very crisp and clean look.
Dies and Embellishments
In place of a bit of bling or different embellishments, I used Dies and Ribbon for the Pop of extra on this card. The two heart Dies are from the Celebration Tags Die set. This is one that is so fun and handy to have. If you remember a card I did a few weeks ago with a gift card holder on the front, then you saw one of the tags. You can see that card HERE
In the second photo you can see the details on the White heart with the stitching on the inside. The larger blue one is the same, it just doesn’t show well in the photo. Layering the hearts was not quite enough of a finish when I realized I needed to add some Sahara Sand. Out came the Sahara Sand and Old Olive Ribbon Combo. These cotton ribbons make beautiful bows! So a small bow sandwiched between the two hearts was the finish. And they are not raised when applied to the card to keep them from being thicker than they already are. It could still be mailed easily if you are careful of the orientation of this layer when putting in the envelope.
Mini Catalog and Sale-A-Bration
Click on either catalog photo and you will be taken to my Online Store where you can download either or both catalogs.
HOST CODE
My August Host Code is H9KF4JUC. Please use this code for orders under $150.00. I will have a small gift for those with orders over $50.00 in addition to the Perk Rewards Program. You can read all of the information at the top of the page in the Menu Bar under SHOP / Perks.
Thank you for stopping by today. I hope you enjoyed today’s project and will come back. I do read and reply to all of the comments individually. They mean a lot to me. Please reach out if you have a question.
Thank You cards are always needed and today’s is a quick one. Using the Shaded Summer stamp and matching Die set it came together easily.
Colors
It is very unusual for me to say a color choice came from anywhere other than some designer paper. But today’s card color choice came from the stamp and me wanting a Red Rose! Then it became a pretty simple and quick card by stamping tone on tone for the base. Which is another unusual technique for me because I tend to have a few layers. But today’s card is mostly Sweet Sorbet all the way!
Stamps
The stamp set for this sweet flower, I believe it is a rose???, is the Shaded Summer stamp set. The Tone On Tone was done using Sweet Sorbet Ink on the Sweet Sorbet card base using the smaller flower stamp. Then using the larger one I stamped on a scrap of White and fussy cut only the flower. With not wanting the card totally one color, I opted for stamping the large image using Pale Papaya. The softness blends well with the Sweet Sorbet, even if it is not a green as expected.
Adding the sentiment took a bit of thought. In trying something different, I stamped the sentiment and then did a bit of fussy cutting around it. Most of the edges are straight lines, but I did go around the Y and u on each end.
Dies and Vellum
A matching Die set for the Shaded Summer stamp set is the Summer Shadow Dies. They are not a bundle however. The dies were released as a special edition last year and then added to the Annual Catalog in June. Personally I was thrilled because dies for flowers are awesome! So the large Pale Papaya flower was Die cut and then the fussy cut Sweet Sorbet flower was layered in to place.
The second Die is the Deckled Rectangles Dies. It was used on the Vellum layer. And it may be a bit difficult to see in the photo, but is very noticeable in person. The Third largest die was used for this piece. Lovely Layers Vellum is a package of Layer Sized pieces of vellum. Some are printed and most are the same as I used.
Finishes
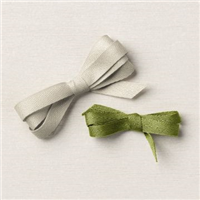
To give the card a bit of bling and shine, there are three different elements. First is the Wink of Stella on the red flower. That leaves a very subtle bit of shine. Secondly is the beautiful Sweet Sorbet Metallic Ribbon bow. This ribbon is available in all of the new In Colors and is a dream to tie bows with. And the metallic shine is a perfect touch. Finally there are three of the 2021-2023 Opals in the Pale Papaya scattered around.
Mini Catalog and Sale-A-Bration
Click on either catalog photo and you will be taken to my Online Store where you can download either or both catalogs.
HOST CODE
My August Host Code is H9KF4JUC. Please use this code for orders under $150.00. I will have a small gift for those with orders over $50.00 in addition to the Perk Rewards Program. You can read all of the information at the top of the page in the Menu Bar under SHOP / Perks.
Thank you for stopping by today. I hope you enjoyed today’s project and will come back. I do read and reply to all of the comments individually. They mean a lot to me. Please reach out if you have a question.
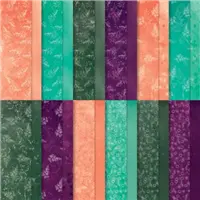
The card I am sharing today is based on a leftover die cut piece from a class. It stars the Texture Chic Designer Series paper. That paper is so beautiful!
Paper
You may remember this piece of the gorgeous Texture Chic Designer Series Paper from a previous card. It was used in a similar layout then. One extra piece remained after I did the die cutting to get the maximum amount of these from one piece of DSP for the class. For sure this is not a piece of paper that I wanted to waste! My favorite part of the paper are the images on it. There is no need for us to stamp on it, because Stampin’ Up! has done that for us. What a great reminder that we can stamp on the DSP!
The Petal Pink and Soft Suede were pulled from the DSP piece. They create a great base for the more colorful layer. And tearing the edge of the middle layer adds detail without having to really do anything. But always remember to tear towards you on all sides to get the similar look.
Dies
The “notebook edge” die is actually the only one I used and is from the Blossoming Happiness Dies. For me this single die is almost worth the Die set! Truthfully, there are great dies in that set, it is simply a favorite for now. Plus it adds quite a lot of detail and flexibility by bending and giving it the worn look. But is just as pretty if left flat.
Stamps
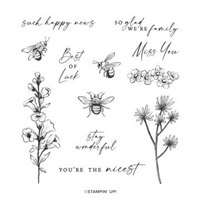
Similar to the single die, there is only a single stamp used on the front of the card. The You’re The Nicest is from the Honeybee Home stamp set. A bee from the set was intended, but was canceled at the last minute. Instead I went with the Brushed Brass Butterfly to embellish the sentiment. That strip is stamped and then angle cut using my Paper Snips. There was nothing fancy in that.
Mini Catalog and Sale-A-Bration
Click on either catalog photo and you will be taken to my Online Store where you can download either or both catalogs.
HOST CODE
My July Host Code is ZMG9Q7EX. Please use this code for orders under $150.00. I will have a small gift for those with orders over $50.00 in addition to the Perk Rewards Program. You can read all of the information at the top of the page in the Menu Bar under SHOP / Perks.
Thank you for stopping by today. I hope you enjoyed today’s project and will come back. I do read and reply to all of the comments individually. They mean a lot to me. Please reach out if you have a question.
The content in this blog is the sole responsibility of Jackie Beers as an Independent Stampin' Up! Demonstrator. The use of and content of classes, services or products offered is not endorsed by Stampin' Up!