Yesterday’s card was a fun tag card and today I have the companion tag. While cutting the snow globes from the Snowy Scenes Designer Series Paper, I cut a couple of them. They are a great beginning to a card, or a sweet Gift Tag. But today I have used it for another card.
STAMPS
The Snowy Wonder stamp set has great pieces for a number of fun cards. I love the “Let It Snow” stamp with the mix of fonts. That and the different size snowflakes are the only ones I used for today. But the little penguin and snowman are really cute.
PAPERS
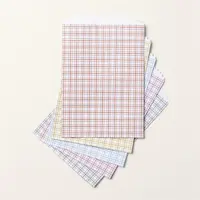
The papers are the star of the show once again. The Snowy Scenes Designer Series Paper is what the snow globe is cut from. This is the same as yesterday’s card and snow globe. I love the orange base on this one. It is a surprising color for a Christmas card, but after adding the Pumpkin Pie sentiment, it really works!
The background is another sheet from the same Snowy Scenes DSP. That led to the extra snow on the tag. And the strip of green DSP is from the Take A Bow Designer Series Paper. This one is another of the scraps from cleaning off my desk the other day. LOL!! Once again, it worked perfectly as a grounding for my snow globe.
EXTRAS
The tag is again from the Merriest Trees Dies. I truly love this Die set. And the stamp set is pretty great also. The ribbon is same as yesterday but just left original in Pool Party. And the final bling is the Regal Foiled Dots. A single one of the green was all that was needed.
Here is yesterday’s snow globe card so you have them together. Some easy cutting and you have these adorable snow globes without having to create them. Although you can from the Snowy Wonder Bundle.
HOST CODE
My DECEMBER Host Code is SAQE7VYU. Please use this code for orders under $150.00. I will have a small gift for those with orders over $50.00 in addition to the Perk Rewards Program. You can read all of the information at the top of the page in the Menu Bar under SHOP / Perks.
Thank you for stopping by today. I hope you enjoyed today’s project and will come back. I do read and reply to all of the comments individually. They mean a lot to me. Please reach out if you have a question.
Smile and Keep On Stamping,
Jackie
New Scrapbooking Catalog
The newest addition to Stampin’ Up! is an Online catalog of Scrapbooking products. You can see the catalog by clicking the photo below and save it to your computer.
Online Exclusives
New Online Exclusives have dropped. There are Halloween, Fall, Christmas, and many that are great year round. Of course the new Designer Series Papers and Embellishments are fabulous as well!
You can go directly to these in my Online Store by clicking HERE
I am still on a Christmas card roll again this week. I hope you are working on yours. Yesterday a radio person said it was 4 weeks until Christmas! Oh My that is soon.
The card I have for you includes a Tag. I got the idea from finding some gift tags I had made last year. Tags are actually pretty versatile but mine is attached to a card front today.
DIES
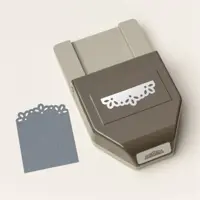
There are several products of equal “star” rating today. One of them is the tag. This perfect sized tag is a Die from the Merriest Trees Die set. This was a bundle that carried over to the Annual Catalog. Now the stamp set and matching Die set are not available as a bundled price. But are definitely worth having in your stash. The size of this tag makes it perfect for a card front as I have used it, and also as a gift tag. It is not going to get lost on the gift!
STAMPS
There are actually two different stamp sets used for this cute tag. The first is for the background trees. These are from the Snowy Wonder stamp set. The darkest one is full strength of Garden Green, the center one is stamped again, and the lightest is stamped a third time. All of them are from the one inking of the stamp. How cool is that!
The adorable little sentiment is from one of my favorite sets in the Mini Catalog. It is the Humble Home stamp set. This fun set, with the matching punch, is one that works year round. Personally I love the little hand written look of the sentiment. To help it match the other tag properties, I simply fussy cut square edges around it. It was really easy.
PAPERS
The papers used today are several. I began with the card base and tag as Thick Basic White cardstock. Then the holly layer of DSP is from the Snowy Scene Designer Series Paper. The small strip of polka dot paper to ground the snow globe is from the Take A Bow Designer Series Paper. This was from scraps left from my cutting for a card swap. I hate throwing away DSP strips!
The star of the tag is the snow globe. This piece is actually cut from the Snowy Scenes Designer Series Paper also. There are two different size snow globes on two different sheets included in the pack. This is one of the smaller ones. I thought the little penguin’s red ear muffs were the bright spot. And that is what prompted the background holly piece. And the little tree next to the penguin is what prompted the trees behind him. Since I usually say my cards begin with the DSP, this one was really lead by this little cut out snow globe.
EXTRAS
There must be bling on a card. However this one is a really busy card. So I had a tough time coming up with the bling. I finally decided on the Real Red & White Peppermint dot. It matched the colors perfectly and seem to go along with the cute penqin.
The idea of this card was partly from the Mini Catalog sample for this stamp set and papers. Then I noticed they showed coloring the Pool Party Pom Pom ribbon with a Stampin’ Write Marker. So I gave it a try to get the red with white pompoms. I used the Real Red marker and it came out quite a bit darker. It looks more like Cherry Cobbler. But I like it. Since the ribbon is a bit wider than I would usually use on a tag, I opted to simple tie a bow using White Bakers’ Twine. This comes in a multi pack of basic colors.
HOST CODE
My DECEMBER Host Code is SAQE7VYU. Please use this code for orders under $150.00. I will have a small gift for those with orders over $50.00 in addition to the Perk Rewards Program. You can read all of the information at the top of the page in the Menu Bar under SHOP / Perks.
Thank you for stopping by today. I hope you enjoyed today’s project and will come back. I do read and reply to all of the comments individually. They mean a lot to me. Please reach out if you have a question.
Smile and Keep On Stamping,
Jackie
New Scrapbooking Catalog
The newest addition to Stampin’ Up! is an Online catalog of Scrapbooking products. You can see the catalog by clicking the photo below and save it to your computer.
Online Exclusives
New Online Exclusives have dropped. There are Halloween, Fall, Christmas, and many that are great year round. Of course the new Designer Series Papers and Embellishments are fabulous as well!
You can go directly to these in my Online Store by clicking HERE
Today I have a Treat or Gift Bag to share with you. This is quick and easy. I used a variety of punches to make it faster and I really like the outcome.
Bag
Most of the work for this project is already done for you. This bag is from the 2023-2025 In Color Treat Bags. All of the new In Colors are represented in this package of bags. There are 25 bags included, 5 of each New In Color, for the reasonable price of $10.00.
To create my bag, I used the Paper Trimmer to make a slit across the bottom to open the bottom of the bag. I then cut up an inch from the bottom on each side. The last touch was to score at 1/2″ on each side all the way down the bag. By cutting and opening the bottom, I was able to create a flat bottom.
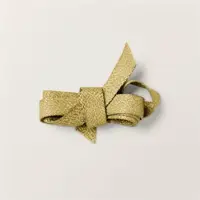
The ribbon is wrapped around the folded over top of the bag and secured in place with a glue dot. It will slip over the fold to open. The bow is made separately and also added with a couple of glue dots. They are strong and my go to for bow adhering!
Tag
This tag may be a bit more elegant than you would think for a guy. It has the filigree look at the top. But that is mostly covered and doesn’t really show all that much. I do love this new tag punch though! It is the Elegant Edge Punch. It will create a tag up to 2″ wide. That is the width of this one. And it is 3 1/2″ long.
The circles are made using the 1 3/4″ Circle Punch and the 2″ Circle Punch. I am so thrilled that Circle Punches are available again! Punches are so quick to grab when you need a simple layer. The stamp is from the He’s All That stamp set. I love the retro bus and it looks great in just one color.
Colors and Finishes
I chose to use the Copper Clay version of the Treat Bag, so made the tag in that color. As well as the stamped image. To add some contrast I turned to another of the New In Colors and went with Wild Wheat. The ribbon is really nice with just a touch of a sheen to it. And the circle layer fits perfectly. The finishing touch for Bling is a bit different. At least it is positioned differently. I used two of the 2023-2025 In Color Dots in Wild Wheat to cover the wheels on the van. That is a retro look that has returned. But we must have bling!
Thank you for stopping by today!!!
Designer Series Paper Sale! June 1-30
Click on the photo to see all of the available papers. If you are ready to order please click on the shop button in the menu and you will be taken to my online store! I also have a host code of 34QVEY4F that I would appreciate you using!
New Starter Kit opportunity for the month of June!
If you have a large Wish List, I would love to talk with you about the Starter Kit. It is the Ultimate Bundle!
Online exclusives are here to stay! Click on the photo and be taken directly to them in my online store. If you place an order, please use my Host Code listed just below.
HOST CODE
My June Host Code is 34QVEY4F. Please use this code for orders under $150.00. I will have a small gift for those with orders over $50.00 in addition to the Perk Rewards Program. You can read all of the information at the top of the page in the Menu Bar under SHOP / Perks.
Thank you for stopping by today. I hope you enjoyed today’s project and will come back. I do read and reply to all of the comments individually. They mean a lot to me. Please reach out if you have a question.
I hope you have taken advantage of the Clearance Rack Refresh as well as the Last Chance Sale for the Mini Catalog. There are some amazing deals in both places.
My project today is a package of Gift Tags, or Random Act of Kindness cards, using one of the Retiring products. It is the Decorated With Happiness set. This is a wonderful Bundle, and one that is less expensive purchased separately with the sale pricing.
Stamps
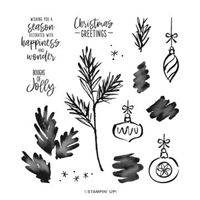
All of the stamps used on this project are from the Decorated With Happiness set. There are matching dies as I mentioned at the top of the post. However, I wanted to keep this as flat as possible. The bough is stamped and then the shadow stamped added. As is the two ornaments. For the sentiment I used the Layering Circles Dies and then turned it into the look of an ornament. To do that I drew a straight line for the hanger using the Sweet Sorbet Stampin’ Write Marker. And to finish that look I tied a bow using the In Color Baker’s Twine in Sweet Sorbet and White.
Cards
The 3 X 3 cards are made the same way as the front of the gift holder. Here is a view of one of those. They do not have the added layers of the sentiment though. I made a few with different ornaments but all done the same way. They each received a Festive Pearl in the center of the ornament for a touch of bling.
Directions for Card Holder
The front stamped layer is 4 X 3 3/4 to begin with. After doing the stamping I cut 1 1/8 off the top to fit over the flap. When adhering this layer, place the bottom section first and allow equal measures on the bottom and sides. Do this with the holder closed and the bottom section you are adhering will be flush against the bottom of the flap. Then add the top piece with it being flush with the bottom of the flap and equal on sides and top.
Here is an open view of the card holder.
This is a very simple card holder. It is another oldy but goody that I found when looking for something! That seems to happen fairly often. The holder begins with a piece of Garden Green card stock cut to 4 1/4 X 11. It is then scored at 1 1/4, 5 1/4, 6 1/4, and 7 1/4. Fold and burnish the score lines to create the mountain in the center .
For a closure, I used clear velcro dots. They were added after the front layer is adhered. You may have your own method for adding these. But I add the one under the flap first. I can place it towards the bottom of the flap and then with the second half attached simply close the flap on to the closed box. This ensures perfect placement.
I included 4 cards and envelopes and there is plenty of room.
HOST CODE
My December Host Code is Y7T7EMTC. Please use this code for orders under $150.00. I will have a small gift for those with orders over $50.00 in addition to the Perk Rewards Program. You can read all of the information at the top of the page in the Menu Bar under SHOP / Perks.
Thank you for stopping by today. I hope you enjoyed today’s project and will come back. I do read and reply to all of the comments individually. They mean a lot to me. Please reach out if you have a question.
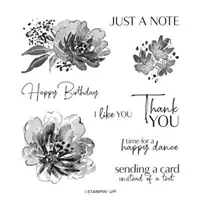
My project for today is a gift tag. Using Flowing Flowers stamp, Sports Event dies, Hearts, and Doilies make a quick and easy project. This one is for my customers who earned my Shopping Award with my Blue Star Perks. You can read about my Perks at the bottom where this month’s Host Code is located. And also the full information regarding my Perks is under the menu bar with Shop / Perks.
Stamps
The single stamp used on today’s tag is from the Flowing Flowers stamp set. All of the sentiments in this set have this type of Font. These are some of my favorite sentiments and partly because of the font style. It is stamped using Real Red Ink onto Basic White cardstock.
Punches
For me grabbing a punch is one of the quickest ways to make a card. I love all of the Stampin’ Up! punches. The hearts I have used here are a pair. They are the perfect size for quite a lot of the sentiments, or a small stamped image. Thankfully the smaller one was perfect for the Thank You!
Dies
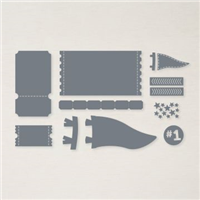
And the base of the tag is a die from the Sports Event Die set. They pair with the Your Biggest Fan stamp set. And they are part of the Hey Sports Fan Suite of products. So there are quite a lot of products they can work with. However, I didn’t use any of those products for my tag, except the tag itself. So now you can see another use for this Die set. Plus it is a perfect size!
Embellishments, etc.
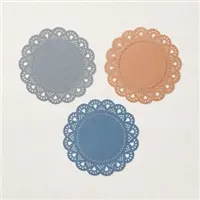
The doily is from the Heart & Home Doilies. There are three different colors in the package. And I chose the Misty Moonlight. The tag needed something besides more red. And I could add the Cotton Ribbon Combo of Misty Moonlight as well. Continuing the Misty Moonlight a bit further, I added one of the 2020-2022 In Color Gems . I love how all of these pieces make a quick tag. And they are not ones that you would normally think of as pairing.
SAVINGS ARE IN BLOOM
CLICK ON THE PHOTO FOR A VIEW OF ALL ITEMS DISCOUNTED
WAVES OF THE OCEAN SUITE …EARLY RELEASE
CLICK ON THE PHOTO TO SEE THE COMPLETE SUITE OF PRODUCTS
ALL TOGETHER … SPECIAL BUNDLE
CLICK ON THE PHOTO TO SEE ALL OF THE PRODUCTS
HOST CODE
My March Host Code is JGGHP66J. Please use this code for orders under $150.00. I will have a small gift for those with orders over $50.00 in addition to the Perk Rewards Program. You can read all of the information at the top of the page in the Menu Bar under SHOP / Perks.
Thank you for stopping by today. I hope you enjoyed today’s project and will come back. I do read and reply to all of the comments individually. They mean a lot to me. Please reach out if you have a question.
Before I get started on today’s project I wanted to tell you how Awesome the upcoming Mini Catalog is. As a Demonstrator, one of our perks is to get to do a Pre-order for the upcoming catalogs. I ordered way more than I should have. But that is the fun of stamping. And I will have the products to use and get the excitement going for the Catalog debut on August 3rd. If you would like to have this pre-order perk, lets talk about you joining my team!
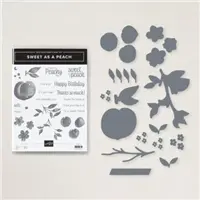
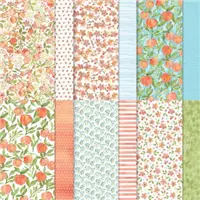
For today’s project I have decorated one of the Mini Paper Pumpkin boxes to hold a small gift and added a sweet gift tag. I used the Sweet as a Peach Bundle along with the You’re A Peach Designer Series Paper. TIP: This DSP is one of the ones on sale for the next month at 15% off!!
Sweet As A Peach
I love everything in this You’re A Peach Suite of products!!! I used the Sweet As A Peach Stamp Set to make the little tag. The branch with the flower are both from the stamp set. The flower itself is die cut using the Peach Dies. The “For You” is from the Pretty Perennials stamp set.
For the Mini Paper Pumpkin Box, (you can see them on page 137 of the Annual Catalog), I covered just the lid with the You’re A Peach Designer Series Paper. The DSP is layered on Balmy Blue cardstock. I think this sheet is my favorite from this DSP pack. I love the mix of colors on the flowers and the tiny blue flower. I chose the Balmy Blue as the stand out color and that it was what I used on the back tag for the Gift Tag.
The gift tag is cut using the Tailor Made Tags Dies. There are two different styles of tags with three sizes of each style. This is a great way to make a darling tag with minimal time and effort.
Finishing Touches
To secure the box, and because it is so pretty, I used the Petal Pink Organdy Ribbon. It is very easy to work with and I love the texture the ribbon has. The gift tag was added just above the bow by making a simple Linen Thread bow.
The layers of the gift tag are secured together with a glue dot, and are a bit offset from each other. The flower is adhered using a Stampin’ Dimensional. I added a single Rhinestone to the center of the sweet flower. It was a toss up to go with Bling or with a Black Matte Dot to match the flowers on the paper. Bling won out!
Designer Series Paper Sale
The papers included in the sale are shown just below. If your order is below $150.00, please use my host code with is below the paper. And for each $50.00 you spend, you earn a Reward perk from me.
The picture below shows the Designer Series Papers that are included in the Sale. There are 9 to choose from!!
HOST CODE
My July Host Code is 2GKGF4Q7. Please use this code for orders under $150.00. I will have a small gift for those with orders over $50.00 in addition to the Perk Rewards Program. You can read all of the information at the top of the page in the Menu Bar under SHOP / Perks.
Thank you for stopping by today. I hope you enjoyed today’s project and will come back. I do read and reply to all of the comments individually. They mean a lot to me. Please reach out if you have a question.
The content in this blog is the sole responsibility of Jackie Beers as an Independent Stampin' Up! Demonstrator. The use of and content of classes, services or products offered is not endorsed by Stampin' Up!