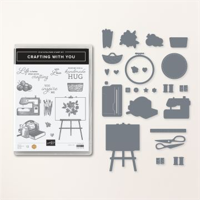
I was excited to find the Crafting With You stamp set has some unique images and sentiments especially for most crafters. The Masterfully Made DSP has the perfect paper to accompany the stamps.
Stamps
The variety of images included in the Crafting With You stamp set are amazing. There are stamps, a Cut & Emboss machine, paper trimmer, easel, yarn, etc. I believe there is something for almost any crafter. This card was made for my knitting and crocheting friends. The basket is stamped with Pecan Pie Ink and the yarn is Starry Sky Ink to match the card base.
Papers
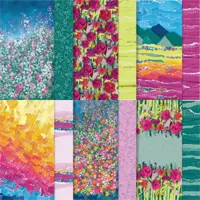
The Starry Sky card base was chosen for the bright color but also a color that yarn would be pretty in! Part of this card idea came when I saw the DSP piece. It looks like torn fabric. That along with the sentiment created the card. This pretty DSP is from the Masterfully Made Designer Series Paper. That pack is full of similarly beautiful pieces. And I love that the Lemon Lime Twist works wonderfully with the Starry Sky!
Layers
The card layers are the result of my Paper Share. This piece of DSP was a leftover piece. So I built the card around its size and landscape mode. The twine is a carryover to the Annual Catalog that I love, and was perfect for my theme. It is the Starry Sky Bakers Twine from the 2022-2024 In Color Twine pack. There is not a bow, just the twine wrapped around a few times to help anchor the sentiment.
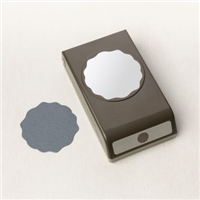
The sentiment was stamped on a piece of White card stock that had been punched using the Decorative Circle Punch. I actually did punch first so that with the stamp placement I had room for the basket of yarn at the bottom. And apparently I failed to add my Bling!!! I will add it before I send the card out. 🙂
Thank you for stopping by today!!!
Online exclusives are here to stay! Click on the photo and be taken directly to them in my online store. If you place an order, please use my Host Code listed just below.
HOST CODE
My May Host Code is K326G6VQ. Please use this code for orders under $150.00. I will have a small gift for those with orders over $50.00 in addition to the Perk Rewards Program. You can read all of the information at the top of the page in the Menu Bar under SHOP / Perks.
Thank you for stopping by today. I hope you enjoyed today’s project and will come back. I do read and reply to all of the comments individually. They mean a lot to me. Please reach out if you have a question.
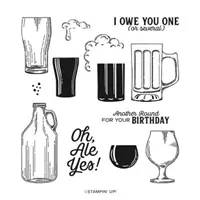
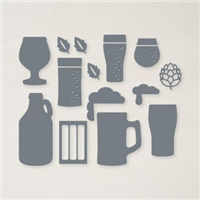
My card for today is a Masculine challenge card. After looking through my stamps I decided that beer and pretzels make a perfect masculine card.
Today’s card is for the Make My Monday Challenge Blog. Click on the badge below to see what the other designers have created for this theme. And you can also join the fun.
Stamps and Dies
I really do like this stamp set and was so happy when it carried over to the new Annual Catalog. Wether you like beer in a glass or mug, or even a glass of wine, this set has it all. I stamped the mug using Crumb Cake Ink and filled it with Daffodil Delight Ink. To finish the foam, I used the Daffodil Delight Light Stampin’ Blend.
The sentiment is also from the stamp set. That was probably a given due to what it says! LOL!! But I think it is perfect and can really have a lot of meaning with it. I think of it as a Thank You or Gratitude.
Papers
The end result has quite a bit more paper than I originally envisioned. The layers kept going with each piece I stamped. For the card base, I matched the Calypso Coral from the Pretzel paper. This piece is from the thick pack of Delightfully Eclectic Designer Series Paper. That pack has a piece that matches quite a few stamp sets in the catalog.
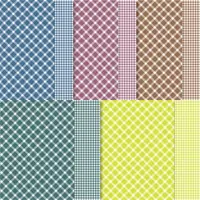
The gingham layer is from the Glorious Gingham 6X6 Designer Series Paper. This piece is the Pecan Pie color and is a really nice brown. As I made the layers for the sentiment and beer I went back to the Pecan Pie card stock. And even another piece of the Pecan Pie Glorious Gingham. I think of that layer as a coaster for the mug.
Finishes
I had a bit of difficulty placing the sentiment. Finally I decided that the angle was the way to go. It adds a bit of fun to the card and keeps the brown off of the gingham where it blends in somewhat. And the final touch was to add a few of the Lemon Lolly Adhesive Back Solid Gems. They are scattered around as another piece of the yellow.
Thank you for visiting today!!
Online exclusives are here to stay! Click on the photo and be taken directly to them in my online store. If you place an order, please use my Host Code listed just below.
HOST CODE
My May Host Code is K326G6VQ. Please use this code for orders under $150.00. I will have a small gift for those with orders over $50.00 in addition to the Perk Rewards Program. You can read all of the information at the top of the page in the Menu Bar under SHOP / Perks.
Thank you for stopping by today. I hope you enjoyed today’s project and will come back. I do read and reply to all of the comments individually. They mean a lot to me. Please reach out if you have a question.
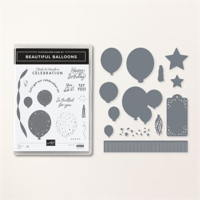
The Beautiful Balloons Bundle is a wonderful mix of fun and whimsy for anyone to appreciate. I have used it in a quick and fairly simple way to share today.
Stamps and Dies
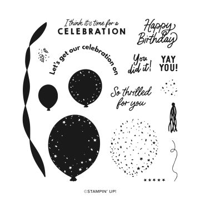
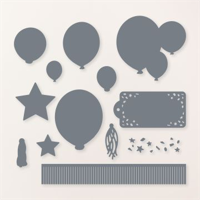
The Beautiful Balloons Bundle is a mix of balloons, streamers, and fun sentiments. And the matching Beautiful Balloons Dies are the same with some added features. I did not use these today, but there is a great tag, stars, and some fun surprises. For my card I used the two smaller balloons and stamped them on the White card stock with Parakeet Party Ink and Berry Burst Ink that had been stamped off first. I wanted a little softer look than the darker Berry Burst at full strength.
To create the sentiment balloon, I die cut the larger balloon from Parakeet Party card stock. For me having the die cut balloon made it easier to see where was best to place the sentiment. The sentiment is from the stamp set and is stamped using Memento Tuxedo Black Ink. I also stamped on the Berry Burst card base the small streamer stamp. It is stamped tone on tone. If you are unfamiliar with that term it is Berry Burst Ink stamped onto Berry Burst card stock. You can get a similar look using Versamark Ink. But the image is a little bit lighter than with the same color ink.
Papers
The gorgeous DSP piece of paper is from the Stargazing Designer Series Paper pack. It is the reverse side of one of the darker galaxy sheets. I loved the fun design that was also a tone on tone look. And it matched the Parakeet Party I used for the balloons. It was a pleasant surprise when I was trying to match a color to that piece that Berry Burst seemed to be the best option. I love bright colors, so I did not hesitate to give it a try.
Finishes
The finishing touches on this card are a little different, or at least one is. To create the tail of the balloon I turned to the 2022-2024 In Color Baker’s Twine. The Parakeet Party and White twine worked perfectly in matching my color theme. I simply looped a few strands of the twine back and forth and used a glue dot under the tip of the balloon to adhere the twine. Then all that was left was snipping the loops at the bottom to create the fringe. Last but not least I added a trio of the Adhesive Backed Sequins Trio. They seemed bright enough to compete with the other bright colors!
Thank you for stopping in today! I hope you have a wonderful weekend.
Online exclusives are here to stay! Click on the photo and be taken directly to them in my online store. If you place an order, please use my Host Code listed just below.
HOST CODE
My May Host Code is K326G6VQ. Please use this code for orders under $150.00. I will have a small gift for those with orders over $50.00 in addition to the Perk Rewards Program. You can read all of the information at the top of the page in the Menu Bar under SHOP / Perks.
Thank you for stopping by today. I hope you enjoyed today’s project and will come back. I do read and reply to all of the comments individually. They mean a lot to me. Please reach out if you have a question.
I am still playing catch up. But have a quick card to share with you. A friend asked me for some Thank You cards. I immediately thought of the Notecards and Envelopes. And paired that with the Inked & Tiled stamp set.
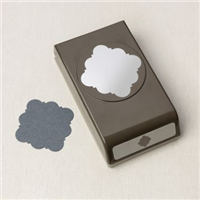
Stamps
The Inked & Tiled stamp set, and the Punch Bundle, was / is a favorite of mine at first sight. I love the punches, and the distressed look of the stamp set is wonderful. And with the New and Improved Stampin’ Write Markers I am loving the direct to rubber coloring! I colored the stamp with Calypso Coral and Lost Lagoon Stampin’ Write Markers before stamping. The markers are only available as a color family. But at times like this they are the perfect tool for the job.
The sentiment is from the Inked & Tiled set as well. It is added using Memento Tuxedo Black Ink. The simple Thank You is perfect. And it doesn’t detract from the flower.
Papers
The base card is the Basic White Notecards and Envelopes. They are a great bang for your buck and a perfect size. It is so easy to decorate these a little, or a lot. I went with the little decoration. From the Inked Botanicals Designer Series Paper I took a 1″ wide strip along the edge. We all have a lot of those strips, even in varying widths, that would work like this. I know I always have narrow strips leftover.
Finishes
My finishing touch is a scattering of bling. For this card I chose the Glossy Dots. I really love these and they are even better because they are almost flat! This makes it so easy to mail. They also fit more into a gift box or bag if gifting a set as I am here. Even if the color is not exact, the Stampin’ Up! colors all seem to work well regardless.
Thank you for stopping by today!!
Online exclusives are here to stay! Click on the photo and be taken directly to them in my online store. If you place an order, please use my Host Code listed just below.
HOST CODE
My May Host Code is K326G6VQ. Please use this code for orders under $150.00. I will have a small gift for those with orders over $50.00 in addition to the Perk Rewards Program. You can read all of the information at the top of the page in the Menu Bar under SHOP / Perks.
Thank you for stopping by today. I hope you enjoyed today’s project and will come back. I do read and reply to all of the comments individually. They mean a lot to me. Please reach out if you have a question.
I am so behind on cards! Life can get crazy sometimes as we all know. So I have a quick card to share with you today. It features one of the Fun stamp sets that I am drawn to always. The Just My Type stamp set is right up my alley.
Stamp Set
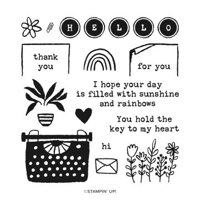
Those of you who know me, know that I love the fun stamp sets. This set is perfect for quick and easy cards. The little typewriter, stamped with Pebbled Path, is adorable and has two different types of “paper” to add on. I chose the one with the rolled edge. There are two simple sentiments that will fit on the papers. It was a debate but I always like For You as an option. If I a sending you a card, then it is For You! The addition of the Bubble Bath little heart was a perfect match.
Papers
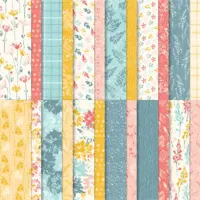
The DSP piece adds a bit of color and brightness to the Pebbled Path typewriter. I got several wonderful colors in this one partial sheet of paper. It is from the Bright & Beautiful Designer Series paper. The uneven spreading of the colors goes with my whimsical theme.
The Bubble Bath card base came after I stamped the heart with Bubble Bath Ink. I really like the softness against all of the more vibrant colors of the DSP. And just to tie in with the White area of the typewriter scene, I added a thin layer of Basic White behind the DSP.
Finishes
There really are no big add ons for this card. All I did was add a couple of the Adhesive Back Solid Gems in Boho Blue. They are placed on the keys of the typewriter. Actually they show up very well in person, but sort of fade in to the Pebbled Path in the photo. Surprisingly that is all I did for a finish! With mailing getting more difficult when we add dimensionals and bumps, I kept this one very flat.
Thank you for stopping in today!!
Don’t forget to check out the Online Exclusives!!!! Online exclusives are here to stay! Click on the photo and be taken directly to them in my online store. If you place an order, please use my Host Code listed just below.
HOST CODE
My May Host Code is K326G6VQ. Please use this code for orders under $150.00. I will have a small gift for those with orders over $50.00 in addition to the Perk Rewards Program. You can read all of the information at the top of the page in the Menu Bar under SHOP / Perks.
Thank you for stopping by today. I hope you enjoyed today’s project and will come back. I do read and reply to all of the comments individually. They mean a lot to me. Please reach out if you have a question.
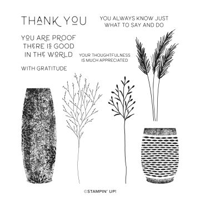
Today’s card is to showcase the Earthen Elegance Suite of products. Think copper glazed pottery and natural grasses. I love it!
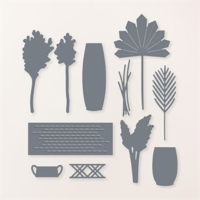
Bundle
The Earthen Textures Bundle is amazing! The stamp set is vases and flora along with some wonderful sentiments. And the Die set is the vases and flora with extra flora. Plus you get some trim for the vases. I stamped the left vase with Pebbled Path on Crumb Cake card stock. The right vase is just die cut from Pecan Pie card stock. But the detail is a die cut from Crumb Cake card stock.
The flora pieces are stamped with Moody Mauve and die cut for each vase. I added a detailed stem cut from Pretty Peacock card stock for some added height and texture. The sentiment is from the Timeless Arrangements stamp set and is stamped with Moody Mauve also.
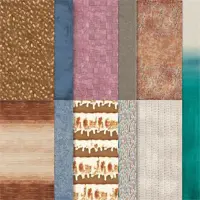
Papers
The paper choice took a sideways turn, but I love it even more. My plan was to use the DSP piece from Earthen Elegance Designer Series Paper that is the copper glaze look. It led to the Pecan Pie card base. The Pretty Peacock was chosen for a touch of color. And that I really am happy for it to be back in the Stampin’ Up! colors! So as I was going to glue the DSP piece to the Pretty Peacock layer I turned it over to add glue. That was the sideways moment. When I saw the opposite side of the paper my mind did a total shift. I had already completed all of the stamping and die cutting. And this piece of DSP fit so much better with my color choices. A win in my book!
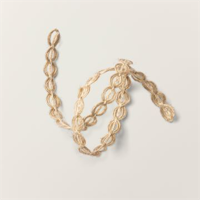
Finishes
There are a couple of finishing touches today. First is the Natural 1/4″ Wavy Trim. Oh My!!! I love the look of this and how much detail it adds to the card. And it was a perfect anchor for the sentiment. You know I need to add bling as well. So the debut of the 2023-2025 In Color Dots happens. I could not decide on which color worked best. A variety is fine in my book. These are one each of the Wild Wheat, Copper Clay, and Moody Mauve Dots.
Thank you for visiting today! I hope I have interested you in this fun Suite of products.
Online exclusives are here to stay! Click on the photo and be taken directly to them in my online store. If you place an order, please use my Host Code listed just below.
HOST CODE
My May Host Code is K326G6VQ. Please use this code for orders under $150.00. I will have a small gift for those with orders over $50.00 in addition to the Perk Rewards Program. You can read all of the information at the top of the page in the Menu Bar under SHOP / Perks.
Thank you for stopping by today. I hope you enjoyed today’s project and will come back. I do read and reply to all of the comments individually. They mean a lot to me. Please reach out if you have a question.
The content in this blog is the sole responsibility of Jackie Beers as an Independent Stampin' Up! Demonstrator. The use of and content of classes, services or products offered is not endorsed by Stampin' Up!