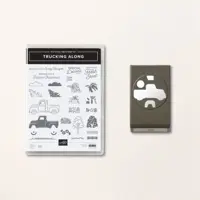
My post today stars the so very loved Trucking Along Bundle. It was so loved that it sold out twice. The stamp set is still available and the punch will be returning as quickly as is possible. So please do not give up on this fun set.
Stamp Bundle
This card originated with the layout. But I am going to begin with the fun part. All of the stamped images are from the Trucking Along stamp set.The Truck is stamped with Memento Tuxedo Black Ink and colored using the Lost Lagoon Stampin’ Blends. The addition of the flowers in the bed of the truck were stamped the same and colored with the Daffodil Delight and Old Olive Stampin’ Blends. This color struck a cord with me for the truck. In my High School parking lot there were probably a dozen trucks that were about that shade of green. Apparently it was a favorite truck color in the 70″s. LOL!!!
To finish the truck scene, I used a strip of Daffodil Delight card stock that measures 4 1/4 X 3/4. It is flagged on each end using the Banners Pick A Punch. The sentiment is from the stamp set and stamped lower than usual on the strip. This is to accommodate the “shadow” stamp for beneath the truck. I used the Truck Builder Punch to cut the truck, but the flowers in the bed must be fussy cut. However I have a great tip for you!! Do not cut straight across the bottom of the flowers. I only cut in a tiny bit on each side of the bottom and then left a part of the scrap that is maybe a 1/4″ by 1/4″ tab. By adding a glue dot to that tab, it makes it extremely easy to add it to the bed of the truck!
Papers
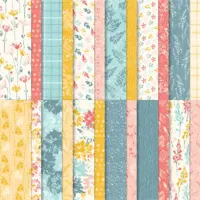
The color choices were made from the DSP. I know you have heard that from me before! When I saw this Lost Lagoon it reminded me of the truck color I mentioned at the top. So that was where I went with this card. The gorgeous DSP is from the Inked Botanicals Designer Series Paper. I love this entire pack! The piece is a square that measures 2 7/8 X 2 7/8 and then is cut on the diagonal. Thankfully it is not a directional pattern. And I will not say how long it took me to find the right measurement to fit the ends of the Basic White layer. 🙂
The Basic White layer is embossed using one of the Basics 3D Embossing Folders. These are only available in the Online Exclusives. As the name implies there are three folders in one pack. This one is what I call the crosshatch one. It is by far my favorite. To finish the card, I raised the truck with Stampin’ Dimensionals and then scattered a few of the Glossy Dots around the White layer.
Bonus Days are winding down……
Please do not forget that Bonus Days will end on July 31st. So you have a week to add to your Coupon collection. Then in August you can redeem those sweet things for items on your wish list.
Bonus Days for the remainder of July!
For every increment of $50.00 in product per order you will receive a Coupon for $5.00. There is no limit to the number of coupon codes you can receive. Then you can redeem all of your codes during the month of August! Additionally, my Blue Star Rewards are for every $50.00 in product per order. So you would also be earning my rewards as well.
Online exclusives are here to stay! Click on the photo and be taken directly to them in my online store. If you place an order, please use my Host Code listed just below.
HOST CODE
My July Host Code is MXQY2UE9. Please use this code for orders under $150.00. I will have a small gift for those with orders over $50.00 in addition to the Perk Rewards Program. You can read all of the information at the top of the page in the Menu Bar under SHOP / Perks.
Thank you for stopping by today. I hope you enjoyed today’s project and will come back. I do read and reply to all of the comments individually. They mean a lot to me. Please reach out if you have a question.
I have a quick card, but with a twist. And not a fun fold type twist. This one is a technique that I have not done in years! And it really adds to the card.
Technique
I saw this technique used on a Stampin’ Up! Demonstrator Event and I have been playing around with it. If you can see on the card, the dragonflies are made using Embossing Paste. That is not something I use in a regular routine card. But after seeing the demonstration, I had to give it a try. The demonstrator made a template from a die cut. I made my template from punching two of the small dragonflies with the Dragonfly Punch. All you need is Embossing Paste and a spatula. Simply place the negative on your paper and add some Embossing Paste. Mine are far from perfect, but that is okay with me. All you have to do is give them time to dry and you have an added texture and pretty element.
Papers
There are a couple of different papers in this card and it’s difficult to say which adds the most stardom. The card base is Berry Burst which is pulled from the DSP. The DSP is the Masterfully Made Designer Series paper. However, between those two layers is a piece of the Vellum Basics Specialty Paper. There are a couple of different designs on the Vellum in this pack. I chose the leaves to go along with the floral print. Then to give some added emphasis to the tiny sentiment I used a scrap piece of the Vellum along with a piece of the DSP that had been trimmed away. They make a fabulous sentiment layer!
Stamps and Punches
The front of the card has a very tiny sentiment. So not a lot of stamping here. However, when paired with the background I gave it, that is plenty. The simple sentiment is from the Go To Greetings stamp set. And it is punched using the Best Label Punch that debuted with the Alphabest stamp set. I love this little punch. A little punch and a punch that was only used as a template are a bit unusual, but wonderful at the same time. The finishing touch was to scatter some of the Tinsel Gem 4 pack of embellishments.
Thank you for stopping by today!!
Bonus Days for the remainder of July!
For every increment of $50.00 in product per order you will receive a Coupon for $5.00. There is no limit to the number of coupon codes you can receive. Then you can redeem all of your codes during the month of August! Additionally, my Blue Star Rewards are for every $50.00 in product per order. So you would also be earning my rewards as well.
Online exclusives are here to stay! Click on the photo and be taken directly to them in my online store. If you place an order, please use my Host Code listed just below.
HOST CODE
My July Host Code is MXQY2UE9. Please use this code for orders under $150.00. I will have a small gift for those with orders over $50.00 in addition to the Perk Rewards Program. You can read all of the information at the top of the page in the Menu Bar under SHOP / Perks.
Thank you for stopping by today. I hope you enjoyed today’s project and will come back. I do read and reply to all of the comments individually. They mean a lot to me. Please reach out if you have a question.
Today’s card is an idea for those leftover strips of Designer Series paper. Plus it is a really quick card. Finding scraps to work with generally ends up as some of my favorite cards.
Paper
This card is super quick and it is because the DSP is the star of the show. These bright daisies, from Fresh As A Daisy Designer Series Paper, were a leftover strip from my prepping for a class. They are 1 1/2 X 1 1/2. It was a 1 1/2″ strip and all I had to do was make the squares from that. The colors are so pretty, and seem to stand out even more in the small pieces. I paired them with a Bubble Bath background layer that is 1 5/8 X 1 5/8. The layout could go in any direction. These were too large to line down the left side, so I staggered them. But smaller squares would work perfectly for a line . And because I wanted this to be a quick card, my card base is simply Thick Basic White with no layers.
Stamp
The only stamp set used is the Cheerful Daisies set. It is part of the Bundle / Suite for the Fresh As A Daisy Designer Series paper. Because of my wanting a Clean card, I simply stamped the sentiment directly on the card base. The ink is Moody Mauve which is also the background of the Daisy paper. And to finish off the card, I scattered a few of the 2023-2025 In Color Dots in Wild Wheat. I love the different sizes for cards with quite a lot of White space!
Thank You for stopping by today!!!
Bonus Days for the remainder of July!
For every increment of $50.00 in product per order you will receive a Coupon for $5.00. There is no limit to the number of coupon codes you can receive. Then you can redeem all of your codes during the month of August! Additionally, my Blue Star Rewards are for every $50.00 in product per order. So you would also be earning my rewards as well.
Online exclusives are here to stay! Click on the photo and be taken directly to them in my online store. If you place an order, please use my Host Code listed just below.
HOST CODE
My July Host Code is MXQY2UE9. Please use this code for orders under $150.00. I will have a small gift for those with orders over $50.00 in addition to the Perk Rewards Program. You can read all of the information at the top of the page in the Menu Bar under SHOP / Perks.
Thank you for stopping by today. I hope you enjoyed today’s project and will come back. I do read and reply to all of the comments individually. They mean a lot to me. Please reach out if you have a question.
Welcome to InKing Royalty’s July Blog Hop! We are embracing some (or all) of Stampin’ Up!’s beautiful blues for today’s hop – there are so many great ways to showcase the blues in the current color families! We are excited to share our creations and hope you love them! After you read my post, I hope you’ll hop over to the next person on the list at the base of this post.
Blue has always been my favorite color. It changes a little from time to time and then I find myself leaning back to blue. So this challenge was easy. Of course having a pack of Designer Series Paper that is everything Blue, is a great help.
Colors
To begin with the colors is easy for this card. I chose a variety of the Countryside Inn Designer Series papers to be the stars of the card. However I used the reverse sides of what are the general favorites. This gave me a simple mix of blues. The common blues in these pieces are Misty Moonlight, Night of Navy, and Boho Blue. So I used all three.
The card base is Misty Moonlight for a little softer touch. A layer of Basic White was necessary just to add some highlight, and then a layer of Boho Blue.
Stamps
To compliment the DSP I needed something that was large enough to stand alone, but would not overwhelm the papers. The perfect flower was this one from Color & Contour. This is an amazing set that I truly do love. From the mixed font sentiments to the pretty flowers. The flower is stamped using Night of Navy Ink and then only the flowers are filled in. I used Boho Blue with the filler stamp. It leaves a little white showing.
The sentiment is also from the stamp set. As I said above, I love the mixed fonts. And it is also stamped using Night of Navy Ink. I believe it is a nice and crisp color that is dark enough to work without using black.
Dies
There are two different Die sets used on this card. The flower was die cut using the die from the Scalloped Contours Dies. This is the partner to the Color & Contours stamp set. They are no longer a bundle, but are a personal favorite! And the other Die set is the Nested Essentials Dies. These are a stand alone Die set in the Annual Catalog. They are amazing with three different shapes that each have multiple sizes of each shape. I chose to use the four larger of this fun shape.
The three largest are the DSP pieces. I wanted a different looking layout and these lined up perfectly across the card. The flower fit well on the blue backgrounds. And to complete the scene I added the smaller of the die shapes. I was thrilled when the sentiment I wanted to use fit perfectly. To complete the card all it required was a scattering of the Iridescent Pearls to add a touch more White to the card.
Thank you for stopping by today. I hope you’ll hop along to the next stop on the blog hop, Renae Novak at Blessed by Cards. There’s lots of inspiration to be found in this group – and you don’t want to miss it!
Thank you for hopping along with us. If you get stuck during the Blog Hop, please use this line-up as a guide:
Please Do Not Forget about today’s Stamp set Sale……..
Bonus Days for the remainder of July!
For every increment of $50.00 in product per order you will receive a Coupon for $5.00. There is no limit to the number of coupon codes you can receive. Then you can redeem all of your codes during the month of August! Additionally, my Blue Star Rewards are for every $50.00 in product per order. So you would also be earning my rewards as well.
Online exclusives are here to stay! Click on the photo and be taken directly to them in my online store. If you place an order, please use my Host Code listed just below.
HOST CODE
My July Host Code is MXQY2UE9. Please use this code for orders under $150.00. I will have a small gift for those with orders over $50.00 in addition to the Perk Rewards Program. You can read all of the information at the top of the page in the Menu Bar under SHOP / Perks.
Thank you for stopping by today. I hope you enjoyed today’s project and will come back. I do read and reply to all of the comments individually. They mean a lot to me. Please reach out if you have a question.
I wanted to drop in to remind you of a Special Sale that is tomorrow only!!!
Stampin’ Up! is offering 15% off on all of the stamp sets in the Annual Catalog! The only exception are the Host sets. So Woohoo!!!!
And since Bonus Days are still going on, you can earn some Coupon Codes with your Sale order. That is a Win / Win!
Please reach out if you have any questions. I would love to help you with your list. You can reach my ONLINE STORE anytime by clicking on the Shop button on the menu. But for now, just click HEREAnd I have a HOST code at the bottom of the post that I would appreciate you using as well.
Bonus Days for the remainder of July!
For every increment of $50.00 in product per order you will receive a Coupon for $5.00. There is no limit to the number of coupon codes you can receive. Then you can redeem all of your codes during the month of August! Additionally, my Blue Star Rewards are for every $50.00 in product per order. So you would also be earning my rewards as well.
Online exclusives are here to stay! Click on the photo and be taken directly to them in my online store. If you place an order, please use my Host Code listed just below.
HOST CODE
My July Host Code is MXQY2UE9. Please use this code for orders under $150.00. I will have a small gift for those with orders over $50.00 in addition to the Perk Rewards Program. You can read all of the information at the top of the page in the Menu Bar under SHOP / Perks.
Thank you for stopping by today. I hope you enjoyed today’s project and will come back. I do read and reply to all of the comments individually. They mean a lot to me. Please reach out if you have a question.
The card I have to share today is a mixture of Country and Chic. It is a peek through type card which is a bit different for me.
This card was made for the Make My Monday Challenge. As a Design Team member, we have the theme ahead of time. This one really through me. It is titled an Aperture Card. I had nothing at first. However now you will have several ideas if you would like to play along. Simply click on the icon below and you will go to the Challenge Blog. There you can see other versions of this challenge and play along yourself.
Dies
As I said above, I had no idea where to start on this theme. But having seen several layered cards using the Countryside Corners Dies I had a thought. I used the dies to make an opening that you could see inside the card. Thank you Stampin’ Up! for these fun dies!!! Here is a view of the inside.
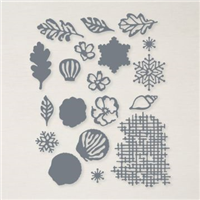
Stamps
The idea for the inside came from a friend’s post on Facebook. She is a talented artist in many different medias. Her last post was some resin with sea shells. As soon as I saw her post I knew what could go inside my opening. The Season of Chic is a set, with Dies, that I love but rarely use! I think we all have those.
I stamped multiples of the sea shell using Petal Pink as the base, both stamped fully and stamped off, and Crumb Cake as the outline. The small swirl shell on the front was where I had tested some of the splatter in different strengths and used that scrap to die cut it. After stamping the splatter, or in my case it is sand, I decided it needed color. Using the Pool Party that matches the card stock, I used a blender brush to brush that area. Then created a fun layer for the bottom front with what looks like bird prints in the sand.
Finishes
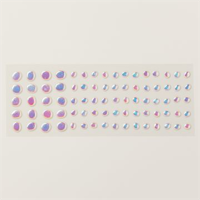
The card took several different turns in the process of being made. The bottom Pool Party piece was added after I decided that after adding the “water” on the inside there needed to be room to write a note. I do think it helps to highlight my unusual spot for the front sentiment though. And to finish I added several of the Flat Adhesive Pearls to the various shells.
Thank you for stopping by today!!! Don’t forget we are halfway through Bonus Days.
Bonus Days for the remainder of July!
For every increment of $50.00 in product per order you will receive a Coupon for $5.00. There is no limit to the number of coupon codes you can receive. Then you can redeem all of your codes during the month of August! Additionally, my Blue Star Rewards are for every $50.00 in product per order. So you would also be earning my rewards as well.
Online exclusives are here to stay! Click on the photo and be taken directly to them in my online store. If you place an order, please use my Host Code listed just below.
HOST CODE
My July Host Code is MXQY2UE9. Please use this code for orders under $150.00. I will have a small gift for those with orders over $50.00 in addition to the Perk Rewards Program. You can read all of the information at the top of the page in the Menu Bar under SHOP / Perks.
Thank you for stopping by today. I hope you enjoyed today’s project and will come back. I do read and reply to all of the comments individually. They mean a lot to me. Please reach out if you have a question.
The content in this blog is the sole responsibility of Jackie Beers as an Independent Stampin' Up! Demonstrator. The use of and content of classes, services or products offered is not endorsed by Stampin' Up!