The card I have to share with you today is one that appears to be created by torn paper. In fact that is the case. Except the paper is produced from the talents of Stampin’ Up!s creative artists who did actually tear paper. I love the look it gives.
Papers
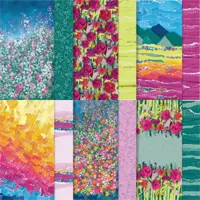
The card layers to this card are mostly from the Masterfully Made Designer Series Paper. One of the Stampin’ Up! artists created this paper. She is obviously very talented. It is one of my favorites. And to prove that I used three different patterns from the pack.
The card base is Pretty Peacock to match the leaves of the flowers. Then the Basic White layer to help the colors pop. And the Berry Burst is a beautiful color with the white mixed in from the pattern. I added the Lemon Lime Twist for a brightness and to help the flowers really stand out. Finally the flowers are cut from the Berry Burst piece with the leaves from a third sheet of the paper.
Dies and Stamps
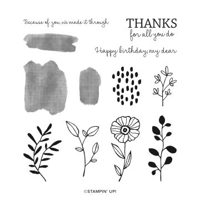
The flowers and leaves are cut using the Timeless Charm Dies. (I also used the stamps for the inside sentiment) I love these flowers and leaves. And with the different shades of green from the paper, it really helps them to pop! NOTE: I apologize. This card was made a little while ago and now the dies have sold out. It was/is an Online Exclusive. The stamp set is still available but not the dies. However there are several floral dies that would work just as well. Sorry!!
The sentiment is simple but one I use regularly. This Happy Birthday is the perfect size for the front of a card. It is from the Go To Greetings set. There are a few sentiments in different sizes. I really love that. And to finish the card I added three of the Iridescent Discs. These are great because they are flat. So no added bulk in the envelope when mailing.
Thank you for stopping in today!! I hope you have a wonderful weekend.
Online exclusives are here to stay! Click on the photo and be taken directly to them in my online store. If you place an order, please use my Host Code listed just below.
HOST CODE
My NOVEMBER Host Code is 626NJVKN. Please use this code for orders under $150.00. I will have a small gift for those with orders over $50.00 in addition to the Perk Rewards Program. You can read all of the information at the top of the page in the Menu Bar under SHOP / Perks.
Thank you for stopping by today. I hope you enjoyed today’s project and will come back. I do read and reply to all of the comments individually. They mean a lot to me. Please reach out if you have a question.
Today’s card is a partner to yesterday’s card. They use the same paper and stamp set. However this one is using Deckled Circles for the layers. I love showing the versatility of our products. And this card shows not only the stamp set but the Designer Series Paper as well.
Yesterday’s card used the same Stamp Set, DSP, just different colors and different sentiment. However it used Deckled Rectangles, where this card is Deckled Circles. Both of these are Go To’s in my Die collection. If you want to check yesterday’s card, Click Here.
Dies
The Deckled Circles Dies are a great set of circles. There are 14 circles in the set. With the largest being a 5 3/4″ circle. So these would be wonderful for Scrapbooking as well as card making. You can see them in my online store, or on page 63 of the Mini Catalog. They are sort of hidden on the corner of the page.
Stamps
This card began just as yesterday’s card with the Stamped With Love envelope. It is stamped using Memento Tuxedo Black Ink. The fountain pen is colored with Mossy Meadow, Real Red, and Smoky Slate Stampin’ Blends. Smoky Slate was used for the “silver” of the fountain pen part. I love that this stamp set is so flexible!
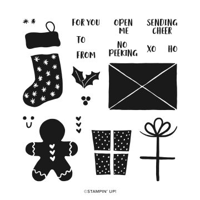
The sentiment used today is from the Sending Cheer stamp set. It is the one with the fun gingerbread man and santa’s hat in the Mini Catalog. I really love the boldness of the message and the font that is used. Stamping with Real Red really makes it pop! And of course the red heart for the postage stamp.
Papers
The colors for today are only one different from yesterday. The card is Mossy Meadow with a Real Red layer. And a Circle layer of Real Red as well. I even placed the focal point in the same place as yesterday. This was done to show off as much of the DSP as possible.
The DSP is from the same sheet of the Traditions of St. Nick Designer Series Paper. This is an online exclusive paper. But it is great for today’s Christmas card, as well as yesterday’s Think of you card. All it took was a bit of a color and sentiment change. The finishing touch is a trio of the green tinted Blooming Pearls.
Thank you for stopping in today!!
Online exclusives are here to stay! Click on the photo and be taken directly to them in my online store. If you place an order, please use my Host Code listed just below.
HOST CODE
My NOVEMBER Host Code is 626NJVKN. Please use this code for orders under $150.00. I will have a small gift for those with orders over $50.00 in addition to the Perk Rewards Program. You can read all of the information at the top of the page in the Menu Bar under SHOP / Perks.
Thank you for stopping by today. I hope you enjoyed today’s project and will come back. I do read and reply to all of the comments individually. They mean a lot to me. Please reach out if you have a question.
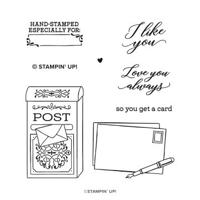
Today’s card mixes Christmas DSP with the Stamped With Love set from the Annual Catalog. They may not have been designed together, but I believe they are a perfect fit.
Papers
The beginning to most of my cards is the DSP. This one was no exception. The retro looking mailboxes are a reverse side of one of the sheets from the Traditions of St. Nick Designer Series Paper. It is an Online Exclusive that is really nice paper with lots of Old World looking ST. Nick’s on it. As soon as I saw the paper, I knew it needed to be paired with the Stamped With Love set from the Annual Catalog.
The DSP piece is a muted Mossy Meadow color. I used Mossy Meadow for the narrow border layer. But went with Wild Wheat for a richer look. Actually, the idea for the Wild Wheat came in coloring the fountain pen. I wanted to make the writing tip either gold or silver. The Wild Wheat fit the bill for gold.
Stamps
There are two stamp sets used for this card. The first is the Stamped With Love. But it does not have a sentiment on the envelope. So I went with the beautifully written Thinking of You from the Very Best Occasions stamp set.
The fountain pen and the heart inside the stamp are both colored using Stampin’ Blends. Real Red for the heart and Mossy Meadow and Wild Wheat for the fountain pen.
Dies
To create the focal layers, I used the Deckled Rectangles Dies. These come in several sizes and are a great to have in your tool chest. To fit the size I needed, I ended up using the same size for the focal layer and the background layer. With them being offset it is a perfect fit. To finish the card, I added a single green pearl from the Blooming Pearls embellishments.
Layers
The layers of the card are 4 1/4 X 11 scored at 5 1/2. The Mossy Meadow is 4 7/8 X 3 5/8. And the DSP is cut to 4 3/4 X 3 1/2.
Thank you for stopping by today!!
Online exclusives are here to stay! Click on the photo and be taken directly to them in my online store. If you place an order, please use my Host Code listed just below.
HOST CODE
My NOVEMBER Host Code is 626NJVKN. Please use this code for orders under $150.00. I will have a small gift for those with orders over $50.00 in addition to the Perk Rewards Program. You can read all of the information at the top of the page in the Menu Bar under SHOP / Perks.
Thank you for stopping by today. I hope you enjoyed today’s project and will come back. I do read and reply to all of the comments individually. They mean a lot to me. Please reach out if you have a question.
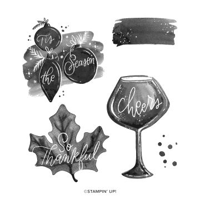
The card I am sharing today is a multi-fold that showcases some of the beautiful Meandering Meadows Designer Series Paper. It is paired with the Cheers To The Season set.
The Folds
The front of the card looks fairly plain. And ended up a tad brighter than I originally planned. But it gets better with the other folds!
Now you can see the gorgeous Meandering Meadows Designer Series Paper! It will be available for you to order soon!
Papers
This fold is one that came about as I was making it. And I failed to write down all of the measurements. The card base is 8 1/2 X 5 1/2, scored at 4 1/4, and then 2″ cut off the front. The inside “card. was cut to fit after I added the Crushed Curry back and front layers. It is intended to look like an additional layer. (Check the first photo). So take that measurement and make it twice as wide to fold over. Sorry about not writing things down!
The papers, besides the DSP, were pulled from the DSP. I used Cherry Cobbler for the base and then Crushed Curry layers. The front disguises the pretty inside of the card. My goal was for the opening to be a bit of an unexpected surprise. I cut the DSP to continue the scene across the layers.
Stamps and Dies
There are a variety of stamp sets used on this card. The front panel is cut with the Scalloped Contours Dies to highlight the Cheers wine glass. That stamp is from the Cheers To The Season set. It is a favorite for it’s solid images for Thanksgiving/Fall, Christmas, and this wine glass for New Year or any time.
The front For You tag is from the Country Bouquet stamp set. I needed something small for a tag and this one worked perfectly. It is punched using the Best Label Punch. The little corner cuts are a great touch on a small tag. And the background is a scrap of the DSP.
The inside sentiment is from the Something Fancy stamp set. I love the mix of fonts as well as the fun sentiment. Being late on cards is a special talent of mine! LOL!!
Finishes
The finishes on this card are pretty simple. The ribbon for the tag is the Sweet Sorbet Woven Metallic Ribbon. This is last year’s In Colors and I used these ribbons regularly. They are very easy to tie a bow with and give just enough sparkle to a card. The other finishes is some additional Bling! I used the Iridescent Pearls and colored two of the three with the Dark Daffodil Delight Stampin’ Blends.
Thank you for stopping in today!
Online exclusives are here to stay! Click on the photo and be taken directly to them in my online store. If you place an order, please use my Host Code listed just below.
HOST CODE
My NOVEMBER Host Code is 626NJVKN. Please use this code for orders under $150.00. I will have a small gift for those with orders over $50.00 in addition to the Perk Rewards Program. You can read all of the information at the top of the page in the Menu Bar under SHOP / Perks.
Thank you for stopping by today. I hope you enjoyed today’s project and will come back. I do read and reply to all of the comments individually. They mean a lot to me. Please reach out if you have a question.
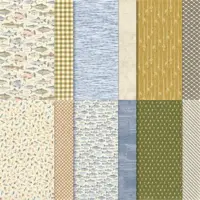
The card I am sharing today is one I made for a long time friend. This one is a fishing card that only required the Let’s Go Fishing DSP to make. That is a winner!
Papers
This card is all about the DSP! The Let’s Go Fishing Designer Series Paper has some beautiful pieces. They include any fishing item, as well as ones like this fun plaid. I used three of the different pieces. Actually four with the plaid background. Scraps can really be our friend!
The background on all of the papers is Very Vanilla. So I began with a Thick Very Vanilla card stock. And even though the papers all have the Wild Wheat, I was pulled to the Boho Blue really popping from the two more colorful pieces. That became my layers to brighten up the card.
Stamp and Punch
The only stamping you see on the front of the card is the simple greeting. This greeting is from Go To Greetings. That set has the most common sentiments in different sizes and fonts. I love this simple, and smaller, Happy Birthday. It is emphasized with the Happy Labels Punch for the background layer and the sentiment layer. A little bit of detail is all that is required.
Finishes
There is no bling on this card!!! I know those of you that are regular followers are shocked. But, I did add extra touches. The Bakers Twine is wrapped around the sentiment layers with a fish attached. I fussy cut the fish from a piece of the paper on the left side. It was an easy and simple touch to replace bling on a man card.
Layout
The card base is 8 1/2 X 5 1/2 and scored at 4 1/4 with a top fold. The Boho Blue layer is 5 1/4 X 4 and the plaid DSP is 5 1/8 X 3 7/8. The layers are 1 3/8 X 3 1/2 for the Boho Blue. All three are the same size. And the DSP pieces are all three cut 1 1/4 X 3 3/8.
Thank you for stopping by today!!
Online exclusives are here to stay! Click on the photo and be taken directly to them in my online store. If you place an order, please use my Host Code listed just below.
HOST CODE
My NOVEMBER Host Code is 626NJVKN. Please use this code for orders under $150.00. I will have a small gift for those with orders over $50.00 in addition to the Perk Rewards Program. You can read all of the information at the top of the page in the Menu Bar under SHOP / Perks.
Thank you for stopping by today. I hope you enjoyed today’s project and will come back. I do read and reply to all of the comments individually. They mean a lot to me. Please reach out if you have a question.
The card I am sharing today is one that I really love. Not only for the stamping but the fold as well. This one is definitely Festive & Fun.
The “FUN” open view is a surprise.
Layout
This Fun Fold is a case from a Connie Stewart video. I used the idea and changed the layers quite a lot. My card begins with the card base of Shaded Spruce cut to 5 1/2 X 4 1/4, a quarter sheet of regular card stock. The DSP is then 5 3/8 X 4 1/8, with Basic White cut to 5 X 3 3/4.
For the top, the Shaded Spruce layer begins as another quarter of card stock, but cut down to 4 3/4 X 3 1/2. Save the longer strip cut away and fold in half. It is the mechanism. Then the DSP is 4 5/8 X 3 3/8 with the Basic White at 4 X 2 1/2. Adhere the folded mechanism centered to the top inside of the base piece with the fold flush with the top. Next adhere the DSP and White to that base. This needs to be done for positioning of all the layers. Now lay the top Shaded Spruce down so that it appears as another layer on top of the bottom three pieces. Attach the folded mechanism to it. Then finish card with your stamping and other layers.
Stamps
The Festive and Fun stamp set is the star of this card. I love the animals making their way with the sled of gifts. It is a Smile card. The image is stamped using Memento Tuxedo Black Ink and then colored with a variety of Stampin’ Blends. All of the Blends are listed in the Supply List at the bottom of the post.
The sentiment on the front and inside are from the Merriest Trees stamp set. I love the font of the front sentiment. It is layered using the Banner Pick A Punch on one end. That banner is accented with my one and only bling for this card. It is a Gold Pearl from the Festive Pearls embellishaments.
The inside tree shaped sentiment is also from the Merriest Trees. This is such a pretty font and the shape of the tree really ads to the wording and the card. It serves as the sentiment and the decoration for the inside.
Papers
There are only three papers used, even though it seems like quite a lot with six layers! The Shaded Spruce is the base and grounding for the card, but also the DSP. The plaid DSP is from the Joy of Christmas Designer Series Paper. It is supposed to be Real Red and Cherry Cobbler I believe. Personally I just love how it pops form the Shaded Spruce and Basic White. It also really plays well with the snow and sled theme with the plaid.
Thank you for stopping by today!!!
Online exclusives are here to stay! Click on the photo and be taken directly to them in my online store. If you place an order, please use my Host Code listed just below.
HOST CODE
My NOVEMBER Host Code is 626NJVKN. Please use this code for orders under $150.00. I will have a small gift for those with orders over $50.00 in addition to the Perk Rewards Program. You can read all of the information at the top of the page in the Menu Bar under SHOP / Perks.
Thank you for stopping by today. I hope you enjoyed today’s project and will come back. I do read and reply to all of the comments individually. They mean a lot to me. Please reach out if you have a question.
The content in this blog is the sole responsibility of Jackie Beers as an Independent Stampin' Up! Demonstrator. The use of and content of classes, services or products offered is not endorsed by Stampin' Up!