I just finished placing my order from the Annual Catalog! With a mile long list, almost everything that is new, it took me a while. Hopefully you are ready to place your first order as well.
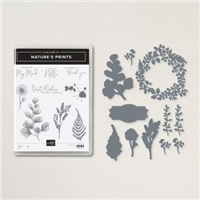
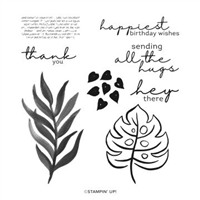
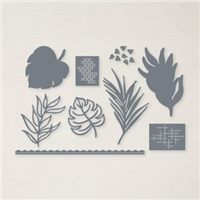
Today’s card is from one of the new bundles available. I feel the new Nature’s PrintsBundle will be a hit with the wonderful leaves and great dies. Especially the frame and sentiments.
Bundle
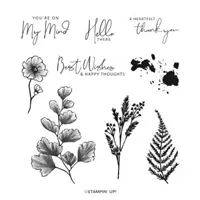
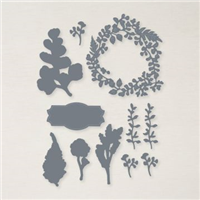
The Nature’s Prints Bundle is a beautiful leafy set with some awesome sentiments. It reminds me of Forever Fern, which has been very popular. As you can see in the photo, this is my type of sentiment. I love the mix of fonts. And this is such a sweet thought for someone. Of course having matching dies is awesome. These two pieces are stamped and then die cut. Both are layered directly onto the embossed layer.
Embossing and Colors
The Fern 3D Embossing Folder is part of the Suite of products that includes the Nature’s Prints Bundle. This also includes the gorgeous Sun Prints Designer Series Paper. Since I did not have the paper available, I went with a similar color pallet. For the embossed layer I used Gray Granite. It shows the embossing well. And the embossing has some “highs and some lows” which helps with the depth
The card base is Pacific Point which pairs great with the Gray Granite. To carry on with the color, I stamped the sentiment in Gray Granite as well. And it is die cut using a frame from the Die set. Again, since I did not have newer DSP, I went with the Brights DSP from last catalog in Pacific Point. The strip measures 3 1/2 X 1/2 and it is raised using Stampin’ Dimensionals. The gem is the just retired Blue Gems, but I am sure there are new ones to use now.
ALL TOGETHER … SPECIAL BUNDLE
The Natural Tones Stampin’ Blends Bundle was extended until the end of May due to the length of time not all were available!
CLICK ON THE PHOTO TO SEE ALL OF THE PRODUCTS
HOST CODE
My May Host Code is Y6J9Y93J. Please use this code for orders under $150.00. I will have a small gift for those with orders over $50.00 in addition to the Perk Rewards Program. You can read all of the information at the top of the page in the Menu Bar under SHOP / Perks.
Thank you for stopping by today. I hope you enjoyed today’s project and will come back. I do read and reply to all of the comments individually. They mean a lot to me. Please reach out if you have a question.
I have used both the Cup of Tea Bundle and the Tea Boutique Designer Series Paper on this card. And added in some of the New In Colors! The Cup of Tea Bundle has been a very popular one with the Demonstrator Preorder.
In Colors 2022 – 2024
This card has two of the new In Colors that debut in the Annual Catalog tomorrow. Personally, I am in love with the Parakeet Party ( the layer) and that was very unexpected! But it is not far ahead of this gorgeous Starry Sky. The tea cup is colored using those same colors in the Stampin’ Blends. Surprisingly when seen in person, the Parakeet Party is a shade lighter and brighter than Granny Apple Green. And the Starry Sky is similar to a Royal Blue.
Cup of Tea Bundle and DSP
The In Colors carry over to the gorgeous paper in the Tea Boutique Designer Series Paper. And the Tea Theme is wonderfully represented. All of the colors as well as the art is amazing. There are two different cups along with a matching cup die included in the bundle. And the flowers that I have inside the cup are soft and happy ones.
The greenery and flowers are stamped using Parakeet Party Ink along with Fresh Freesia flowers. For the Tea Cup, I stamped it with Memento Tuxedo Black Ink and then colored with the Stampin’ Blends to match the cardstock. It is raised with Stampin’ Dimensionals for depth.
A Second Version
This card features the same products with the exception of the card base color. The star is another of the New In Colors and is Tahitian Tide. And as you can see Parakeet Party pairs well here as well. The sentiment used on this card is from the stamp set. But the one on the first card is from the Hello Beautiful Stamp set in the Mini Catalog.
Measurements
The card base on each card is cut to 5 1/2 X 8 1/2 and scored at 4 1/4. The Parakeet Party layer is the same on each and is cut to 5 1/4 X 4. For the Basic White layer they are cut to 5 1/8 X 3 7/8 each. And the strip of DSP is each cut to 5 1/8 X 1 1/2. The DSP is layered flush with the bottom of the Basic White.
ALL TOGETHER … SPECIAL BUNDLE
The Natural Tones Stampin’ Blends Bundle was extended until the end of May due to the length of time not all were available!
CLICK ON THE PHOTO TO SEE ALL OF THE PRODUCTS
HOST CODE
My May Host Code is Y6J9Y93J. Please use this code for orders under $150.00. I will have a small gift for those with orders over $50.00 in addition to the Perk Rewards Program. You can read all of the information at the top of the page in the Menu Bar under SHOP / Perks.
Thank you for stopping by today. I hope you enjoyed today’s project and will come back. I do read and reply to all of the comments individually. They mean a lot to me. Please reach out if you have a question.
Smile and Keep On Stamping,
Jackie
SUPPLIES:
This will be updated once the new Annual catalog goes live.
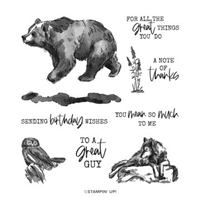
I have combined three great products for today’s card. The star is the Wildlife Wonder bear paired with the Tasteful Textile Embossing Folder and New Horizon DSP. A simple and pretty card.
Stamps
This beautiful bear is from the Wildlife Wonder stamp set, as are all of the stamps used here. The details on the bear really give the illusion of movement. And the shadow at the base adds to it. For a bit of realism, and depth, I added the single wildflower. Of course the sentiment is one of the stars. And if you know me, you know that I love a mix of fonts. This one is perfect and a great size.
Embossed
The Tasteful Textiles Embossing Folder has always been a favorite. It adds subtle texture. But if stamped on prior to embossing it gives the look of a canvas. On this card I went with the Thick Basic White, stamped and then embossed. And it is raised with Stampin’ Dimensionals to give more depth to the card.
Papers
Even though the card base is Thick Basic White and the focal layer is White, this card shows quite a bit of color. That is from the New Horizon DSP. And I promise that I did not use most of a piece of this beautiful paper to only hide it behind the front layer. I would never do that! This piece had some punches cut from it. And I actually thought ahead to position the punches further inside so it could be used as a layer. That is unusual for me to actually think ahead!! Plus I used one of the cut off pieces as the strip which backs the sentiment. It is a great extra touch of color.
Please do not forget that the Last Chance products are winding down. Additionally we have been notified that all of the Natural Tones Stampin’ Blends are back in stock. They are part of the All Together early release shown below. Because of this that special has been extended through the end of May! Woohoo!
WAVES OF THE OCEAN SUITE …EARLY RELEASE
CLICK ON THE PHOTO TO SEE THE COMPLETE SUITE OF PRODUCTS
ALL TOGETHER … SPECIAL BUNDLE
CLICK ON THE PHOTO TO SEE ALL OF THE PRODUCTS
HOST CODE
My April Host Code is STVD4BDV. Please use this code for orders under $150.00. I will have a small gift for those with orders over $50.00 in addition to the Perk Rewards Program. You can read all of the information at the top of the page in the Menu Bar under SHOP / Perks.
Thank you for stopping by today. I hope you enjoyed today’s project and will come back. I do read and reply to all of the comments individually. They mean a lot to me. Please reach out if you have a question.
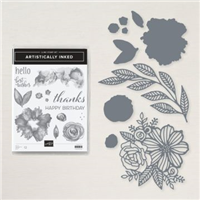
Today’s card is a mix of FunFold, Beautiful Paper, and an easy Wow factor. It all begins with the Expressions In Ink and Artistically Inked products.
Paper
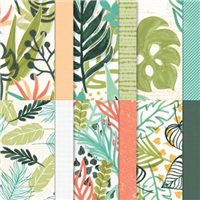
Choosing which product is the star of this card was difficult , the paper or the stamps. Since the paper has been purchased the most over the last year, I will say that is the winner. It is the Expressions In Ink Designer Series Paper. I have used two different pieces of the gorgeous pack of papers.
First is the Gold Striped piece. It is on the front and on the right edge of the back layer. To say it is pretty is very lacking. And the best piece is what I have just barely peeking from behind the center flower. A marble look with pink and yellow flowers and veins of gold could not be prettier. This fabulous DSP is paired with Pale Papaya. Which works wonderfully with the gold and the brightness of the pinks.
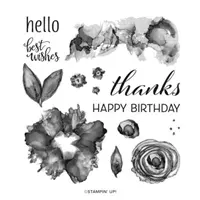
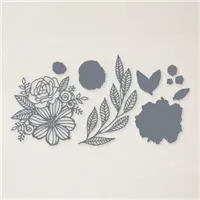
Stamps and Dies
Artistically Inked is the name of this gorgeous bundle. The flower in the center of the card is stamped and die cut using Pale Papaya Ink as well as Pear Pizzaz. There are a variety of colors in the paper to choose from, but these were the ones I chose for this card. Both stamped images are die cut and then adhered to the center panel with Stampin’ Dimensionals. And the finishing touch is a couple of Champagne Rhinestones. The color matches the Pale Papaya pretty closely.
Directions and Measurements
Beginning with the Pale Papaya card base, it is cut 5 1/2 X 8 1/2 and scored at 2 1/8 and 4 1/4. Make an accordion fold on the left side of the card with the scores. Next the striped DSP is cut 1 7/8 X 5 1/4. (There are two of these pieces but you only see the one on the front in the photo. The other piece is on the inside of that accordion and is viewed when the card is open.)
The inside back layer is Basic White cut to 4 X 5 1/4. You can see the matching DSP on the right side edge. A strip of the gold DSP is cut to 1/2 X 5 1/4 and adhered flush to the right edge of the White.
The front diamonds are cut 2 from Pale Papaya at 1 3/4 X 1 3/4 , and 2 cut from the flowery DSP at 1 1/2 X 1 1/2. These are adhered together and then placed as a diamond with the points centered on the folded line. One is even with the DSP at the top and the other at the bottom. Carefully place the adhesive so it is only on the left side. Otherwise these would stick to the inside back layer.
For the center diamond cut a piece of Pale Papaya to 3 X 3 and a piece of Basic White to 2 3/4 X 2 3/4. Adhere the die cut flower and leaves to that piece using Stampin’ Dimensionals. Center the diamond between the two smaller diamonds. Add this diamond using Stampin Dimensionals also. Be careful that your adhesive is only on the left side!
WAVES OF THE OCEAN SUITE …EARLY RELEASE
CLICK ON THE PHOTO TO SEE THE COMPLETE SUITE OF PRODUCTS
ALL TOGETHER … SPECIAL BUNDLE
CLICK ON THE PHOTO TO SEE ALL OF THE PRODUCTS
HOST CODE
My April Host Code is STVD4BDV. Please use this code for orders under $150.00. I will have a small gift for those with orders over $50.00 in addition to the Perk Rewards Program. You can read all of the information at the top of the page in the Menu Bar under SHOP / Perks.
Thank you for stopping by today. I hope you enjoyed today’s project and will come back. I do read and reply to all of the comments individually. They mean a lot to me. Please reach out if you have a question.
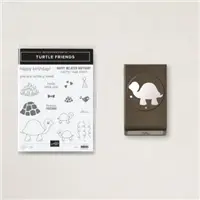
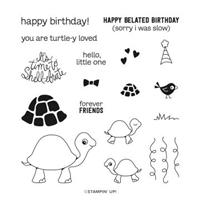
Today’s card is starring the Turtle Friends Punch Bundle and would work for any age. At least I hope it does since I made it for a close friend, who is younger than me, but not a child. I thought the turtly play on words was just perfect.
Stamps and Punch
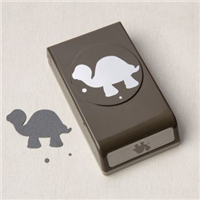
I had not really played with this stamp very much and making this card has given me several ideas for it. Sadly it is on the retiring / almost gone list. (There are only 7 days left of the current Annual Catalog!) For the sweet turtle, I stamped and then colored her body with Crumb Cake Stampin’ Blends. And did you notice her pink toes and lips? The shell is stamped with Old Olive and then punched with the matching Turtle Punch.
The adorable little bird is stamped with Polished Pink and fussy cut using my wonderful Paper Snips. Both the turtle and the bird are raised with Stampin’ Dimensionals. I don’t care for a lot of a solid cardstock. So to alter that part of the Polished Pink I stamped the party streamers tone on tone down the open section. And finally the sweet Turtly sentiment was added on the White with the Turtle and Bird.
Colors
Normally my color choices begin with the DSP. This time the black and white plaid strip from the Pattern Party Designer Series Paper was indeed the original idea. And the Polished Pink came more from “what would go best with this strip of DSP?”. An odd way of getting there but it worked!
There are probably not very many real life pink birds. Maybe a flamingo? But I took creative license and went with it for the little bird. And to add bling for my finishing touch I went with pink again. This time was the 2021-2023 In Color Gems.
Product Share
I am taking orders for the new Annual Catalog Product Share for New Designer Series Paper and Ribbons. The form is on my menu under Shop/Product Share. This is a wonderful way to get a sample of all of the new papers so you can really see their beauty in person. Then you can decide on the ones you like the most. And the ribbon is the same way.
WAVES OF THE OCEAN SUITE …EARLY RELEASE
CLICK ON THE PHOTO TO SEE THE COMPLETE SUITE OF PRODUCTS
ALL TOGETHER … SPECIAL BUNDLE
CLICK ON THE PHOTO TO SEE ALL OF THE PRODUCTS
HOST CODE
My April Host Code is STVD4BDV. Please use this code for orders under $150.00. I will have a small gift for those with orders over $50.00 in addition to the Perk Rewards Program. You can read all of the information at the top of the page in the Menu Bar under SHOP / Perks.
Thank you for stopping by today. I hope you enjoyed today’s project and will come back. I do read and reply to all of the comments individually. They mean a lot to me. Please reach out if you have a question.
Fun Folds are the best kind of folds for creating cards. Today I have paired a Double Z fold with products from the Artfully Composed Suite of Products in the Mini Catalog.
Front
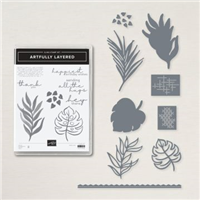
The front of the card stars not only the beautiful Artfully Composed Designer Series paper, but some of the Artfully Layered Stamps. And to top it off there are two different die cut leaves using the Tropical Layers Dies, which are part of the bundle. For a bit of the unexpected, I heat embossed the sentiment and some extra little heart shaped leaves onto the solid die cut leaf.
Inside Back
I know it seems odd doing the back before the center but you will see the method behind my madness…hopefully! The Double Z fold, the extra Z fold, is attached to the front and the back of the card. You can see the back section is attached to a piece of the DSP which has a very similar leaf. And to pair better with that DSP, I added the word stamp from the set using Pale Papaya Ink.
Center Section
From this center view you can see all of the sections of the card. The center panel of the small Z is where you would write your greeting and sign. It is the least exciting of the card and why I went here last. But this open view allows you to view the full Double Z at work. And you can see that the front sentiment layer is raised with Stampin’ Dimensionals with a few of the Polished Dots embellishments for some bling.
Measurements:
The card base of Pear Pizzaz is cut to 5 1/2 X 8 1/2 and scored at 2 1/8 and 4 1/4 on the 8 1/2″ length. The panels are 2 Mint Macaron pieces cut to 1 7/8 X 5 1/4. With the back larger panel cut to 4 X 5 1/4. For the DSP there are 2 pieces cut to 1 3/4 X 5 and the larger one is cut to 3 7/8 X 5 1/8.
The smaller Z section is also Mint Macaron and is cut to 3 1/8 X 7. The Basic White panels are the front focal piece cut to 2 7/8 X 2 7/8. And the small panels are 2 that are cut 1 7/8 X 2 7/8 each.
To adhere the smaller Z section, fold both the little Z and the card as they would be closed. Center the small Z on the closed card. Pay attention to how much of the focal layer is actually over that front left fold. Place Stampin’ Dimensionals only on that part. Adhere it to the front panel. Then find where the back section lands. Add adhesive to that panel and close the card.
WAVES OF THE OCEAN SUITE …EARLY RELEASE
CLICK ON THE PHOTO TO SEE THE COMPLETE SUITE OF PRODUCTS
ALL TOGETHER … SPECIAL BUNDLE
CLICK ON THE PHOTO TO SEE ALL OF THE PRODUCTS
HOST CODE
My April Host Code is STVD4BDV. Please use this code for orders under $150.00. I will have a small gift for those with orders over $50.00 in addition to the Perk Rewards Program. You can read all of the information at the top of the page in the Menu Bar under SHOP / Perks.
Thank you for stopping by today. I hope you enjoyed today’s project and will come back. I do read and reply to all of the comments individually. They mean a lot to me. Please reach out if you have a question.
The content in this blog is the sole responsibility of Jackie Beers as an Independent Stampin' Up! Demonstrator. The use of and content of classes, services or products offered is not endorsed by Stampin' Up!