Today’s project is called it a Joy Fold Card. it is definitely a joy to make . The Wildly Flowering DSP is the star of the card of course.
Papers
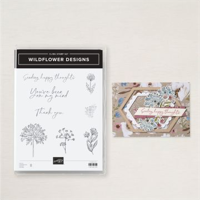
This fun card is one I cased from a dear friend The Paper Pixie. You get to see both sides of the paper with this Joy Fold and I love that. This large main piece of paper is from the Wildly Flowering Designer Series Paper. The smaller focal layer piece is also from the same pack of papers. I paired these gorgeous papers with Crumb Cake card stock for the card base, with a layer of Basic White underneath each DSP layer. A white layer against the Crumb Cake has always been a favorite of mine and with the white in the main DSP pattern it really pops.
Here is an open view of the card.
With the card open you can really allow the DSP to shine. And this view shows the simplicity of the card as well.
Stamps and Ink
The focal layer stamped images are from two separate sets. The flower is from the Wildflower Designs stamp set. On the front I stamped using Pecan Pie Ink and then colored the flower with the Light Misty Moonlight Stampin’ Blend. On the inside of the small card I stamped the smaller, but similar, image using Crumb Cake Ink that is stamped off first.
The sentiment is from the Wonderful Thoughts stamp set. This set is full of great sentiments. I wanted something simple and that would allow for this card to work for almost any occasion. The small “hello” works perfectly. I stamped it using Misty Moonlight Ink. The focal layer is fairly simple as well. I used the Modern Oval Punch to cut the piece and then added Stampin’ Dimensionals to give it some Pop.
Finishes
To tie in more of the Crumb Cake, soft brown shade, I used the new Basic Beige Ribbon beneath the focal layer. By adding a couple of short strips of adhesives, I was able to zig zag the ribbon easily for a bit of a different look. Of course there must be bling as well. So lastly out came the Pecan Pie & Clear Ribbon Dots. Just a scattering of them around the focal layer was plenty.
Measurements
This card looks more intricate than it actually is. There are just a couple of layers to place. And I did not mention earlier that it is only a quarter sheet of card stock for the card base. So very easy to make multiples of.
The card base is Crumb Cake that is 4 1/4 X 5 1/2
The White layer is 4 X 5 1/4
The DSP is 6 X 5, score at 2 1/4 on the 6″ length with the pattern for the flap being up.
The small Crumb Cake card is 4 X 5 1/2 scored and folded at 2 3/4
There are 2 of the White layers on the small card, inside and front layer, each is 2 1/2 X 3 3/4
The small card DSP is 2 1/4 X 3 1/2
The focal layer was a scrap that was roughly 2 1/4 X 3
Thank you for stopping by today!!!
Designer Series Paper Sale begins on August 6 – 31st.
Papers included in the sale are:
Bright & Beautiful
Countryside Inn
Country Lace
Country Woods
Full of Life
Lily Pond Lane
Mediterranean Blooms
Perennial Lavender
Take To The Sky
Thoughtful Journey
To Market
Unbounded Beauty
Wildly Flowering
Winter Meadow
Online Exclusives
New Online Exclusives have dropped. There are Halloween, Fall, Christmas, and many that are great year round. Of course the new Designer Series Papers and Embellishments are fabulous as well!
You can go directly to these in my Online Store by clicking HERE
HOST CODE
My AUGUST Host Code is NB9XKFUZ. Please use this code for orders under $150.00. I will have a small gift for those with orders over $50.00 in addition to the Perk Rewards Program. You can read all of the information at the top of the page in the Menu Bar under SHOP / Perks.
Thank you for stopping by today. I hope you enjoyed today’s project and will come back. I do read and reply to all of the comments individually. They mean a lot to me. Please reach out if you have a question.
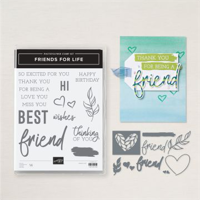
Today’s card is one that I made for a Team swap. I was so surprised how much I fell in love with this Bundle that is Friends For Life. Of course, the matching DSP really adds to the card.
Stamp Bundle
The gorgeous script Die of “friends” is my favorite part of this card. I love the size, font, everything! The other sentiment is part of several words, or groups of words, that can be used to create your own sentiment. Because of the layout of my card, using these partial sentiments was actually the perfect layout to create my full sentiment.
The extra words are stamped using Shaded Spruce and the inside image is in Lemon Lime Twist. Due to the front sentiment, I did not add one to the inside. I thought I would wait until I knew who I was sending it to and then add an appropriate one. So the simple leaf was a great fit. Here is a view of the inside of the card. And you see the “fun Fold” of the card.
Papers and Embossing
The beautiful DSP is from the matching Full of Life Designer Series Paper. This is a 6 X 6 pack of bold and bright designs as well as colors. The blocks down each side of the card are cut from one of the sheets. And the bold “friend” is from another piece. I added Foam Adhesive Sheets to the back of the variegated piece before die cutting it. I love the various colors. The little green heart is also die cut from the same sheet.
To continue the bold colors, I went with Lemon Lime Twist for the card base. It is also the layer for the front underneath the sentiment. I gave this layer a little bit extra texture by using what has become a favorite embossing folder. This is the So Swirly Embossing Folder. Those swirls are wonderful for any card. The movement is very different. The only finishing touch is a single Rhinestone on the little heart. That is extremely conservative for me!!
Measurements of Fun Fold
The card base is quarter sheet of Lemon Lime Twist card stock (5 1/2 X 4 1/4). The White layer is 5 1/4 X 4. There is also the “small” card attached to the center. You see it in that second photo. It measures 3 3/4 X 8, folded at 4. The side DSP are each 1/2 X 3 3/4. And the swirly embossed Lemon Lime Twist measures 3 1/2 X 3 3/4.
Thank you for stopping in today!!
Extra 10% on Bundles, and the Stamp Cut & Emboss Machine, both regular and Mini…
HOST CODE
My JUNE Host Code is VGC9HN6B. Please use this code for orders under $150.00. I will have a small gift for those with orders over $50.00 in addition to the Perk Rewards Program. You can read all of the information at the top of the page in the Menu Bar under SHOP / Perks.
Thank you for stopping by today. I hope you enjoyed today’s project and will come back. I do read and reply to all of the comments individually. They mean a lot to me. Please reach out if you have a question.
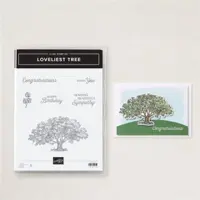
I have a stand up easel Birthday card to share today. It is a mix of stamp sets with the Wildly Flowering DSP. Plus it is a quick Fun Fold to try.
.
Card Views
Three card views begin with the standing easel. Next is the closed for mailing view. The top section would not lay flat. You should be seeing the blue card base at the top section as well. And then the totally opened inside so you can see the inside sentiment
Papers and Measurements
The paper is as much the star as the Fun Fold I believe. I was amazed, when I cut paper for my paper share, as I got to the Wildly Flowering Designer Series Paper. These sheets are fabulous. Part of it may be that they include my most favorite colors. But I think they are really special floral sheets. The paper I used is probably my favorite. Although they are difficult to choose in this package.
The card base is Misty Moonlight with a layer of Crumb Cake. And the layer to the focal piece is Mossy Meadow. The base layer is 4 1/4 X 11 and scored at 5 1/2 and 8 1/2. The Crumb Cake layers are 4 X 5 1/4 and the “stop” section is 4 X 2 1/2. For the front DSP it is cut 3 3/4 X 5 with the “stop” layer at 3 3/4 X 2 1/4. And the Basic White inside is 4 X 2 1/2 also.
To create the card, the largest section of the card base is flat on the table with the fold at the rear and the second fold standing up. Adhere the large front DSP to the large Crumb Cake. Then adhere the Crumb Cake to ONLY THE last small section. (from the 8 1/2 score line to the end) This allows the card to stand up. I used the butterfly as my “Stop” by adding Stampin’ Dimensionals. See how simple that is!
Stamps
There are a variety of stamp sets used on this card, mostly for the sentiments. The main set is the Spotlight On Nature stamp set. I used Stampin’ Write Markers in Mossy Meadow and Moody Mauve for the flowers. The butterfly is from this set as well. I stamped it in Early Espresso and colored with Misty Moonlight and Petunia Pop Stampin’ Blends.
The front sentiment is from the Loveliest Tree stamp set. I wanted a simple Happy Birthday and this fit perfectly. The inside sentiment is a favorite that I use often. It is from the So Sincere stamp set. This is a sentiment that is good for any happy occasion in my book.
Dies and Punches
The detailed circles for the focal layer flowers are from the matching, and bundled, Spotlight On Nature Dies. These are now my go to for layering Circles. I love the choice of edging detail to choose from. And the sentiment was punched using the Happy Labels Punch. With so many of the punches retiring, I was thrilled that this one stayed. Those two sizes of scallops/ticket edge compliment almost anything.
Finishes
The finishes for this card were to add a bit of the Moody Mauve by way of the 2023-2025 In Color Jute Trim. I wrapped a couple of strands around just to have some texture and the color. To add a touch of bling, although it is not shiny bling, I used the Dappled Dots in a couple of places.
Thank you for stopping in today!!!
May Join Promotion
New demonstrators who join during the month of May will receive the following products in their Starter Kit at no additional cost:
2024–2026 In Color Classic Stampin’ Pad Bundle
2024–2026 In Color 8-1/2″ x 11″ (21.6 x 27.9 cm) Cardstock
2024–2026 In Color 6″ x 6″ (15.2 x 15.2 cm) Designer Series Paper
2024–2026 In Color Stampin’ Write Markers
HOST CODE
My MAY Host Code is 96AT2UNW. Please use this code for orders under $150.00. I will have a small gift for those with orders over $50.00 in addition to the Perk Rewards Program. You can read all of the information at the top of the page in the Menu Bar under SHOP / Perks.
Thank you for stopping by today. I hope you enjoyed today’s project and will come back. I do read and reply to all of the comments individually. They mean a lot to me. Please reach out if you have a question.
Today is Free Shipping!!! I will probably have already placed my order by the time you are reading this. Free Shipping can save enough for an extra pack of DSP.
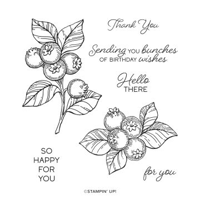
Today’s card is a Fun Fold featuring the Blueberry Bunches stamp set. This set carried over and I love it. It is an easy set to work with and to color.
Stamp Set
The Blueberry Bunches set contains two different bunches of blueberries. This is the smaller bunch. The other also has a stem attached. I wanted this one to go across the front of the card, so opted for the smaller ones. The berries are stamped using Memento Tuxedo Black Ink and then colored with Stampin’ Blends. I used Boho Blue, Balmy Blue and Night of Navy on the berries. And Granny Apple Green was used for the leaves. The inside sentiment is also from the set. I think it is just right on the “sweetness” level!
Papers
The beautiful tile DSP is from the Mediterranean Blooms Designer Series Paper. Each of the sheets has citrus plants on one side and different blue tiles on the other. I chose to go with the blue tiles for today. The card base is Night of Navy. For the inside card, I used a Basic White half card that I cut down just a little. At the 4″ wide it made the card to “full” and difficult to keep closed. You can see from the second view that I edged it over to the right more than the left. This keeps the closed borders equal.
Finishes
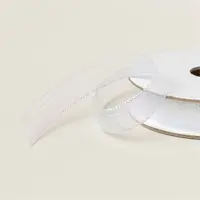
There is no sentiment on the front of this card. I was being a little different. But it needed a bit of something extra. So I added a bow wrapped around the blueberry layer made with the Iridescent Striped Trim. This is a great ribbon to work with and adds shine! For the final touch my Bling is blue to match the card. These are from the new Opal Rounds.
Measurements
The card base is 6 1/4 X 5 1/2, scored at 2″ on the 6 1/4″ side. For the inside card the Basic White is cut to 3 3/4 X 11 and folded at 5 1/4. It is placed towards the outer edge to keep the borders even with the card closed. The front DSP is 1 3/4 X 5 1/4. I totally covered the inside White card so the DSP is cut 3 3/4 X 5 1/4. I failed to measure the White on the blueberries. But the Night of Navy base is 4 7/8 in width. It goes from the DSP on the flap to the right edge DSP. The height can be adjusted to fit your choice of focal image.
Thank you for stopping by today!!
May Join Promotion
New demonstrators who join during the month of May will receive the following products in their Starter Kit at no additional cost:
2024–2026 In Color Classic Stampin’ Pad Bundle
2024–2026 In Color 8-1/2″ x 11″ (21.6 x 27.9 cm) Cardstock
2024–2026 In Color 6″ x 6″ (15.2 x 15.2 cm) Designer Series Paper
2024–2026 In Color Stampin’ Write Markers
HOST CODE
My MAY Host Code is 96AT2UNW. Please use this code for orders under $150.00. I will have a small gift for those with orders over $50.00 in addition to the Perk Rewards Program. You can read all of the information at the top of the page in the Menu Bar under SHOP / Perks.
Thank you for stopping by today. I hope you enjoyed today’s project and will come back. I do read and reply to all of the comments individually. They mean a lot to me. Please reach out if you have a question.
The card I am sharing today is one my downline, Karen Szczepkowski, made as a swap for OnStage. I fell in love with it immediately. And I bet you will as well.
The Card
Above is the card laying flat for mailing. Now for the stamp up view.
And the other side
I should have taken a view from the top. The column is square and shows off the three panels of DSP, plus the additional one that is on the right edge. I did not add an inside sentiment in my recreation. However the card folds flat for mailing but also will fold flat to the left so you could easily stamp, write, or add a thin layer with your inside sentiment.
Papers and Directions
The gorgeous DSP are all pieces from the Perennial Lavender Designer Series Paper. Each of the three column strips measure 1 3/8 X 5 3/8. And the right side back panel one is 1 1/8 X 5 3/8. The card base is Basic White that measures 5 1/2 X 10 1/8. It is scored at 4 1/4, 5 3/4, 7 1/4, and 8 3/4. Fold and burnish all of the folds with all going in the same direction. As you fold them all you will see that the column almost creates itself as they curl in. To dry fit and square up the column. Lay the card with the “back of the card” to the right and all of the scores to the left. Fold at the 4 1/4 score line and then on each score line making a square of those folds. The last and smallest one does not quite meet the 4 1/4 score line. Now you are ready to secure the column
Before gluing, add all of the DSP panels in place as shown. Next, fold the top sections at the third score line ( the one closest to the 4 1/4 score) and press the others flat. Lift the last, and smallest section, add adhesive to it and tuck under. Press it flat and when you open it up you should have a column. To fold for mailing, simply fold on the 4 1/4 score line and you will have the card laying like the first photo above. Make sure to try this before adding adhesive!!
Sentiment layer
The simple sentiment layer is perfect to not cover the beauty of the paper. This lovely Happy Birthday is from the Charming Sentiments set. And the matching Die cuts it perfectly. The dies are named Sentiment Silhouette Dies. I stamped in Shaded Spruce to bring out the dark green of the DSP. To give some added texture, I added a faux bow from the 2022-2024 In Color Orchid Oasis Bakers Twine. And of course some bling! One of the Fine Purple Shimmer Dots fit that bill perfectly.
Both of the Last Chance Lists are listed below. Click on either the Mini or Annual Catalog list and you will get a PDF of the full list.
HOST CODE
My MARCH Host Code is GBUE3X7H. Please use this code for orders under $150.00. I will have a small gift for those with orders over $50.00 in addition to the Perk Rewards Program. You can read all of the information at the top of the page in the Menu Bar under SHOP / Perks.
Thank you for stopping by today. I hope you enjoyed today’s project and will come back. I do read and reply to all of the comments individually. They mean a lot to me. Please reach out if you have a question.
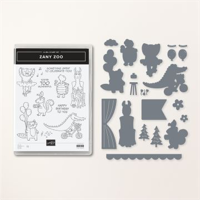
The card today is a pocket card of sorts. I am calling it a “tuck card” because a small card tucks in the behind the corner. It features the Zany Zoo products. I have neglected these fun products for too long.
The Card
This is a fun Birthday card for any age. The idea came from Karen Titus. I love a simple Fun Fold card. The card base is Basic White that is a quarter sheet of card stock. The layer, which is an opposite side of the Zoo Crew DSP, is 4 X 5 1/4. Next I cut a square of Basic White 3 1/2 X 3 1/2 with a square of matching DSP at 3 1/4 X 3 1/4. Both of these are cut on the diagonal. You layer one White and one DSP and save the other two for another card. Then add the diagonal piece to the bottom left corner of the card. Only adhere the left side and bottom!
Here is a photo of the real card.
The small card is a card base of Pool Party that is 3 1/4 X 4 1/4. And the DSP is 3 X 8 and folded at 4. Layer the DSP folded piece onto the Pool Party. I added the Basic White inside with a strip of DSP at the bottom. The inside White is 2 3/4 X 3 3/4.
The Bundle
The Zany Zoo Bundle is an awesome one. Not only are their great animal stamps and sentiments, but Dies that cut them out. Plus there are some additional Dies for added layers and scene creations. Also, and one of the best parts, the animal Dies will cut some of the animals from the Zoo Crew DSP. Both sentiments are stamped from the stamp set. The front sentiment is then Die Cut with the banner Die included in the Bundle.
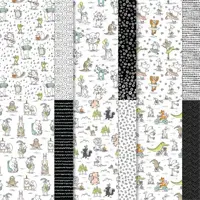
DSP
This Zany Zoo Designer Series Paper is so fun! I love the animals and their different actions they are doing. There is not a die for the elephant on the card front. But I wanted an unusual focal point on the front of the card. Since the DSP is thinner than card stock, I cut the elephant from the DSP leaving a wide area around her and then glued her to a scrap of White. While the glue was drying I finished coloring her with Stampin’ Blends. Once the glue had dried, I fussy cut the elephant and then added her to the front of the card with the banner. It was really quick and easy to do.
To finish the card I simply added a trio of Classic Matte Dots in Black. I felt they would show the best with all of the White and Black of the card.
Thank you for stopping by today!!
HOST CODE
My MARCH Host Code is GBUE3X7H. Please use this code for orders under $150.00. I will have a small gift for those with orders over $50.00 in addition to the Perk Rewards Program. You can read all of the information at the top of the page in the Menu Bar under SHOP / Perks.
Thank you for stopping by today. I hope you enjoyed today’s project and will come back. I do read and reply to all of the comments individually. They mean a lot to me. Please reach out if you have a question.
The content in this blog is the sole responsibility of Jackie Beers as an Independent Stampin' Up! Demonstrator. The use of and content of classes, services or products offered is not endorsed by Stampin' Up!