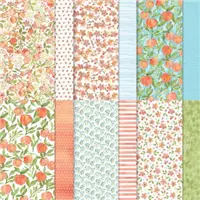
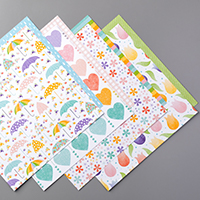
A Double Z fold card comes in such a variety of looks. And I love that! I have one today sharing the Double Z fold together with the Easter Friends stamp set. The You’re A Peach DSP has some softly colored papers that mix wonderfully!
This is a card I made over a week ago for a class. As I was typing this, I realized that several of the different products are the same as what yesterday’s card used! And the two cards are nothing alike.
Fun Fold
This Double Z fun fold is a really simple one. As I mentioned at the beginning, there are quite a lot of variations of the fold and some look nothing like this one. To begin, the base card is cut 4 1/4 X 8 1/2 and scored at 1 1/2 and 3 on the 8 1/2 side. And the second Z is cut 2 X 8 1/2 and scored the same measurements and again on the 8 1/2 side.
For the inside layer, it is stamped before adding and measures 5 1/4 X 4. Place the two Z folded pieces together before adding the DSP. Align the card base with the Z folds on the right hand side. The strip Z fold will have the Z on the left hand side. It is easiest to adhere the pieces with the Z sections folded instead of flat. After the band is attached, layer the 1 1/4 X 4 piece of DSP. That piece will cover the connection of the two pieces. For the band, the DSP is cut 3 7/8 X 1 3/4 and the small 1 1/4 X 1 3/4.
Stamp Set
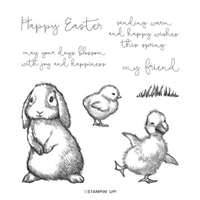
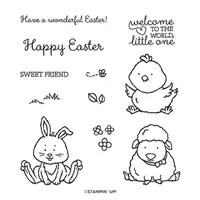
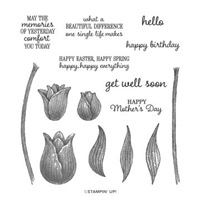
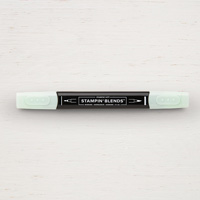
This sweet Easter Friends is a wonderful set to have on hand for several occasions. The chicks are adorable and so happy. They are stamped with Mango Melody and then colored with Daffodil Delight Stampin’ Blends. Little chicks need some grass to play in. So the grass image was randomly stamped several times. To tie in with the blue of the DSP, the Happy Easter is stamped using Misty Moonlight Ink.
Papers
Knowing this was an Easter card with the baby chicks, I looked for paper that seemed to match that theme. It was found in the You’re A Peach Designer Series Paper. The Pear Pizzaz card base was pulled not only for the green grass but to match the stems of the blue flowers. And the polka dot blue is just a happy piece that coincidentally matched the flower piece. To pull the chicks’ color into the card in another place, I used that as the backing of the My Friend sentiment.
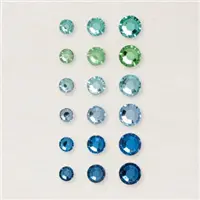
Another of the products that are also in yesterday’s card is the bling. Waves Rhinestone Jewels are becoming a quick “go to” because of the different colors. The green rhinestone was the choice once again on that layered sentiment. For the same reason as yesterday, that green perfectly matches the green in the card. Thankfully that green shade seems to pick up the color of what it is near. I love that.
SAVINGS ARE IN BLOOM
CLICK ON THE PHOTO FOR A VIEW OF ALL ITEMS DISCOUNTED
WAVES OF THE OCEAN SUITE …EARLY RELEASE
CLICK ON THE PHOTO TO SEE THE COMPLETE SUITE OF PRODUCTS
ALL TOGETHER … SPECIAL BUNDLE
CLICK ON THE PHOTO TO SEE ALL OF THE PRODUCTS
HOST CODE
My March Host Code is JGGHP66J. Please use this code for orders under $150.00. I will have a small gift for those with orders over $50.00 in addition to the Perk Rewards Program. You can read all of the information at the top of the page in the Menu Bar under SHOP / Perks.
Thank you for stopping by today. I hope you enjoyed today’s project and will come back. I do read and reply to all of the comments individually. They mean a lot to me. Please reach out if you have a question.
Welcome to InKing Royalty’s March Blog Hop! During this year’s blog hops, we are having fun with our stamping favorites – our favorite themes for seasonal cards and projects. This month’s projects feature Flowers & Fauna, a brilliant starting point for so many projects. We are excited to share our creations with you today! After you read my post, I hope you’ll hop over to the next person on the list at the base of this post.
Happy Hop Day, and Happy St. Patrick’s Day! I have a 2 for 1 deal for you today. I couldn’t Not make a St. Patrick’s Day card, and I wanted to follow the Hop theme with a pretty Easter card. Even though both cards follow the title, you get two cards! And I apologize in advance for a longer than normal post.
First is my Hop card. I made an Easter wreath like I would place on my door.
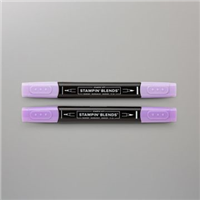
I have been using quite a lot of the Highland Heather of late. But when I think of Easter, it is my go to. My Mom loved purple and would always dress me in purple when I was young. All of my Easter dresses were purple!! So you understand my color scheme.
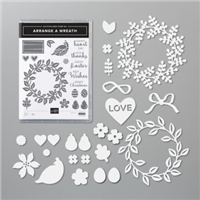
All of the wreath items are from the Arrange A Wreath Bundle. I stamped the base of the wreath, then added a die cut wreath on top for texture. The eggs and flowers are also from the bundle. As is the sentiment!
I decided to use the Stitched Rectangle Dies to add a bit to the layers. And to tie in the sentiment, I used one of the smaller dies. I had to adjust the size, which is fairly easy with the stitched rectangles. There are several videos out there showing how to do it. Basically you just place the paper back into the die at the desired length and match up the already made stitches and the die. Easy Peasy!
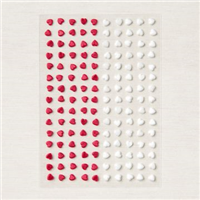
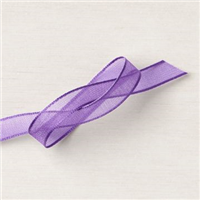
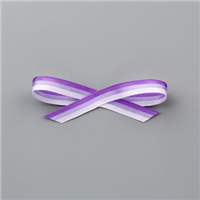
For the finishing touches, I added a Gorgeous Grape Sheer Ribbon bow to the wreath. I also added some of the Resin Hearts to the centers of the flowers and one on the sentiment banner.
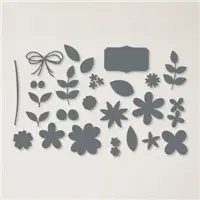
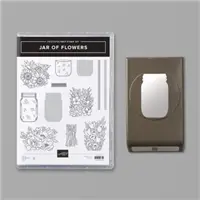
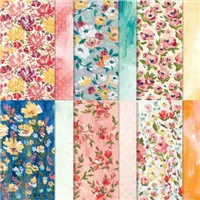
Here is my St. Patrick’s Day card. I used the Jar of Flowers Bundle for the jar. I die cut the shamrocks by cutting flowers from the Pierced Blooms Dies and cutting off some of the petals. The white flowers are from the Pierced Blooms also. The background is the gorgeous Fine Art Floral Designer Series Paper.
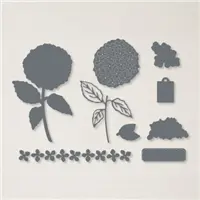
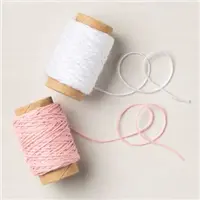
The finishing touch is the tag and bow. The tag is from the Hydrangea Dies. I have used it quite a few times. It is the perfect size! I added the White Baker’s Twine from the Snail Mail Trim Combo. It is wrapped around the jar and then an added bow.
I have the supply list for both cards at the bottom of the post! Thank you for stopping by today. I hope you’ll hop along to the next stop on the blog hop, Renae Novak at Blessed By Cards. There’s lots of inspiration to be found in this group – and you don’t want to miss it!
Thank you for hopping along with us. If you get stuck during the Blog Hop, please use this line-up as a guide:
I do not normally post on the weekends. But I had a cute idea that was appropriate to share for a little Easter project. I had the idea to use the Delightful Tag Topper Punch to make a little basket to hold 3 X 3 cards and envelopes. After I made it, I thought it would make an adorable Easter Basket. I did a video and hopefully you could make some of these for your little ones.
If you get my blog posts through an email, you may need to open it into a web browser to see the video. I haven’t got all of the kinks out of the process yet. They say practice makes perfect…..I sure hope so!!
I decorated the basket with the Welcome Easter little chick stamp. I stamped it on a piece of Thick Whisper White card stock and die cut with the Stitched So Sweetly Dies. The chick is stamped a little above half way on the die cut. I used the design of the die , where you can see the chick’s top knot, as a line. I scored across there and then secured it to the bottom of the basket and to the side. You could also simply cut off that section and adhere the piece flush with the bottom of the basket.
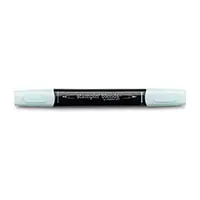
The chick is stamped in Gray Granite Ink and colored using the Stampin’ Blends. The yellow is both of the Daffodil Delight Blends. The feet and beak are colored with the Light Mango Melody Blend. I went around the chick with the Light Pool Party Blend.
The DSP is from the Dinoroar Designer Series Paper and is one of my famous “back side” of the paper. I have a tip in constructing the basket. Put the DSP on while the box is laying flat. I messed up in the video and forgot to do that!! Of course I would make a mistake 🙂
Here is a picture of the 3X3 holder that I made originally
I hope you can use this idea to spread some extra cheer this Easter. It will be different for all of us. Take care!!
HOST CODE
My April Host Code is HKP6K3Z4. Please use this code for orders under $150.00. I will have a small perk for those with orders over $50.00.
Today is the last day of Sale-A-Bration. I am sad to see these great products, that we can earn FREE, going away. Double check your wish lists and see if you need just one more order today!
I have a cute Easter Fun Fold to share today. I also have my first ever Video!!!!! I have said several times in my posts that I would do a video for some cards and I never had. Well, now I have. I hope you will let me know what you think. I still need to get some lighting so I do not have the shadows. I know I am my worst critic, but please share your thoughts.
The Easter Fun Fold is using the Welcome Easter stamp set and SAB Small Blooms punch as well as the Pleased As Punch Designer Series Paper.
Base card is 5 1/2 X 8 1/2, scored at 2 1/4 and 6 1/4 (It ends up as 5 1/2 X 4 instead of 4 1/4)
NOTE: The two “flaps” are the same measurements, it does not matter which you choose as the top.
Front flap bases are 5 1/4 X 2 ( you need 2)
Front DSP is 5 X 1 3/4 ( you need 2)
Inside card is 3 1/2 X 4 3/4
When securing bottom flap to hold inside card, lay the card in place before peeling off the Tear & Tape to secure the flap. This ensures you have room to easily slide the card in and out. If you are adding a gift card, lay it down there as well prior to securing.
Thank you for stopping in today. If you have any questions, please let me know. I would be happy to assist you.
HOST CODE
My March Host Code is YZH2VG6Y. Please use this code for orders under $150.00. I will have a small perk for those with orders over $50.00.
Join Promotion …… The Ultimate Shopping Spree !!
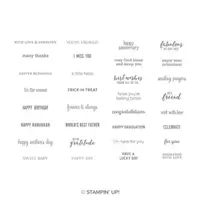
The Ultimate Bundle is the Stampin’ Up! Starter Kit. During Sale-A-Bration you get the extra value for your $99.00. If you have a wish list or are ready to place an order and it totals close to 99.00, please read this first.
There is NO OBLIGATIONS to do anything beyond ordering the kit. You pay $99.00 + tax and receive $125.00 of your choice of products + any stamp set from the annual or mini catalog (the most expensive one is the Well Said set with a $45.00 price) + the Mini Paper Cutter, a $26.50 value + the 6X6 DSP sampler pack (48 sheets of DSP) an $11.50 value + a Paper Pumpkin Kit with a value of $22.00 + FREE Shipping which is usually 10% of the order and would add another $23.00 value here. This equals over $230.00 value + business supplies added in at no cost. That is an awesome deal!! And you never have to purchase another thing. But while you are trying it out, and you have until the end of July before your trial period runs out, you are part of my Team! As well as my upline’s team. We have Facebook groups to share our projects and assist each other. I would love to talk with you about this opportunity.
Welcome to InKing Royalty’s March Blog Hop! During this year’s blog hops, we are enjoying a year of celebrations. Hop, hop! This month’s projects celebrate Easter, so prepare yourself for a variety of gorgeous, Easter-themed projects. We are excited to share our creations with you today! After you read my post, I hope you’ll hop over to the next person on the list at the base of this post.
I have once again matched the color of the Hop Banner, without knowing ahead of time what it is. Hopefully that is a good sign for my projects I have to share. I rarely do two projects, but I have broken that today.
First here is my card for the Easter theme.
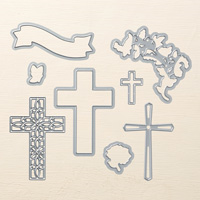
I paired the Cross of Hope Dies, from the Annual Catalog, with the Welcome Easter stamp set . I really love that particular cross from the dies. Those dies are definitely a keeper. My color choices for the card along with the bunny and lamb, come from childhood memories. My Mom loved any shade of purple. So all of my Easter dresses growing up, at least while I was younger, were shades of purple. I knew that had to be the base of my Easter card.
My second project is a little variation of a recent project from The Paper Pixie. Julie’s Easter Mini Gift Bag, you can see her post HERE, was my idea for an Easter basket. The only problem was I didn’t have candy that fit that size. However, I found something that fit perfectly without shortening the size of the basket, which is now a bag.
Can you tell what is inside? Yes, it is a Bath & Body Hand Sanitizer. I know they cannot be found right now. But as a crafter, I had several in my craft room for projects. Now you know that they fit perfectly inside this bag.
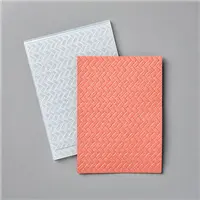
I used the Coastal Weave embossing folder and the card stock measurements Julie gives fit perfectly inside the embossing folder. The handle I is the Braided Linen Trim. I have included in my supply list the items used for both projects.
Thank you for stopping by today. I hope you’ll hop along to the next stop on the blog hop, Ann Murray at Murray Stamps Ink. There’s lots of inspiration to be found in this group – and you don’t want to miss it!
Thank you for hopping along with us. If you get stuck during the Blog Hop, please use this line-up as a guide:
My March Host Code is YZH2VG6Y. Please use this code for orders under $150.00. I will have a small perk for those with orders over $50.00.
Join Promotion …… The Ultimate Shopping Spree !!
The Ultimate Bundle is the Stampin’ Up! Starter Kit. During Sale-A-Bration you get the extra value for your $99.00. If you have a wish list or are ready to place an order and it totals close to 99.00, please read this first.
There is NO OBLIGATIONS to do anything beyond ordering the kit. You pay $99.00 + tax and receive $125.00 of your choice of products + any stamp set from the annual or mini catalog (the most expensive one is the Well Said set with a $45.00 price) + the Mini Paper Cutter, a $26.50 value + the 6X6 DSP sampler pack (48 sheets of DSP) an $11.50 value + a Paper Pumpkin Kit with a value of $22.00 + FREE Shipping which is usually 10% of the order and would add another $23.00 value here. This equals over $230.00 value + business supplies added in at no cost. That is an awesome deal!! And you never have to purchase another thing. But while you are trying it out, and you have until the end of July before your trial period runs out, you are part of my Team! As well as my upline’s team. We have Facebook groups to share our projects and assist each other. I would love to talk with you about this opportunity.
I am mixing two of my most favorite stamp sets today. One is A Good Day stamp set. It is so versatile, especially when you need a small sentiment or circle. I really am sad to see it on the retiring list. The second is Wishing You Well. It is a great distinctive stamp set. The bow is probably my favorite. So to combine the two I made an Easter wreath.
A Good Day, 145873
This little bunny has been a favorite from day one. I think he is just adorable, and the perfect size for so many things. I was surprised when I had the wreath idea that he fits perfectly!
The background splatter is from Touches Of Texture stamp set. I stamped under the wreath with Mint Macaron and then above and below is Mint Macaron stamped off once. This is another set that will be missed. I will be looking for a new favorite background splatter!
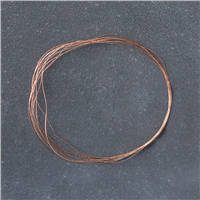
To finish off the card I went around the outside of the wreath circle with the Mango Melody Stampin’ Write Marker. It is a great way to differentiate the white when layering a white piece onto white. I thought it needed a bit more though. So I added the Copper Thread under the wreath.
Thank you for visiting today. I am a bit late on today’s post, but life happens. All of the supplies are listed at the bottom of the page.
Be sure to check the retiring products list. Some may already be selling out. Usually the retiring In-Colors go first! I also have a host code for the month listed below the Last Chance sticker. You can click on the Last Chance and go straight to the retiring products.
If you place an order with me, please use the April Host Code of 3KNKXJFH. If your order is $75.00 (of product) or more, I will send you a small gift. If it is over $150.00 (of product) I will send you a small gift, but DO NOT use the code. 150.00 is the minimum host rewards so you get the host rewards.
The content in this blog is the sole responsibility of Jackie Beers as an Independent Stampin' Up! Demonstrator. The use of and content of classes, services or products offered is not endorsed by Stampin' Up!