My card today is another Fun Fold. I found this with directions from a few different people and none referred to anyone else. So I really do not know who to give credit to. I shrunk it a tiny bit so that it fits in a regular envelope.
The Fold
I am calling this a Diamond Fold. It is actually very similar to the Kite Fold or the fold used for graduation hat cards. The other fold names usually do not stand open. I love that about this one.
To allow this to fit in a regular A2 envelope, 4 1/4 X 5 1/2, I used a piece of 4 1/4 X 8 1/2 piece of cardstock. It is scored at 2 1/8 and 4 1/4. You then mark the center of the 4 1/4 end of the paper that has the 2 1/8 score line. Cut from the score line to that center mark from each side. This makes the front point. Fold the card in half and use the already cut edges to make the same cut on the bottom. It is actually very easy and quick to get all of this done.
The Paper
I used the Harvest Meadow Designer Series Paper. I love these patterns for Fall , or anytime, cards. I have used three different patterns from the paper pack. For a layer between the DSP and Calypso Coral, I added Soft Succulent. The Bumblebee diamond shape pieces are cut 2 @ 2 3/4 X 2 3/4 with a Soft Succulent cut 2@ 2 7/8 X 2 7/8. The wide strips, there is one on the inside as well as the one on the top, is cut 2 @ 4 X 1 7/8 with a Soft Succulent layer of 2 @ 4 1/8 X 2. And finally the corners are a SS layer of 2 X 2, and the DSP 1 7/8 X 1 7/8. Each of these squares is then cut in half to make two triangles. (Simply place them on your cutter with a top and bottom point in the cutting track.
You can see all of the paper placements in the photo. Only one is not shown and it is the inside wide strip. It is just like the top one and I added a piece of White cardstock for a signature. The top Diamond shape is only adhered on the front half to allow it to stand up. Here is a view of the card folded flat for mailing.
It is not laying totally flat. The picture is a bit deceiving in that the point in the back actually is flush with the back of the fold.
The Finishing Touches
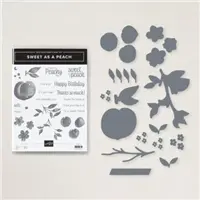
I used the Pretty Pumpkin Bundle for this card. Fall is probably my favorite season. I LOVE Christmas, but Fall seems to get a bit overlooked.
The DSP pumpkin is another sheet from the Harvest Meadows DSP. The stamped and Die cut pumpkin is from the stamp set. I used a variety of the both the 2020-2022 and 2021-2023 In Color Markers to color the various leaves and berries. Both of the pumpkins are raised with Stampin’ Dimensionals.
The sentiment is from the stamp set also. It is cut with the Stitched Rectangle Dies and only adhered in the center so that it hangs over the diamond shape. The final touch was a single gem from the Elegant Faceted Gems.
The 2nd Sale-A-Bration Is Here!!
Join My Team Promotion During Sale-A-Bration!!
HOST CODE
My August Host Code is Y4GZ7QNY. Please use this code for orders under $150.00. I will have a small gift for those with orders over $50.00 in addition to the Perk Rewards Program. You can read all of the information at the top of the page in the Menu Bar under SHOP / Perks.
Thank you for stopping by today. I hope you enjoyed today’s project and will come back. I do read and reply to all of the comments individually. They mean a lot to me. Please reach out if you have a question.
It has been so horribly hot here in the south lately. And quite a few of my friends are commenting about making homemade peach ice cream. Oh My!!! That is a favorite of mine from my childhood and I have been seriously craving some. All of this peach ice cream talk led me to today’s card. I will bet you can guess which Suite of products I am referring to.
The Paper
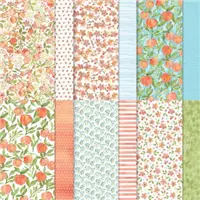
This You’re A Peach Designer Series Paper is full of beautiful paper patterns. I used two of them for this card, but there are several more. I wanted the peach sheet for more of the highlight and not the background. To get that look, I decided on a fun cut instead of a fun fold as I usually do. I call it an envelope fold/cut. This peach piece looks like it has folded over the top of the other layers.
The base piece from the DSP package is so pretty and I hated covering up part of it. The polka dot is always so fun to work with. And the variation of the peach coloring gives it a little worn look. The card base and layer are both pulled from the peach sheet, but pair perfectly with both pieces of DSP.
Stamps and Dies
The stamp for the sentiment is from the Sweet As A Peach stamp set. That set has such “sweet” sentiments!! I wanted the words to pop a bit and not blend into the gorgeous paper. After a bit of looking through my dies, I noticed the Painted Labels Dies and this swirl one. I have loved this die from first seeing it and it is perfect for this sentiment and card. All it took for the finishing touch was one of the 2021-2023 In Color Jewels in the Pale Papaya.
Measurements
Card base of Calypso Coral cut 5 1/2 X 8 1/2, scored and folded at 4 1/4
Layer of Pear Pizzaz cardstock cut to 5 1/4 X 4
Polka Dot DSP cut to 5 X 3 3/4
Peach DSP cu to 5 1/4 X 3 1/4 layered at an angle and cut to fit the layers.
The 2nd Sale-A-Bration Is Here!!
Join My Team Promotion During Sale-A-Bration!!
HOST CODE
My August Host Code is Y4GZ7QNY. Please use this code for orders under $150.00. I will have a small gift for those with orders over $50.00 in addition to the Perk Rewards Program. You can read all of the information at the top of the page in the Menu Bar under SHOP / Perks.
Thank you for stopping by today. I hope you enjoyed today’s project and will come back. I do read and reply to all of the comments individually. They mean a lot to me. Please reach out if you have a question.
I hope you have your new Mini Catalog and the Sale-A-Bration catalog! They are both awesome! This is the first time for a 2 SAB. I love the idea of spitting up this Free products event. Today I am sharing one of the stamp sets that is available when you purchase $100.00 in product. It is the Delicate Dahlias.
Stamps
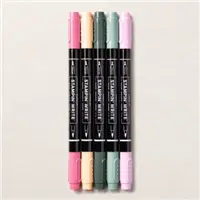
I love this Delicate Dahlias stamp set. This flower is a two step stamp, but it also has the definition and shading in the filler stamp. It really produces a lovely image. I used Misty Moonlight Ink for the filler stamp and Night of Navy Ink for the outline. They really work well together.
The sentiment is from the stamp set also. I finished both the flower and the sentiment with a bit of bling. These are the Blue Adhesive Gems. The different sizes are great and definitely needed the larger one for the flower.
Paper
To compliment the blue flower I went with this great piece of DSP from the Beauty of the Earth Designer Series Paper. It is one of the most vibrant ones in the pack. And the mix of blues and cajun craze are a perfect blend.
There are other great choices in the paper, but I went with the Misty Moonlight and Cajun Craze for my background and layers. The sentiment and background are given added dimension with the Banner Pick A Punch.
Measurements
Misty Moonlight card base is cut 5 1/2 X 8 1/2 scored and folded at 4 1/4
Basic White layer is 5 1/4 X 4
DSP layer is 5 1/8 X 3 7/8
Cajun Craze flower layer is 3 1/8 X 3 1/8
Flower layer is 3 X 3
Sentiment layer of Cajun Craze is 3/4 X 2 3/4
Sentiment is 5/8 X 2 1/2
HOST CODE
My August Host Code is Y4GZ7QNY. Please use this code for orders under $150.00. I will have a small gift for those with orders over $50.00 in addition to the Perk Rewards Program. You can read all of the information at the top of the page in the Menu Bar under SHOP / Perks.
Thank you for stopping by today. I hope you enjoyed today’s project and will come back. I do read and reply to all of the comments individually. They mean a lot to me. Please reach out if you have a question.
I have found another Fun Fold card to share. You may have seen this design from fellow Stampin’ Up! Demonstrator Sue Campfield. She has a couple of posts and videos on it. I fell in love immediately and had to give it a try.
Corner Tuck Fun Fold
As I said at the top of the post, this card is from Susan Campfield and she has a video. I used her basic measurements and added a little bit. The inside of her card did not have an extra layer. To add a bit of carry through, I stamped the Misty Moonlight layer with the stamped tree images. These are from the Perfectly Plaid stamp set. I thought they worked perfectly with the Beauty of the Earth Designer Series Paper.
The other thing I added was the layer of cardstock behind the DSP strip on the left side of the front. It seemed the DSP sort of bled into the base color. I also used that strip to anchor the front square focal layer. I centered and placed the square layer right up against that left strip. That allowed me to better center everything. You can see from the photo that the layer tucks underneath the corner but is still fairly centered on the card.
Here is the view of the open card.
Stamps and Paper
The star of this card, besides the fun fold, is the DSP. I mentioned above that it it the Beauty of The Earth Designer Series Paper. This is what most people would think of as the back side. You know how I love using the back side!! And I love that the corner piece and the other two containing the trees are all from the same sheet of paper. The corner piece is from the top of the paper.
In trying to add some texture and detail to the inside of the card, I decided some matching trees would be the perfect thing. By finding this similar tree in the Perfectly Plaid set, it seemed just meant to be. It is a carryover from the last two holiday catalogs and a favorite of mine. I love the small tree images that work for various seasons and needs.
The sentiments are from the Beauty of Friendship stamp set. These are perfect for any time. We should let people know whenever they inspire us in some way. The mix of fonts are always something that draws me to a sentiment. The front sentiment is cut using a die from the Painted Labels Dies. It is finished off with a Glitter Ribbon to ground it.
Measurements and My Directions
Card base of Night of Navy is cut 4 1/4 X 8 and scored at 2 1/2
Inside layer of Misty Moonlight is cut to 5 1/4 X 4 1/8
Front left Misty Moonlight layer is cut to 1 X 4
Front left DSP layer is cut to 7/8 X 3 7/8
Center Misty Moonlight layer is cut to 3 1/8 X 3 1/8
Center DSP layer is cut to 3 X 3
Inside White layer is cut to 3 X 3
The right corner is Night of Navy cardstock and a piece of DSP. Both are cut to 3 X 3 and then each is cut on the diagonal. Save one half piece from each paper for later.
Glue the triangle of DSP and cardstock together to make a stronger corner. Add dimensionals to each corner.
Stamp the tree image on the Misty Moonlight inside layer using Misty Moonlight Ink that you stamp off first.
Adhere this layer to the inside of the card.
Adhere the corner piece flush against the corners of the inside.
Test fold the front flap and make sure it clears the point of the corner layer. You may need to trim just a fraction off of that end.
Layer and add the Left side strip to the left edge of the front flap. Space it evenly at top, bottom, and left side.
Add the focal layer right up against strip.
Place the White inside sentiment in the center of the inside and it should be hidden by the front flap.
My Paper Share for Upcoming Mini Catalog
This is my first time doing a Paper Share. I opted to only do the paper for this first one. I would love to get you a sample of all of the new paper in the upcoming Mini Catalog as well as the Sale-A-Bration catalog. Click HERE to see what papers are included and to sign up for my shares. I will close this on July 31st.
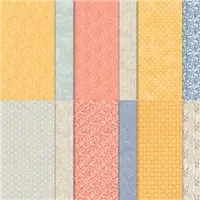
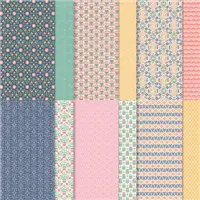
The picture below shows the Designer Series Papers that are included in the Sale. There are 9 to choose from!!
HOST CODE
My July Host Code is 2GKGF4Q7. Please use this code for orders under $150.00. I will have a small gift for those with orders over $50.00 in addition to the Perk Rewards Program. You can read all of the information at the top of the page in the Menu Bar under SHOP / Perks.
Thank you for stopping by today. I hope you enjoyed today’s project and will come back. I do read and reply to all of the comments individually. They mean a lot to me. Please reach out if you have a question.
I have made this same Interlocking Gate Fold card previously. Today is simply using different DSP and a different stamp set. This version is using the Sweet Symmetry Designer Series Paper along with the In Symmetry stamp set.
Here is a view of how it opens.
Fun Fold
The Interlocking Gate Fold, that is what I call it, is a fun and easy card to make. The only difficulty is aligning the bars across the front to be equal distance apart. The top and bottom bars are connected by one that is hidden. The flower is attached to the hidden bar. These two are attached to the card on the left side. The center bar is by itself and is attached on the right side.
Products
The In Symmetry stamp set and the Sweet Symmetry Designer Series paper are two of the four products in the Sweet Symmetry Suite of products. I did not use the punch which Bundles with the stamp set, or the matching Flirty Flamingo ribbon.
To make the flower, I stamped the large flower stamp twice. It is a photopolymer stamp set. I inked and stamped onto a square of Basic White cardstock. The first time I had the flower in the straight up, normal position. For the second stamping, I re-inked and turned it upside down. Because it is photopolymer, I could see pretty clearly the bottom of the first stamping. So lining them up was pretty simple. Then all I needed were my handy Paper Snips to fussy cut the flower out. The final touch was adding a Blue Adhesive Gem to the center of the flower.
Previous version with directions
Click HEREfor the link to the previous version of this card. I have all of the sizing and directions in that post. If you have any questions, please do not hesitate to contact me. I am happy to help you.
Designer Series Paper Sale
The picture below shows the Designer Series Papers that are included in the Sale. There are 9 to choose from!!
HOST CODE
My July Host Code is 2GKGF4Q7. Please use this code for orders under $150.00. I will have a small gift for those with orders over $50.00 in addition to the Perk Rewards Program. You can read all of the information at the top of the page in the Menu Bar under SHOP / Perks.
Thank you for stopping by today. I hope you enjoyed today’s project and will come back. I do read and reply to all of the comments individually. They mean a lot to me. Please reach out if you have a question.
You all know how much I love the beautiful Stampin’ Up! Designer Series Paper. Today I have gone a bit overboard in the use of it. LOL!! I even added in an embossed layer of the Gold Foil Sheets. The outcome is well worth all the shine and DSP.
Gold
I have added a variety of “Gold” to today’s card. As I commented in yesterday’s post, I have been neglecting the Embossing Folders. So the star of this show is the Gold Foil Sheet embossed using the Painted Texture 3D Embossing Folder. Oh My, does it show up wonderfully with the gold! I really hated to cover up parts of it.
To carry on the Gold theme, I went with two sheets from the Expressions In Ink Designer Series Paper. This paper is all a work of art! I like using smaller pieces of it in that it makes me think it will last longer. The final gold layer is another small piece of the Gold Foil sheet cut using the Layering Circles Dies.
Shaded Spruce
To break up all of the gold, I pulled Shaded Spruce from the marble looking piece of DSP. It could have been the softer shade of green, but I wanted something that was strong enough to highlight the gold. I still used it somewhat sparingly. By using it as the background layers, it is like the man’s black tuxedo to better show the lady’s sparkling evening gown. (I read that somewhere, I do not wear evening gowns!)
The last touch of greens are on the sentiment layer. Since I went with the Gold background for the sentiment, I stamped the Best Wishes using the Shaded Spruce Ink. Although I have not used Soft Succulent in the card, the softer color for the bow is the correct choice. Plus the texture of that Open Weave Ribbon is a great contrast to the gold.
Measurements
card base of Shaded Spruce is cut 4 1/4 X 11, folded in half at 5 1/2
layer of Basic White is cut 4 X 5 1/4
Gold Foil embossed layer is cut 3 7/8 X 5 1/8
Shaded Spruce long layer is cut 1 5/8 X 4 5/8
Striped DSP is cut 1 1/2 X 4 1/2
Shaded Spruce wider layer is cut 2 5/8 X 3 5/8
Veined DSP is cut 2 1/2 X 3 1/2
The Expressions In Ink DSP is not included in the current 15 % off sale. However, when I checked it is back in stock and available to order. If you place your order through my online store, please use the host code further down, or on the right side of the page depending on your computer.
The picture below shows the Designer Series Papers that are included in the Sale. There are 9 to choose from!!
HOST CODE
My July Host Code is 2GKGF4Q7. Please use this code for orders under $150.00. I will have a small gift for those with orders over $50.00 in addition to the Perk Rewards Program. You can read all of the information at the top of the page in the Menu Bar under SHOP / Perks.
Thank you for stopping by today. I hope you enjoyed today’s project and will come back. I do read and reply to all of the comments individually. They mean a lot to me. Please reach out if you have a question.
The content in this blog is the sole responsibility of Jackie Beers as an Independent Stampin' Up! Demonstrator. The use of and content of classes, services or products offered is not endorsed by Stampin' Up!