I am sharing a quick card that is more Spring than Winter. Hopefully you will like the technique of the focal layer and try it yourself.
Background Technique
The DSP is probably more the star of this show because it is so soft and elegant looking. However, I am focusing on the background I used with the focal layer. But the softness of the DSP did give me the color combinations I used on the floral layer. This is my Squiggle Technique!
The Squiggle Technique is simply taking a Stampin’ Blend and using the brush end to “squiggle” lines back and forth across the paper. For this floral stamp, I wanted different colors to simulate (sort of) looking eye level to the flowers. So I began with Dark Mint Macaron, next was Light Mint Macaron followed by Light Soft Sea Foam. Then I added Dark Soft Sea Foam and finished with Light Pool Party. My mind sees the darker grass at the bottom moving up to lighter and then the sky. You may just see squiggles! And that is okay. 🙂
Stamps
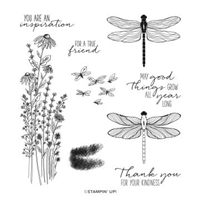
The floral stamp is from the Dragonfly Garden stamp set. This looks to me like a bunch of wild flowers growing up from my imaginary field. Part of the thought with the background was a way to not have to color all of the flowers with shades of green and flowery colors. I thought the squiggles were a much quicker route to take.
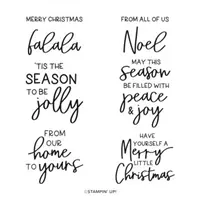
For the sentiment I went to the Charming Sentiments stamp set. This set is one of all wonderful sentiment in a mixture of fonts. I love the mix of fonts and partially chose this one for the fun look it gives. It seems to be trying to get your attention with the exclamation point!
Papers
Last but not least is the beginning of the card! This beautiful embossed DSP is from the Splendid Day Designer Series Paper. It contains this same pattern in a few of the softer colors. Since this DSP piece is a Soft Sea Foam, I went a shade darker for the card base. That is Mint Macaron with a layer of Basic White between the two.
Finishes
To finish this card I added just a few little touches. First is the Brass Butterfly with the larger flower in the field. As I said in the beginning, it really is not a Winter card! Next I used the Label Me Fancy Punch to cut the fun sentiment with. The floral layer is placed close to the left edge to leave room on the right side for the tag. The two are almost touching in the center. So I added a simple White Baker’s Twine Bow to break that up a bit.
Don’t forget the Current Clearance and Last Chance Products!!!
HOST CODE
My December Host Code is Y7T7EMTC. Please use this code for orders under $150.00. I will have a small gift for those with orders over $50.00 in addition to the Perk Rewards Program. You can read all of the information at the top of the page in the Menu Bar under SHOP / Perks.
Thank you for stopping by today. I hope you enjoyed today’s project and will come back. I do read and reply to all of the comments individually. They mean a lot to me. Please reach out if you have a question.
Today I have stepped away from Holidays and back to every day life. For me that means Birthday cards for friends. These are always needed and are my favorite to make. Plus this one is a quick one.
Stamp Set
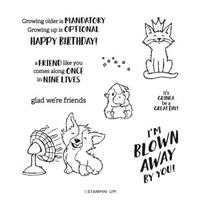
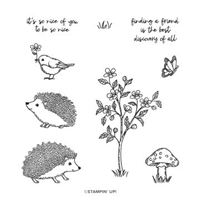
The “critter” stamps are the ones I am first drawn to. This one is the Glad We’re Friends set. I think the little animals are so cute. And since this recipient is a cat person, and we all know cats are King, this was an easy choice. Making the cat the focal point was also an easy choice because they are always the focal point. At least in their minds! So the cat is stamped and colored with Smoky Slate Stampin’ Blends. For the crown I went with Daffodil Delight Stampin’ Blends.
Paper
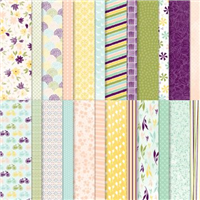
These two DSP pieces are from the Host pack Design A Daydream Designer Series paper. These are extra thick packs of DSP with several of each pattern. That makes them wonderful for creating multiples of a card. I actually chose these papers to compliment each other and they were chosen first. Then the card base color came next. And instead of black from the stripes, I substituted the gray. It was a simple and quick process.
Finish
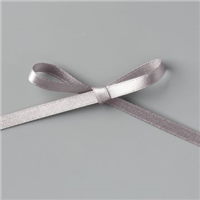
I left the front of the card pretty clean since the paper is fairly loud. And of course the cat is sitting proudly as the star. So to do a simple finish I went with a simple strip of ribbon and bow. This is the Gray Granite ribbon and is beautiful. It adds some glam to the King Cat with the shimmer it has.
Birthday Organizer Kit
DETAILS
Kit includes one 8″ x 10″ (20.3 x 25.4 cm) monthly planner with space to record birthdays each month as well as a pocket sleeve to hold birthday cards.
Includes 12 full-size birthday cards, 6 of 2 designs, and 12 coordinating envelopes.
Includes Glue Dots, Stampin’ Dimensionals, Adhesive-Backed Embellishments, and Tear & Tape Adhesive
Includes die-cut florals and pieces ready for you to use—no prep work required!
Includes sticker sentiments and die-cut labels in Dutch, English, French, and German
My November Host Code is XUE6MDFV. Please use this code for orders under $150.00. I will have a small gift for those with orders over $50.00 in addition to the Perk Rewards Program. You can read all of the information at the top of the page in the Menu Bar under SHOP / Perks.
Thank you for stopping by today. I hope you enjoyed today’s project and will come back. I do read and reply to all of the comments individually. They mean a lot to me. Please reach out if you have a question.
I have another of the Framed Florets and Fitting Florets to share today. In the team class we had Brain King challenged us to use the plaid piece of the Fitting Florets DSP. I hope you enjoy my version.
Paper
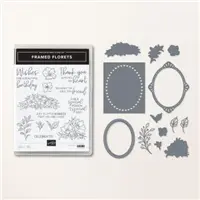
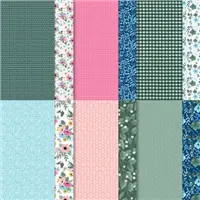
The Fitting Florets Designer Series paper is the star of this card. If you like it as much as I do, you need to order now. This part of the sneak peek of products is only available while supplies last. Only the stamp set will carry over to the Mini Catalog in January. And this paper is impressive! The challenge was to use this piece of the plaid Evening Evergreen.
In looking through the papers, I realized this blue flower pattern is the reverse side of the plaid. Of course they coordinate beautifully. So the hard part of the card was over! Pulling the Evening Evergreen for the card base and the Balmy Blue for the layer was a piece of cake. And who would think that these colors would work so well together! I added a few of the Balmy Blue die cuts as a bonus.
Stamp Set
The sweet sentiment is from the Framed Florets stamp set. And you cannot really see it in the photo, but I used the small flower outline behind the sentiment. It is in Balmy Blue and a bit light. I do love the sentiment. This is one that would work for any “Special Day”!
Dies and Finishes
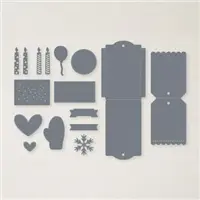
As I mentioned above, the little leaves surrounding the sentiment are from the Framed Florets Dies. Personally I love the open leaves. And you may have recognized the plaid tag. It is from the Celebrate With Tags Dies that I have used a few other times. For this card, I cut the tag in half. It is a folded tag and I saves the other half for another use. The sentiment layer is also from the Celebrate With Tags Dies. It fit the perfectly.
For the finishing touch, I added the leaves behind the sentiment. To add some extra bling, I added a couple of the blue Fine Sparkle Gems on the sentiment layer and one at the top of the tag. That one is actually covering the ribbon hole of the tag. I think that is a good spot for a gem!
Framed Florets Suite available now.
Here is all of the information on this beautiful suite of products. The Framed Florets stamp set will also be available in the January Mini Catalog. However the Framed and Festive stamp set along with the DSP are only available while supplies last. Sadly the gold swirl embellishments are already gone.
Birthday Organizer Kit
DETAILS
Kit includes one 8″ x 10″ (20.3 x 25.4 cm) monthly planner with space to record birthdays each month as well as a pocket sleeve to hold birthday cards.
Includes 12 full-size birthday cards, 6 of 2 designs, and 12 coordinating envelopes.
Includes Glue Dots, Stampin’ Dimensionals, Adhesive-Backed Embellishments, and Tear & Tape Adhesive
Includes die-cut florals and pieces ready for you to use—no prep work required!
Includes sticker sentiments and die-cut labels in Dutch, English, French, and German
My November Host Code is XUE6MDFV. Please use this code for orders under $150.00. I will have a small gift for those with orders over $50.00 in addition to the Perk Rewards Program. You can read all of the information at the top of the page in the Menu Bar under SHOP / Perks.
Thank you for stopping by today. I hope you enjoyed today’s project and will come back. I do read and reply to all of the comments individually. They mean a lot to me. Please reach out if you have a question.
I have a fun card to share with you today. It is a card designed by my upline, Brian King, for a team creative day. It is made from Brian’s directions, but with a twist. I added a gift card slot to mine.
Isn’t this card adorable? Brian designed it with the Framed Florets Bundle and matching Framed Florets Designer Series Paper. The sentiment is from an additional stamp set that is only available now in this special sneak preview. That set is the Framed and Festive set. This fun fold is a square Joy Fold Card. Here are the open versions.
As I said, I added a gift card slot. That Is what I like to do as I tend to give quite a lot of them throughout the year. And here is the final open view.
You can see where I added the gift card. When adhering the DSP piece on the inside, I used Tear & Tape to the bottom and fold edges. That makes a much stronger hold and allows the gift card to simply slip between the cardstock and DSP. I may have to see what other cards can use this new idea!
I did not add an inside sentiment. However I did take a scrap from the DSP and fussy cut the little flowers on the inside layer. Sometimes those scraps can really make a difference on the cards.
Framed Florets Suite available now.
Here is all of the information on this beautiful suite of products. The Framed Florets stamp set will also be available in the January Mini Catalog. However the Framed and Festive stamp set along with the DSP are only available while supplies last. Sadly the gold swirl embellishments are already gone.
Birthday Organizer Kit
DETAILS
Kit includes one 8″ x 10″ (20.3 x 25.4 cm) monthly planner with space to record birthdays each month as well as a pocket sleeve to hold birthday cards.
Includes 12 full-size birthday cards, 6 of 2 designs, and 12 coordinating envelopes.
Includes Glue Dots, Stampin’ Dimensionals, Adhesive-Backed Embellishments, and Tear & Tape Adhesive
Includes die-cut florals and pieces ready for you to use—no prep work required!
Includes sticker sentiments and die-cut labels in Dutch, English, French, and German
My November Host Code is XUE6MDFV. Please use this code for orders under $150.00. I will have a small gift for those with orders over $50.00 in addition to the Perk Rewards Program. You can read all of the information at the top of the page in the Menu Bar under SHOP / Perks.
Thank you for stopping by today. I hope you enjoyed today’s project and will come back. I do read and reply to all of the comments individually. They mean a lot to me. Please reach out if you have a question.
Today’s card is far away from the holiday cards I have been posting. It is a design card for the challenge of “Things With Wings” for the Make My Monday Blog Challenge. . And I came up with more of a Spring card than a Winter one.
You too can join in on this challenge. Simply click on the button below and you will be taken to the blog. Design your own card and add it to the post.
Stamps
This is a one stamp set card, which is always a win in my opinion. Today’s set is the Happy Hedgehog stamp set. Except I did not use the hedgehog! I needed wings and used those plus the tree as a base. All of the images were stamped with Memento Tuxedo Black Ink and then colored using Stampin’ Blends. The different Blends are listed in the Supply List at the bottom of the post.
Colors
My color inspiration was more from the images. It led me towards nature with grass and sky. By using the Stampin’ Blends, I created my own background. The bottom color is Light Soft Succulent with the next layer Light Mint Macaron, Then came Light Pool Party and finally Light Balmy Blue. Of course the card base and layer were pulled from these as well.
Pops and Finishes
The bird was the image I chose first because of the Wings theme. So it needed to Pop for me. To do this, I used the Stylish Shapes Dies and cut the bird, as well as the layer. By envisioning this bird in a “highlighted” way, I chose Balmy Blue to be the background layer. It is die cut using the next larger shape. And as the final touch, I added a couple of the 2021-2023 Opal Rounds. The two on the background are the Soft Succulent ones. To add some different color, I went with the Pale Papaya to give a pop on the bird layer.
Birthday Organizer Kit
DETAILS
Kit includes one 8″ x 10″ (20.3 x 25.4 cm) monthly planner with space to record birthdays each month as well as a pocket sleeve to hold birthday cards.
Includes 12 full-size birthday cards, 6 of 2 designs, and 12 coordinating envelopes.
Includes Glue Dots, Stampin’ Dimensionals, Adhesive-Backed Embellishments, and Tear & Tape Adhesive
Includes die-cut florals and pieces ready for you to use—no prep work required!
Includes sticker sentiments and die-cut labels in Dutch, English, French, and German
My November Host Code is XUE6MDFV. Please use this code for orders under $150.00. I will have a small gift for those with orders over $50.00 in addition to the Perk Rewards Program. You can read all of the information at the top of the page in the Menu Bar under SHOP / Perks.
Thank you for stopping by today. I hope you enjoyed today’s project and will come back. I do read and reply to all of the comments individually. They mean a lot to me. Please reach out if you have a question.
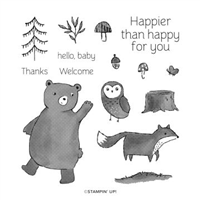
I have gone back to the Annual Catalog for some fun and non-holiday cards. Today’s is from the Happier Than Happy Bundle. It is a happy Thank you card!
Bundle
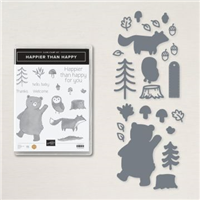
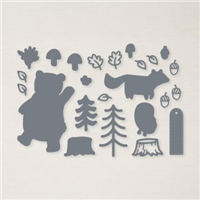
My original thought when starting this card was for a Happy card. This cute bear definitely gives off the Happy and Smile vibe I was looking for. And the fact he is part of a bundle with dies is a huge bonus. This is the Happier Than Happy Bundle that includes the Happy Forest Dies. I will say that my first opinions of this suite of products was that it was for children. But after seeing the pieces and playing with them, I totally changed that opinion. They make great SMILE cards!
The bear was stamped with Soft Suede ink and then die cut. He is raised using Stampin’ Dimensionals to give some depth to the card and make it look more like he walking in front of those cute flowers. And the sentiment frame is adorable! I have begun making a list of cute frames like this one to use with different sentiments. Sometimes I forget to look further than what I am currently working with and that is sad. So to finish this card I added the tag and sort of “attached” it to the bears hand with one of the Rustic Metallic Dots.
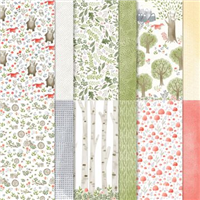
Paper
This paper is so pretty and saved me from having to decide on a stamped background. The little woodsy scene is perfect as is. And to compliment the color of the flowers, I went with a second sheet from the Happy Forest Friends Designer Series paper. I love the colors and the small hearts.
I hope you have an awesome weekend!
Birthday Organizer Kit
DETAILS
Kit includes one 8″ x 10″ (20.3 x 25.4 cm) monthly planner with space to record birthdays each month as well as a pocket sleeve to hold birthday cards.
Includes 12 full-size birthday cards, 6 of 2 designs, and 12 coordinating envelopes.
Includes Glue Dots, Stampin’ Dimensionals, Adhesive-Backed Embellishments, and Tear & Tape Adhesive
Includes die-cut florals and pieces ready for you to use—no prep work required!
Includes sticker sentiments and die-cut labels in Dutch, English, French, and German
My November Host Code is XUE6MDFV. Please use this code for orders under $150.00. I will have a small gift for those with orders over $50.00 in addition to the Perk Rewards Program. You can read all of the information at the top of the page in the Menu Bar under SHOP / Perks.
Thank you for stopping by today. I hope you enjoyed today’s project and will come back. I do read and reply to all of the comments individually. They mean a lot to me. Please reach out if you have a question.
The content in this blog is the sole responsibility of Jackie Beers as an Independent Stampin' Up! Demonstrator. The use of and content of classes, services or products offered is not endorsed by Stampin' Up!