I have a fun technique to share with you today. And I actually created it myself. At least I have not seen it done before. A really quick method to create a background for your cards. It is paired with the Layering Leaves and Bough Punch for a bright card.
Background
This fun background was created when I was trying to create some stripes with watercolor. Except I messed up and it looked horrible. I happened to look at a clear block that was standing on it’s side and realized the sides are not flat. Duh!!! Like I didn’t already know that. So I took the H Clear Block, inked the side with Pebbled Path Ink and stamped. My lines are not straight, but that is okay with me. The best part is that you get two lines at once. I tried to eyeball the straightness and the placement by doing the block with between stamping. It is definitely an easy background to try and I hope you will give it a shot.
Colors and Stamps
To pair with the Pebbled Path, I wanted bright colors for the layers. The card base is Parakeet Party with Bubble Bath as the layer. Keeping with those colors, I stamped the leaves from Layering Leaves stamp set with Parakeet Party and colored with the Stampin’ Blends. For the little flower looking pieces I stamped with Parakeet Party and colored the tip with Bubble Gum Dark Stampin’ Blend.
The sentiment is such a sweet one and is great for many card occasions. It is from the Wonderful Thoughts stamp set. The ink is Pebbled Path to tie back to the stripes. I also stamped some Bubble Bath splatters, from the stamp set, around where the leaves would be.
Punches
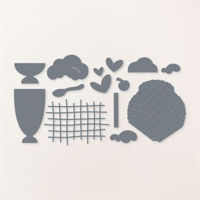
There are two punches used on this project. The first is for the leaves which is the Boughs Punch. A tip I have used is to punch from a scrap of paper. Use that negative to place your stamps. I placed them stamping side down into the negatives (both stamps) and then picked up with a Clear Block. That way when I stamped the images they were perfectly aligned to punch out. This is especially good when doing multiples!
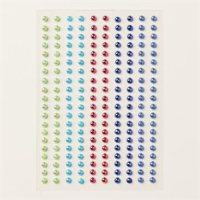
The second punch is the one used on the sentiment. It is the Happy Labels Punch. This is a pick a punch. There are two sizes of scalloped ends. I chose to use the larger scallops for this card. The sentiment is adhered over the greenery with Stampin’ Dimensionals and then a scattering of the Pastel Adhesive Backed Sequins in the pink color are used.
Thank you for stopping by today!!!
Designer Series Paper Sale! June 1-30
Click on the photo to see all of the available papers. If you are ready to order please click on the shop button in the menu and you will be taken to my online store! I also have a host code of 34QVEY4F that I would appreciate you using!
New Starter Kit opportunity for the month of June!
If you have a large Wish List, I would love to talk with you about the Starter Kit. It is the Ultimate Bundle!
Online exclusives are here to stay! Click on the photo and be taken directly to them in my online store. If you place an order, please use my Host Code listed just below.
HOST CODE
My June Host Code is 34QVEY4F. Please use this code for orders under $150.00. I will have a small gift for those with orders over $50.00 in addition to the Perk Rewards Program. You can read all of the information at the top of the page in the Menu Bar under SHOP / Perks.
Thank you for stopping by today. I hope you enjoyed today’s project and will come back. I do read and reply to all of the comments individually. They mean a lot to me. Please reach out if you have a question.
Today I have a second card made using the Patchwork Pieces Dies. This is the sunburst looking one. I have created a flower garden look with some fun products.
Dies and Stamps
There are two different Die sets used today. The main one is the Patchwork Pieces Dies. This set contains two dies that cut a scene for you. You can see the other die HERE that was used in a card I posted a few weeks ago. Both Dies are made to fit the pieces back together. And I will say that both can be a bit tricky. In each instance I had to look at the die itself to place the pieces. But once you get started it is fine. For this card I used a piece of DSP that was 3 1/4 X 4 3/4. That leaves a very thin border once it is cut. And I layered it on a White that is cut 3 1/2 X 5. I wanted the layer and it’s border to assist me in placing the pieces.
The second Die set used is the Sending Dies. They pair with the Sending Smiles stamp set but are no longer bundled together. All of the additional layers are stamped using the Sending Smiles stamp set and die cut with the Sending Dies. I love the sentiment label. There are two different sizes of this in the Die set.
Colors and Extras
The card base, and all of the colors, came from this fun flower DSP. This piece is from the Delightfully Eclectic Designer Series paper. It is one of the large packs of paper and has pieces that can pair with a number of the stamp sets and punches. The Night of Navy and White help the DSP to pop. So the flowers were pulled from the colors also. Daffodil Delight for the daisy and Bubble Bath for the little flowers. I did go traditional on the stem and leaves with Shaded Spruce. It is also used for the sentiment to not feel as left out!
The sentiment is bookended with Blue Pastel Sequins. There is also one of the large pink Pastel Sequins in the center of the daisy. The light doesn’t allow it to really show. And the final touch is the Starry Sky Metallic Ribbon tied onto the end of the sentiment.
Designer Series Paper Sale! June 1-30
Click on the photo to see all of the available papers. If you are ready to order please click on the shop button in the menu and you will be taken to my online store! I also have a host code of 34QVEY4F that I would appreciate you using!
New Starter Kit opportunity for the month of June!
If you have a large Wish List, I would love to talk with you about the Starter Kit. It is the Ultimate Bundle!
Online exclusives are here to stay! Click on the photo and be taken directly to them in my online store. If you place an order, please use my Host Code listed just below.
HOST CODE
My June Host Code is 34QVEY4F. Please use this code for orders under $150.00. I will have a small gift for those with orders over $50.00 in addition to the Perk Rewards Program. You can read all of the information at the top of the page in the Menu Bar under SHOP / Perks.
Thank you for stopping by today. I hope you enjoyed today’s project and will come back. I do read and reply to all of the comments individually. They mean a lot to me. Please reach out if you have a question.
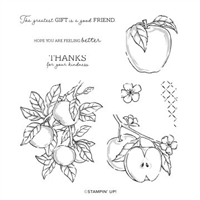
Today’s project was an idea that took a turn. I saw a card which reminded me of an old technique and then turned into this quarter cut, fun, and simple technique starring the Apple Harvest stamp set.
Layout
The original idea of this card was to stamp layers that then come together for a 3D look. I did not like how that turned out, but them thought of this much easier version. The White layer began as a 3 1/2 X 3 1/2 piece. After stamping I cut it into four equal squares. The Granny Apple layer began as a 3 3/4 X 3 3/4 layer with the same cutting. And to make layering easier I used a Crumb Cake layer of 4 X 4 to adhere the squares to.
The card base is a Fun Fold as well as a cute technique. It is Sweet Sorbet that is 4 1/4 X 11 and scored at 5 1/2 and 2 3/4. The stamped layers are adhered to the short fold only. So be careful when you add that. Here is an open view.
Stamps
The Apple Harvest stamp set is a set that can be used in a variety of ways. I used most of the stamps in creating this card. The images are all colored using Stampin’ Blends and all are listed at the bottom of the post in the Supply List. I do have to say that I love the little cross hatch background stamp. Those type images add a great bit to a card. And to create my “stopper” point, I stamped an additional little bloom and fussy cut it. By popping it up with a Stampin’ Dimensional it is both cute and functional.
Colors and Extras
The card base is Sweet Sorbet as are the apples. The leaves are Granny Apple Green and the layer behind the squares is as well. The tree branch and the cross hatch stamp are Crumb Cake. The sentiment is from the set and is stamped and then punched using my Go To punch the Double Oval. For the finishing touches I added a scattering of the 2022-2024 In Color Pearls and the Black and White Gingham ribbon.
Thank you for visiting today!!
Designer Series Paper Sale! June 1-30
Click on the photo to see all of the available papers. If you are ready to order please click on the shop button in the menu and you will be taken to my online store! I also have a host code of 34QVEY4F that I would appreciate you using!
New Starter Kit opportunity for the month of June!
If you have a large Wish List, I would love to talk with you about the Starter Kit. It is the Ultimate Bundle!
Online exclusives are here to stay! Click on the photo and be taken directly to them in my online store. If you place an order, please use my Host Code listed just below.
HOST CODE
My June Host Code is 34QVEY4F. Please use this code for orders under $150.00. I will have a small gift for those with orders over $50.00 in addition to the Perk Rewards Program. You can read all of the information at the top of the page in the Menu Bar under SHOP / Perks.
Thank you for stopping by today. I hope you enjoyed today’s project and will come back. I do read and reply to all of the comments individually. They mean a lot to me. Please reach out if you have a question.
Welcome to InKing Royalty’s June Blog Hop! We are inspired by circles for this month’s hop and are excited to share our creations with you. We hope you love them! After you read my post, I hope you’ll hop over to the next person on the list at the base of this post.
I took a little different direction for my Circles. But since they began life as circles I am going to count it as meeting this month’s theme!
Circles
The idea for my card actually came from the DSP. And yes, most of my cards are in some way made with the DSP playing a prominent roll. But this piece from the Bright & Beautiful Designer Series paper gave me the idea to cut the circles because they are cut in half on the paper.
I am loving that Stampin’ Up! has brought back Circle Punches. Personally I love punches and the fact you punch and go. These circles are built, or begun, with the 2 3/8″ Circle Punch, the 2″ Circle Punch and then a retired 1 1/2″ Circle Punch. However the smaller one can be created using a die from a few different Die Sets. (Reach For The Stars is one with several sizes of circles) The 2 3/8″ Circle is part of the Circle Saying Bundle and the 2 “, along with a 1 3/8” are in the Online Exclusives.
After punching my circles, I marked a line down the center on the reverse side and cut them in half. I debated several ways of laying them out for the center design. But ultimately the swirl look was the winner.
Stamp Set
The wording on the card is from the Circle Sayings Stamp set. This was the first set I went to after my idea from the DSP. Of course it having the matching Circle Punch was perfect. After the layout of the center was decided, I could not figure out how to showcase the sentiment or to leave it without one. There were some extra circles on my desk and I thought of using a full circle for a sentiment. Except there was not really a good placement for it. So back to half circles and the completed card.
Colors and Extras
The card is mostly made of Lemon Lime Twist and Bright & Beautiful Designer Series Paper that contains Lemon Lime Twist. However it needed a touch of another color. I used Blueberry Bushel Ink for the two sentiments. And I needed something to cover the cut edges of the center focal area. So a piece of Blueberry Bushel card stock came to the rescue. With a couple of the 2022-2024 In Color Pearls in Parakeet Party (which is compatible to Lemon Lime Twist) the card was finished.
Thank you for stopping by today. I hope you’ll hop along to the next stop on the blog hop, Renae Novak at Blessed By Cards. There’s lots of inspiration to be found in this group – and you don’t want to miss it!
Thank you for hopping along with us. If you get stuck during the Blog Hop, please use this line-up as a guide:
Click on the photo to see all of the available papers. If you are ready to order please click on the shop button in the menu and you will be taken to my online store! I also have a host code of 34QVEY4F that I would appreciate you using!
New Starter Kit opportunity for the month of June!
If you have a large Wish List, I would love to talk with you about the Starter Kit. It is the Ultimate Bundle!
Online exclusives are here to stay! Click on the photo and be taken directly to them in my online store. If you place an order, please use my Host Code listed just below.
HOST CODE
My June Host Code is 34QVEY4F. Please use this code for orders under $150.00. I will have a small gift for those with orders over $50.00 in addition to the Perk Rewards Program. You can read all of the information at the top of the page in the Menu Bar under SHOP / Perks.
Thank you for stopping by today. I hope you enjoyed today’s project and will come back. I do read and reply to all of the comments individually. They mean a lot to me. Please reach out if you have a question.
Free Shipping on Wednesday for orders of $75.00 or more!!
Tomorrow you can take advantage of the Designer Series Paper sale and other Wish List items with Free Shipping. That is a double Win in my book and I have my list ready to go.
Today’s card
I failed to post the one Father’s Day card I created. So I am posting it a few days late. The best part is that it is a Fun Fold / Gift Card Holder. And with a change of the inside sentiment it could be for any manly occasion! The star is the He’s All That stamp set and Dies.
Stamps and Dies
The starring stamp set is the He’s All That set. All of the stamped images are from that set. And the coordinating, but no longer a bundle, dies are the All That Dies. Dies were used for the main sign shape as well as the arrow. For some fun, I used the crosshatch die from the Share A Milkshake Dies for some added texture and color.
Extras
Extras are always needed but sometimes hard to see. Especially in the photo. The white layer is embossed using the Exposed Brick Embossing Folder. Oh My!! I really love the look of this and the different textures. And I do apologize that you cannot see it in the photo. Some of the other extras are the Rustic Metallic Dots that are scattered around. They add an extra manly touch as they look sort of like a nail head in color.
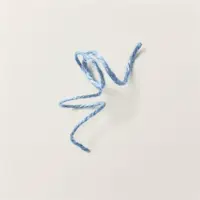
The final Extra is the Jute twine. This is a new pack of 2023-2025 In Color Jute Twine. I used the Pebbled Path to match the card base and ink used. I love the jute and how well it ties a bow. But I will say that it is a bit fuzzy with the strands. That is the nature of jute however.
Colors
This section was added last so I could share the Fun Fold and colors. It can be a little difficult to make manly cards except in dull colors. So I went through my colors seeing what would pair well with Pebbled Path. It is new and I have not used it really. Surprisingly it really popped with the Coastal Cabana. So I went with that. And I love the outcome!
The card design shows a good bit of the Pebbled Path card base. After that it is mostly White and Coastal Cabana. As I mentioned in the opening, this is a Fun Fold and Gift Card Holder. Here is the open view:
Layout
The card base is a piece of Pebbled Path that is cut to 5 1/2 X 4 1/4. The White layer is 5 X 3 3/4 and embossed. For the tri-fold Coastal Cabana you need a piece that is 4 1/4 X 11 and scored at 3, 6, & 9. Accordion fold these pieces as shown in the photo. The sections are even sizes with the exception of the last one which is 2 1/2. Fold that one in and adhere with Tear & Tape for your gift card holder.
The only important thing to remember is to center and adhere the Jute Twine to the back of the accordion fold prior to adding it to the card. The inside layers are 3 7/8 X 2 5/8 of Pebbled Path, and 3 3/4 X 2 1/2 of White. Simply change the inside sentiment and you are ready to go for any manly occasion!
Designer Series Paper Sale! June 1-30
Click on the photo to see all of the available papers. If you are ready to order please click on the shop button in the menu and you will be taken to my online store! I also have a host code of 34QVEY4F that I would appreciate you using!
New Starter Kit opportunity for the month of June!
If you have a large Wish List, I would love to talk with you about the Starter Kit. It is the Ultimate Bundle!
Online exclusives are here to stay! Click on the photo and be taken directly to them in my online store. If you place an order, please use my Host Code listed just below.
HOST CODE
My June Host Code is 34QVEY4F. Please use this code for orders under $150.00. I will have a small gift for those with orders over $50.00 in addition to the Perk Rewards Program. You can read all of the information at the top of the page in the Menu Bar under SHOP / Perks.
Thank you for stopping by today. I hope you enjoyed today’s project and will come back. I do read and reply to all of the comments individually. They mean a lot to me. Please reach out if you have a question.
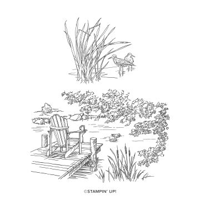
Today’s card is a challenge for simply “water”. I turned to the Host stamp set titled Calm & Quiet. And it is a fabulous stamp set.
The challenge I mentioned is the Make My Monday Challenge. Click on the link below and see what the other MMM Designers have created. And add your own version of the “water” theme.
Stamp Set
The stamp set I used is the Host Rewards set Calm & Quiet. It has two different scene images. I loved this one and new it was the perfect stamp for this challenge. Plus you all know how much I love to color. All of the different Stampin’ Blend colors are listed in the Supply List at the bottom of the page. Since sitting in the chair with a book seems like paradise, I made that the focal point and used that as the card base color.
Layers
To allow the stamped image to be the center of attention, I kept the layers fairly simple. By highlighting the bright colors I believe it helped the scene to pop. The layers were created by using the Deckled Rectangles Dies. With the Tahitian Tide card base and Lemon Lolly layer, the scene was finished.
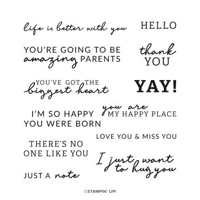
Sentiment
The sweet sentiment is a perfect compliment to the card and scene in my book. It is from the Happy Labels stamp set. Except this is not the complete image. It actually says “you are my happy place”. Since I only needed the happy place, I used Post It tape to cover the “you are”, inked the stamp, removed the tape (that is very important! LOL!!), and stamped. All of my fingers that could be were crossed that I would get a straight and good image since I was stamping onto the layer itself!
Thank you for stopping by today!!!
Designer Series Paper Sale! June 1-30
Click on the photo to see all of the available papers. If you are ready to order please click on the shop button in the menu and you will be taken to my online store! I also have a host code of 34QVEY4F that I would appreciate you using!
New Starter Kit opportunity for the month of June!
If you have a large Wish List, I would love to talk with you about the Starter Kit. It is the Ultimate Bundle!
Online exclusives are here to stay! Click on the photo and be taken directly to them in my online store. If you place an order, please use my Host Code listed just below.
HOST CODE
My June Host Code is 34QVEY4F. Please use this code for orders under $150.00. I will have a small gift for those with orders over $50.00 in addition to the Perk Rewards Program. You can read all of the information at the top of the page in the Menu Bar under SHOP / Perks.
Thank you for stopping by today. I hope you enjoyed today’s project and will come back. I do read and reply to all of the comments individually. They mean a lot to me. Please reach out if you have a question.
The content in this blog is the sole responsibility of Jackie Beers as an Independent Stampin' Up! Demonstrator. The use of and content of classes, services or products offered is not endorsed by Stampin' Up!