I am sharing a card made with a couple of the new additions to the Sale-A-Bration options. The new additions are all wonderful products and some are from current catalogs. That is not a regular occurrence. My card idea showcases the new Beautiful Butterflies Bundle and the Happy Labels Punch.
STAMP BUNDLE
The Beautiful Butterflies Bundle is a winner in my book. It includes the awesome stamp set with gorgeous butterflies. (The smallest is shown lighting on my banner) Plus a matching Die set, and a Hybrid Embossing Folder. I have used the embossing folder as my layer here. You can see the amazing details.
This background needed a bold sentiment as I wasn’t really adding a focal layer of the normal kind. The sentiment and the butterfly are from the stamp set. The butterfly is fussy cut as there is not a matching Die for it. But it is a quick one to cut out.
The stamp set is the only part of the bundle that has been added to the Sale-A-Bration options. If you choose this, with a qualifying order, remember to use the product number on the flyer or on your computer in the options. Do not use the catalog product number.
PAPERS
This idea of a simple but bold card first started with what color to use. I chose Granny Apple Green as the card base and Lemon Lolly for the layer. With some colors, the Lemon Lolly seems very light and does not really stand out. I was very pleased that it does stand out with the Granny Apple Green. To make a different type layer for the sentiment, I also used more of the Granny Apple Green. Color wise this is a simple card with only a couple of colors and no pattern papers.
EXTRAS
The first Extra is the second of the new Sale-A-Bration Options. It is the Happy Labels Pick A Punch. I cut the two layers for the sentiment and then punched the ends of both using the larger of the ticket look. The White is 3 3/4 X 3/4 and the Granny Apple Green is 4 X 1, or roughly those dimensions before punching.
To add sparkle and bling I went with two different options, but both are silver. The first is the ribbon. It is the White and Silver Ribbon. I love the shine it brings to the card. And then to add more silver shine, I opted to use the adhesive backed Sparkle Gems. These have several base colors and I used the silver one. You should see three of them scattered around.
Sale-A-Bration Additions for February
HOST CODE
My FEBRUARY HOST CODE is S2EYAW9N. Orders of $50.00 or more will receive an appreciation gift from me. I appreciate you choosing me as your demonstrator!
Thank you for stopping by today. I hope you enjoyed today’s project and will come back. I do read and reply to all of the comments individually. They mean a lot to me. Please reach out if you have a question.
Smile and Keep On Stamping,
Jackie
New Scrapbooking Catalog
The newest addition to Stampin’ Up! is an Online catalog of Scrapbooking products. You can see the catalog by clicking the photo below and save it to your computer.
Online Exclusives
New Online Exclusives have dropped. There are Halloween, Fall, Christmas, and many that are great year round. Of course the new Designer Series Papers and Embellishments are fabulous as well!
You can go directly to these in my Online Store by clicking HERE
The Friendly Seagulls stamp set from Sale-A-Bration is one that makes me smile every time I look at it. I am a huge french fry fan and apparently so are these guys. This card is one that only takes a couple of products to create. And when you add a Free stamp set, it is definitely a winner!
STAMPS
There is one additional stamp set used in addition to Friendly Seagulls. It is the texture around the edges of the Crumb Cake card base. This stamp is from the Lovely & Sweet stamp set. I used tone on tone to add this texture.
The Friendly Seagull is stamped on a scrap Basic White and then fussy cut. He is colored with Stampin’ Blends. The french fry box is as well. I love the flock of birds in the top left as an addition for distance. And stamping them off of the “scene” area is something I like to do. I have a painting that has part of the picture painted on the matting. This made me think of that.
The sentiment is fun and bold. So it needed to stand alone. I stamped the two parts and then did straight cuts, no fussy cutting, to keep it simple. The way they are placed makes it seem as if the seagull is shouting out his love of fries. Except for having his mouth full of them. 🙂
PAPERS
This is one of the simplest cards in regard to papers. There are only two. The Crumb Cake card base and then the Basic white for everything else. I used scraps for the seagull, fries, and sentiments. Since I stamp almost every day, I have a ton of scraps from cutting paper. I try to keep them under control but White is the one that can quickly become overloaded!
EXTRAS
The special part of the card is the Pool Party square. This is such a fun and easy technique. I inked the Clear Block D with Pool Party ink, stamped off, and then stamped onto my square of Basic White. And that is my ocean. To add some texture, and bling, I added a trio of the Antique Pearls to the bottom. The seagull is popped up with dimensionals and the fries are glued down. So the pearls are in between the two in terms of height.
HOST CODE
My FEBRUARY Host Code is S2EYAW9N. Orders of $50.00 or more will receive an appreciation gift from me. I appreciate you choosing me as your demonstrator!
Thank you for stopping by today. I hope you enjoyed today’s project and will come back. I do read and reply to all of the comments individually. They mean a lot to me. Please reach out if you have a question.
Smile and Keep On Stamping,
Jackie
New Scrapbooking Catalog
The newest addition to Stampin’ Up! is an Online catalog of Scrapbooking products. You can see the catalog by clicking the photo below and save it to your computer.
Online Exclusives
New Online Exclusives have dropped. There are Halloween, Fall, Christmas, and many that are great year round. Of course the new Designer Series Papers and Embellishments are fabulous as well!
You can go directly to these in my Online Store by clicking HERE
I have had the Ocean Friends Bundle for a month and this is the first time I have inked it up. That is shocking! Now I see a lot more crabs in my future. And choosing the colors is such a fun task to make the crab your own.
I apologize for the darkness. not sure what is going on with my photography.
STAMPS& DIES
The Ocean Friends stamp set is such a cute set. The crab and lobster are a perfect mix of real and fun. Plus the sentiments are sweet like this Hello, Friend. The seaweed behind the crab is part of the stamps. It did not have a matching Die but was not difficult to fussy cut. The crab did have a Die and was easy to cut.
There are different thoughts regarding two step stamping. I go back and forth with which should be stamped first the solid or the outline. For me on the crab it was easier to line things up with stamping the outline first. I used Pumpkin Pie for the outline. Then I was able to line up the solid with the top near the eyes and the bottom legs. Peach Pie was used for the solid shape. But everyone has their own technique.
PAPERS
The adorable starfish paper is one of the amazing sheets from the pack of Friends of The Ocean Designer Series Paper. Those colors are a mix of exactly my colors. I wanted to use more of it, but also wanted the embossing folder. The compromise of this strip surprised me at how well it stands out. I paired it with bright colors that come from the paper. Again the dark photography doesn’t do it justice. The card base is Lemon Lime Twist with the embossed layer being Summer Splash.
The measurements are 5 1/2 X 8 1/2 for the card base. With the layer being 5 X 3 3/4. And the strip of DSP is 4 3/4 2. I liked giving the waves some show off space but still have enough of the starfish paper showing.
EXTRAS
The main of the extras is an embossing folder that is part of the ocean Suite. It is the Soft Waves Embossing Folder. The swirls are amazing, and perfect for the images. Of course the bling matches well also. The Antique Pearls are scattered around the waves for some shine there.
HOST CODE
My January Host Code is KSG3THS3. Orders of $50.00 or more will receive an appreciation gift from me. I appreciate you choosing me as your demonstrator!
Thank you for stopping by today. I hope you enjoyed today’s project and will come back. I do read and reply to all of the comments individually. They mean a lot to me. Please reach out if you have a question.
Smile and Keep On Stamping,
Jackie
New Scrapbooking Catalog
The newest addition to Stampin’ Up! is an Online catalog of Scrapbooking products. You can see the catalog by clicking the photo below and save it to your computer.
Online Exclusives
New Online Exclusives have dropped. There are Halloween, Fall, Christmas, and many that are great year round. Of course the new Designer Series Papers and Embellishments are fabulous as well!
You can go directly to these in my Online Store by clicking HERE
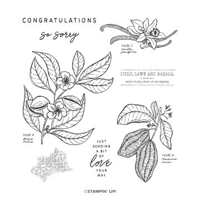
I have a gorgeous butterfly to share with you today. Generally I do not choose the butterfly sets but this one really got my attention. Part of the grab is the matching Die set and the other are the sweet sentiments that go along with the butterflies. You will be seeing more of this bundle in the near future from me!
STAMPS & DIES
This card is all about the Beautiful Butterflies Bundle! This is a fabulous bundle of images, sentiments, and some really neat Die details. My card is a bit on the simpler side of things for this first one. The big star is the large butterfly. You can see the wonderful details of the Die even in my photo. To give myself away, I actually intended to use the other side of the butterfly as I chose that paper first. But after seeing the detail and it seemed to show better on this more floral side. The detail on the reverse does not disappoint either.
To decide on the sentiment for the front of the card became a bit of a challenge. There is a lot going on for this card front. Since the butterfly is so large and I have it going from edge to edge, I opted to do the same with the sentiment. This strip of Daffodil Delight was from trimming the layer. I cut it to fit and then stamped this simple Happy Birthday.
PAPERS
The butterfly and the DSP layer are one sheet from the Floral Delight Designer Series Paper pack. As I said above, my plan was to use the other side of the butterfly. That is what is now the layer pattern. I flipped both pieces back and forth a few times until I decided to go as you see.
The flowers at the bottom of the card are from another sheet from this same DSP. I fussy cut these little flowers to add to the card. There is also a corner piece on the inside of the card. Please remember when you have a design in the corner of a sheet that it is not wasted! They work wonderfully by being cut out and added to the bottom of the inside layer. I apologize that I failed to get a photo.
EXTRAS
To add some bling to this card was debated for a few minutes. There really is a lot going on here. But I gave in to my normal way of doing things. And I am so happy I did. These gold dots are from the new Low-Profile Dots that are an Online Exclusive item. And they are really low profile! In fact they feel almost flat. This pack has both gold and a pink/coral color. You will be seeing me use a lot of these little sweeties!
HOST CODE
My January Host Code is KSG3THS3. Orders of $50.00 or more will receive an appreciation gift from me. I appreciate you choosing me as your demonstrator!
Thank you for stopping by today. I hope you enjoyed today’s project and will come back. I do read and reply to all of the comments individually. They mean a lot to me. Please reach out if you have a question.
Smile and Keep On Stamping,
Jackie
New Scrapbooking Catalog
The newest addition to Stampin’ Up! is an Online catalog of Scrapbooking products. You can see the catalog by clicking the photo below and save it to your computer.
Online Exclusives
New Online Exclusives have dropped. There are Halloween, Fall, Christmas, and many that are great year round. Of course the new Designer Series Papers and Embellishments are fabulous as well!
You can go directly to these in my Online Store by clicking HERE
I am back from my knee replacement surgery. Woohoo!! It was so hard not being able to go down the steps to my craft room. The worst part was not really the getting down or back up. It was that I do not really have the room to prop my leg up. And it has not cared for hanging down for any length of time. I am at three weeks post op now and it is behaving itself and accepting the seated position down there. Being short has all kinds of issues. But feet not reaching the floor is one of the most problematic!! Enough about me. Just know that I am happy to be back creating for you, and myself!
Today’s card is a simple one using the Friendly Seagulls stamp set. It is Sale-A-Bration time and this is my favorite of the catalog. The cute french fries is what grabbed my attention. My last meal wish will be a hamburger and french fries!! LOL!!!
STAMPS
The stamps used are all part of the Friendly Seagulls stamp set. The seagulls do not have matching dies. So I did have to fussy cut them. I like fussy cutting so did not mind at all to create the scene I had in mind. They are stamped using Memento Tuxedo Black Ink and then colored using Stampin’ Blends.
The shells are stamped using Crumb Cake Ink and are just part of what you would see on the beach. Although my experience is they are generally broken! I did add the cute little bubbles, or foam, at the water line. That is so appropriate. And of course the birds flying overhead.
PAPERS
The papers are what make this scene. Shockingly, there is no designer series paper used. To create my seashore scene I began with a piece of Basic Beige cardstock. Next came strips of Coastal Cabana for the water and Balmy Blue for the sky. These were scraps I had on hand. I tore the edge of the Coastal Cabana to show the water coming onto shore. The two pieces were then layered onto the Basic Beige and cut off on the length. Really it was much easier than I anticipated!
EXTRAS
The extra is only one thing. The Antique Pearls are from the new Mini Catalog. I love them!! They have a great shine and are pretty flat. You could count the seagulls as extras since they are fussy cut. But I did not raise them. They are glued flat onto the scene.
HOST CODE
My January Host Code is KSG3THS3. Orders of $50.00 or more will receive an appreciation gift from me. I appreciate you choosing me as your demonstrator!
Thank you for stopping by today. I hope you enjoyed today’s project and will come back. I do read and reply to all of the comments individually. They mean a lot to me. Please reach out if you have a question.
Smile and Keep On Stamping,
Jackie
New Scrapbooking Catalog
The newest addition to Stampin’ Up! is an Online catalog of Scrapbooking products. You can see the catalog by clicking the photo below and save it to your computer.
Online Exclusives
New Online Exclusives have dropped. There are Halloween, Fall, Christmas, and many that are great year round. Of course the new Designer Series Papers and Embellishments are fabulous as well!
You can go directly to these in my Online Store by clicking HERE
Fun Fold cards are my favorite to make. And cute animals are a close second in favorites. So today I joined the two using Christmas Friends Bundle.
STAMPS
The star of this card is the Christmas Friends Bundle and this adorable Moose. He looks so happy ice skating through the woods with his warm scarf. I stamped him using Early Espresso Ink and then colored with Stampin’ Blends. All of the colors are in the Supply List at the bottom of the post. The trees and stars are also part of the stamp set and matching Dies. The garland at the bottom, as well as the circle, are also part of the Die set. There are a lot of goodies here that you should check out.
There are two additional stamp sets for the sentiments. This front one is from the Humble Home stamp set. I love the small and simple handwriting look to the Merry Christmas. And the inside sentiment is from the Peaceful Season stamp set.
PAPERS
The DSP is where all of the other papers were pulled from. These pretty snowflakes are from the Snowy Scenes Designer Series Paper. This sheet has the snowglobes on the reverse side. From this I pulled the Garden Green as the card base. The small card is Pool Party which is also part of the DSP.
EXTRAS
The bling for this card is a bit brighter than usual. At least it stands out in the photo very well. They are a trio of the Earth Tone Shimmer Gems from the Mini Catalog. I thought the darker green would pop better and highlight the card base. And I believe they do.
Fun Fold Directions
To create this card you begin with a piece of cardstock measuring 5 1/2 X 8 1/2. Score it at 4 1/4. Then with the 8 1/2 along the top and the score line down the center, place the score line on the trimmer cutting channel. Hold that in place and rotate the cardstock so that the left side bottom point is also in the cutting channel. Cut that angle off. Next is the DSP. The inside panel measures 4 X 5 1/4. Cut two of these. One goes on the inside of the card. The other gets cut at an angle to go on the front of the card. Cut from the top right to the bottom left.
The small card measures 3 X 8 and is scored at 4. And the inside Basic White measures 2 3/4 X 3 3/4. Here are photos of the two other views of the card.
When the small card is added, align it with equal borders as you would any layer. Just ensure the front flap will close. I suggest doing a dry fit before adding adhesive. Please let me know if you have any questions.
HOST CODE
My DECEMBER Host Code is SAQE7VYU. Please use this code for orders under $150.00. I will have a small gift for those with orders over $50.00 in addition to the Perk Rewards Program. You can read all of the information at the top of the page in the Menu Bar under SHOP / Perks.
Thank you for stopping by today. I hope you enjoyed today’s project and will come back. I do read and reply to all of the comments individually. They mean a lot to me. Please reach out if you have a question.
Smile and Keep On Stamping,
Jackie
New Scrapbooking Catalog
The newest addition to Stampin’ Up! is an Online catalog of Scrapbooking products. You can see the catalog by clicking the photo below and save it to your computer.
Online Exclusives
New Online Exclusives have dropped. There are Halloween, Fall, Christmas, and many that are great year round. Of course the new Designer Series Papers and Embellishments are fabulous as well!
You can go directly to these in my Online Store by clicking HERE
The content in this blog is the sole responsibility of Jackie Beers as an Independent Stampin' Up! Demonstrator. The use of and content of classes, services or products offered is not endorsed by Stampin' Up!