Pumpkins are popping up everywhere now. So I have a pumpkin card to share. It is a second look at the Corner Tuck Card I shared a few weeks ago.

You can click HERE to see the earlier version of this fun fold.
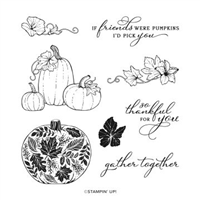
Stamps
I truly Love the stamps in the Pretty Pumpkins stamp set. The matching Dies are awesome as well, but I did not use them today. I stamped the three pumpkins, which is one stamp, and then colored with Stampin’ Blends. The pumpkins are colored using Both Pumpkin Pie , Light Cinnamon Cider, and Light Old Olive. I stamped the pumpkins with Soft Suede Ink.
Everyone seems to have their own way of coloring with the Stampin’ Blends. When I want some shading, like with these guys, I start with an all over using the Light Blend. I then come back and add the Dark where needed. I finish with the light again and only drag the dark colors into the lighter area. By not going all over with the Light the second time, I get the really light in the center of the larger pumpkin. However, if you have a method that works for you, then stick with it!
Paper
I used the Host Rewards Paper Pack of Pattern Party Designer Series Paper. This pack of paper is awesome! The colors are great, as are the patterns. Plus you get a lot of paper for a very inexpensive price. The only downside is that you can only purchase it with Host Rewards. Anyone interested in a Party???
Measurements and Folds
- The base card of Pumpkin PIe is cut 4 1/4 X 8 and scored at the 2 1/2 mark, fold and burnish
- The left side strip layer of Old Olive is 1 X 4
- The left side strip of DSP is 7/8 X 3 7/8
- The focal layer is Old Olive cut 3 X 3
- The stamped White is cut 2 7/8 X 2 7/8
- The upper right corner that is the Tuck, is a piece of Pumpkin Pie and a DSP piece both cut to 2 7/8 X 2 7/8. they are each placed at a diagonal on the Paper Trimmer and cut in half to form triangles. Then glue the two together for thickness. you only use half, so save one for the next card.
- The inside White, that you do not see, is cut 2 3/4 X 2 3/4
Assembly:
- Place Stampin’ Dimensionals in each of the corners of the triangle double thick piece and place in the upper right corner.
- Adhere the DSP and Old Olive strips together and place on the left side of the flap. Align the left edge, top and bottom.
- Layer the Old Olive and Focal Layer together. Place it, centered, up against the strip on the left .
- Add the inside White for the sentiment, place it further left than normal so it doesn’t show when the card is closed.
- Close the card by tucking the focal layer underneath the raised upper corner
I hope you enjoy this card. Please let me know if you have any questions!
The 2nd Sale-A-Bration Is Here!!

Join My Team Promotion During Sale-A-Bration!!

HOST CODE
My September Host Code is NWZNBFH2. Please use this code for orders under $150.00. I will have a small gift for those with orders over $50.00 in addition to the Perk Rewards Program. You can read all of the information at the top of the page in the Menu Bar under SHOP / Perks.
Thank you for stopping by today. I hope you enjoyed today’s project and will come back. I do read and reply to all of the comments individually. They mean a lot to me. Please reach out if you have a question.
Smile and Keep On Stamping,
Jackie

SUPPLIES: