For me at least, Birthday cards are my most made and mailed cards. And that is wonderful!! Birthday cards are Happy and Smile cards. This Cool Treats is a super stamp set for all ages. It is definitely a keeper!
Cool Treats, 142982, $27.00
I am going to be so sad to see Mint Macaron go away. It has become a favorite of mine. I used the Softly Falling Embossing Folder to continue with the “sprinkles” aspect of the card. Even with the different products used, this card came together quickly. The Layering Ovals Framelits and the Stitched Shapes Framelits are perfect to frame the ice cream. The smaller of the Pearl Basic Jewelry is great for the sprinkles on the ice cream.
Welcome to InKing Royalty’s March Blog Hop! Today’s Blog Hop is filled with projects inspired by a Spring Celebrations theme. What fun! Stampin’ Up! catalogs are filled with so many great ideas for Spring-themed projects – Easter, birthdays, Mother’s Day, Father’s Day, Spring weddings… We are excited to share our creations with you today. After you read my post, I hope you’ll hop over to the next person on the list at the base of this post.
This is my first InKing Royalty Blog Hop ! I am so excited to join this extremely talented group of stampers.
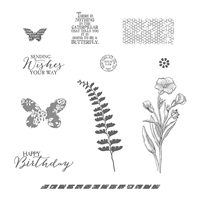
My card today is Hello Spring and is a collage background with the addition of the lovely Dragonfly from the Occasions Catalog.
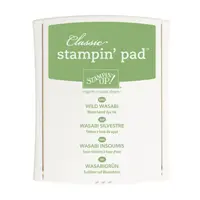
I love doing collage backgrounds. There is no right or wrong and mistakes do not matter. On this one, I stamped the large leaf in Wild Wasabi ink and then stamped again without reinking. The honeycomb ,which really does not show up in the photo, is in So Saffron Ink. The lacy butterfly, another no show in the photograph, is stamped in Soft Sky ink. The small flower is done is Calypso Coral ink but stamped off prior to the first stamp. The butterfly saying is full strength Sahara Sand ink. I also sponged around the edges of the white with Sahara Sand ink to give it a not quite so bright look.
The “Hello Spring” is stamped in Calypso Coral and the two circles are cut out using the Layering Circles Framelits. I placed some loops of Linen Thread under the circles for a little extra texture.
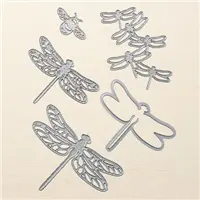
And the icing on the cake is the beautiful dragonfly. He is cut out of Soft Sky card stock with the smaller of the detailed dragonflies in the Dragonfly Framelits. I also went over his entire body with the Clear Wink of Stella. This gives him some sparkle!
The basic colors of this card are Sahara Sand, Calypso Coral and Soft Sky. There are quite a few colors used on this card, but you could easily swap to your own color preferences. Or you could click on the product links and add these to your collection.
Thank you for stopping by today. I hope you’ll hop along to the next stop on the blog hop,
Today’s card is a Patchwork card and this is a technique I have not done in quite a while. Fortunately it is also a technique that can be done in several different ways. I believe the way I chose has to be the simplest. I say that because I used scraps from a card I designed for my monthly Card Club last weekend.
The “You Are Amazing” is from the All Things Thanks set in the Occasions Catalog. That is a wonderful set for different ways of saying thank you.
You are Amazing, Stampin’ Up!, Jackie Beers Independent Demonstrator
Calypso Coral has been a favorite of mine since it was an In-Color several years ago. And when Mint Macaroon appeared it was like they were a match just meant to be together. The By the Shore Designer Series Paper is one you might overlook at first glance. But when you give it a chance and really look at the colors it is a must have. If by chance you are not into “beachy” kind of cards , just turn to the other side of the paper. It is wonderful.
Anyway, after cutting theBy the Shore DSP for my Club last week I had these little pieces left. I just could not throw these starfish and circles in the trash!! And there a card is born… A patchwork is what came of these poor little leftover pieces.
I don’t have the measurements for this and to those of you who love measurements, I apologize. But I just took them in the size they were and cut paper to fit. The only ones that I trimmed were the Mint Macaroon band and the bottom piece of Calypso Coral circles. The “You Are Amazing” is framed with the Stitched Shapes Framelits and Layering Ovals Framelits.
All Things Thanks, 143097, 19.00
By The Shore DSP, 141640, 11.00
Thank You for visiting my site. I hope you enjoyed this patchwork card.
I don’t know about you, but I believe Stampin’ Up! has the best Designer Series Paper. It is beautiful, coordinates perfectly, and is doubled sided. And I believe it is thicker than other designer papers as well.
For me, this stamp set was a bit of a sleeper. I immediately fell in love with the Designer Series Paper. What is not to love about the classiness of Navy? But the stamp set was so so. Until the first time I inked it up!!! OMG….. I love the variation in the flower. It is almost a faded look on parts of it. I remember stamping in about six different colors just to see how the variation looked in the different colors. It is a WOW!, at least to me. So here it is…..
This is actually a pretty quick card to make as there is very little stamping involved. Using this layout, which primarily uses DSP, you could make quick cards using your DSP scraps. That is definitely a Win/Win to me. I hope you will fall in love with this set like I did. I made a package of our note cards into Thank You cards for a friend. I used this set with Rich Razzleberry ink. Those were awesome !! I challenge you to try the different colors and let me know what you think.
The base is our Thick Whisper White Card Stock.
The Night of Navy layer = 5 1/4 X 4
The DSP layer = 5 X 1 1/4, and 5 X 2 1/2
The small Night of Navy layer = 3 1/2 X 2 1/2
The Whisper White layer = 3 3/8 X 2 3/8
The stamped layer is raised up with dimensional for an added interest.
Balloons are one of my favorite things. They just make me smile! And today’s card is one that hopefully would make anyone smile. It is also an alternate use for the Balloon Pop Up Dies. It is a tough call, but I think I like using the die cut better on the front than as a pop up for the inside. This way it gets your attention when you first see the card.
Isn’t that a Happy card? I love the touches of Rich Razzleberry. I know that Daffodil Delight and Rich Razzleberry are not your normal color combination, but I love it.
I cut the Whisper White card stock to 5 X 3 3/4 ( the width is the exact width of the die cut frame in case I wrote it down incorrectly ). I eyeballed the top and bottom placement as I put the card stock onto the die cut. It is actually more even in person than it appears on the picture!. This die cut is awesome in that it cuts extremely well and very easily pops out of the frame. That is a Yay to me!!
I used the balloon dies from the Thinlits set. However you can stamp them and cut out with the Balloon Bouquet punch from the Annual Catalog. I was playing around for what to put on the left hand balloon and just tried the circles from other balloons I had die cut. I liked that look so I went with it. I did use glue dots for the circles though. I was afraid that just a drop of glue might not hold well enough. The other two balloons are held down with the Fine Tip Glue Pen. As is the Rich Razzleberry bow.
The banner was so easy to line up since the stamps are photopolymer and you can see through them. I a loving that rubber more and more! Anyway, I stamped the outline of the banner and the saying onto Daffodil Delight Card stock and then hand cut it out. Unfortunately there is not a punch or die for that one. But it is very quick and easy to cut out.
The balloon section is raised with Dimensionals on each corner and the center and placed on the striped Daffodil Delight Designer Series Paper. The DSP is from the Brights DSP stack. Those color family stacks are so awesome! They are a little more expensive but you get 2 each of 2 different double sided designs of each of the 10 colors in a collection. It is so wonderful to just open that stack and find the perfect match for your card.
The items used today are:
Balloon Adventure Bundle, 144708, $53.00
Brights DSP Stack, 138434, $22.00
Thank You for stopping by !!!!! If you have any questions, please contact me. I would love to hear from you.
Today’s card is one of the quickest cards you can make. I keep telling myself to use my Designer Series Paper and it is so hard !! But this card is the kind of kick in the pants I need to actually use it. And truly, using a Festive (HaHa) DSP as the background is so easy. The fact that all the sheets coordinate is a super bonus. (Notice the strip behind the saying) And it gets an immediate smile from the recipient. Who could resist this paper?
The stamp set Confetti Celebration is definitely one that you need on your shelf. It is perfect for any type celebration. The sentiments are so versatile. For the front of the card I went with Time To Party. At least to me, it perfectly matches that paper. I colored the individual words with my Stamp n Write Markers to match the paper. The ovals are from Layering Ovals and the Stitched Frames.
As I said, this is a quick , but Smile worthy card. And as much as we want to keep our DSP, it is much more enjoyable to share it with others.
The content in this blog is the sole responsibility of Jackie Beers as an Independent Stampin' Up! Demonstrator. The use of and content of classes, services or products offered is not endorsed by Stampin' Up!