I have showcased the Joyous Noel Suite today! And it is an awesome Suite of products. The colors are traditional with a bit of a twist. Merry Merlot and Tranquil Tide are the main two I focused on. They are more of a jewel tone than a bright Red and Green of traditional Christmas Colors. After seeing these on today’s card though, I believe I will be using them for non-holiday cards as well.
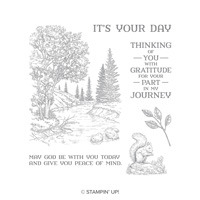
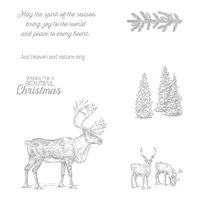
Peaceful Noel, 147694
To go with the Merry Merlot and TranquilTide, I added Sahara Sand as a soft blending color. The DSP includes Sahara Sand and Gray Granite as the soft colors. Either would be perfect and are equally gorgeous.
The Joyous Noel Specialty Designer Series Paper has copper foil details on one side and more traditional paper on the other. For this card I went with the not coppered side. I love the softness of the colors on this particular sheet.
When I noticed the different shades of green in the evergreen sprigs of the paper, I wanted to mimic that as a detail on the focal layer. I inked the stamp with Tranquil Tide, stamped in the corner, then stamped again on each side without re-inking the stamp. I repeated this on opposite corners. I stamped the star design on the opposing corners. I thought it was very cool the dramatically different shades of green from doing that technique. I hope you will give it a try. A note though….it requires a darker color to be able to stamp three times without reinking.
Thank you for stopping by today! I very much appreciate you visiting my blog. And if you do not have a current demonstrator, I would love to assist you. Also, please let me know if you need a new catalog. I have listed the measurements and the supplies I used on this card for you. Please stop back tomorrow for a new card.
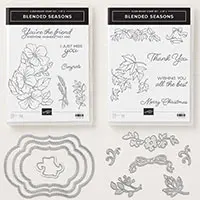
This is the last card I have for you from the Blended Seasons Bundle. This super set and absolutely awesome dies will be waving goodbye tomorrow at midnight. It is very sad, but I may not let my set go because I do really love these dies.
Blended Seasons Bundle, 149894
This card is actually very simple. I die cut the two layers using the Blended dies and stamped the Merry Christmas on the white panel. The bell is part of the set. I stamped and die cut it, then colored it with the Stampin’ Blends.
The DSP is gorgeous and I hated to cover it up. Because of the boldness of the paper, I think it works well with the more simple layer of sentiment. As I layed out the pieces before putting it all together, it reminded me of a gift wrapped package. That is where the little strips of Old Olive came from. Another reason to never throw away your little cut off pieces!
Thank you for visiting again today! I greatly appreciate you checking my blog and I hope you will leave me comments when you like something I have made. The complete supply list is at the bottom of the post.
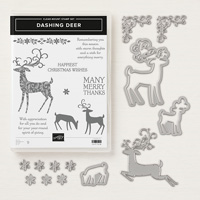
I have another of the Sneak Peek cards of the Holiday Catalog. The stamp set Dashing Deer is a beauty. There have been deer in past holiday stamp sets so I am sure you are asking why this one is so special. When you see the imprint on the body you will understand. Plus the matching Thinlits are just a WOW.
Dashing Deer Bundle, 149935
I am so in love with the body of the deer! That bit of built in shading is just a WOW to me. Yes, I know there are not any blue deer . That was my creative license at work:)
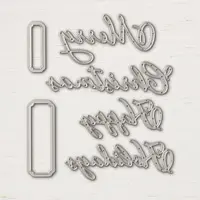
The “Merry” is from another Holiday Catalog set Merry Christmas to All. It is full of gorgeous sentiments and matching Thinlits. You will see a lot of cards using that set in the near future as well.
I kept this card very plain to showcase the beautiful deer. The DSP is from Under The Mistletoe in the Annual Catalog. A tip for you is to purchase the Multi-purpose Adhesive sheets, if you have not already done so. It makes adhering the “Merry”, and any similar pieces, just as simple as peeling off the backing paper. I am so happy Stampin’ Up! carries this product now. I am not great with glue and this is just the easy way of adoring intricate pieces.
Thank you so much for visiting today! I greatly appreciate it and hope you will return on Monday to see what I have created.
Once again I was unable to grab the icons for my supply list. I am so sorry. I will update the post as soon as I get this figured out. Technology is not my friend sometimes!
Welcome to the Pals August, 2018 Blog Hop. We love to cut it out so this month our creations feature our favorite “cuts” using punches, Framelits and Thinlits from the current Stampin’ Up! catalog.
You may be starting the hop here or coming from a previous Pal’s blog. Either way, you’ve come to the right place. You’ll find the the full line-up below to help you move, or “hop” along from Pal to Pal.
I have made a little bit special card for today’s blog hop. I normally stick with the basic folds and occasionally do a “Z” fold. But today I have made a Double Easel Fold. It is really quick and only takes a little more card stock than a simple card requires.
Blended Seasons Bundle, 149894
I LOVE the bright colors and especially the Die Cut layers from the Blended Seasons Bundle. The holly , sentiment, bow, extra leaves, and layers are all included in the bundle! There are also Fall leaves and a summer like flower. Can you see the endless possibilities here?
I CASED this card from fellow Stampin’ Up! Demonstrator Patty Bennett. You can see her video tutorial HERE. I have included basic instructions at the bottom of the post.
And here is a picture to showcase the Double Easel.
The card stands up beautifully, so it would be great for someone to easily display. This is a simple but WOW type card. I Love those kind. I hope you will give it a try. I have included the measurements below. A wonderful part of this card is the beautiful Designer Series Paper “Under The Mistletoe” from the Annual Catalog. I used one sheet of paper and just flipped the front piece for a different look. The best part…..you can get the needed pieces for three cards, with a bit left over, from one sheet of the DSP!!
MEASUREMENTS:
Card base is 4 1/4 X 11, scored and folded at 5 1/2
Second layer base is 4 X 10 1/4, scored at 2 1/2 and 5. Mountain/Valley fold this piece and attach the larger section to the card base. It should fit as a regular layer would.
DSP = 3 3/4 X 5, 3 3/4 X 2 1/4, 3 3/4 X 2 1/4 (The same size are for the two small sections. You can flip the DSP for the coordination you like best if you are using both sides of your DSP.
Decorate the front as you wish.
Thank you for visiting my blog today and I hope you will continue hopping along with us. I appreciate and love to read your comments, so please leave one. And please contact me if you have any questions.
Now it’s time to use the Blog Hop Line-up below to see what the rest of my Pals have created to inspire you.. Don’t forget to show us some love by commenting on our creations.
Mark your calendars for September 12, 2018 for the next Pals Blog Hop. We’ll inspire you with projects for the upcoming holidays and seasons including Autumn, Winter, Halloween, Thanksgiving or Christmas. Don’t miss the fun.
Welcome to InKing Royalty’s July Blog Hop! This year’s Blog Hop themes are inspired by popular songs – this month’s song is “I Don’t Want to Wait ’til Christmas.” We are half-way through the year, so there’s no better time to start thinking about the joy of Christmas. We are excited to share our creations with you today! After you read my post, I hope you’ll hop over to the next person on the list at the base of this post.
Even though this is a blog hop and you usually get cards that are a little extra special, I have gone the more simple route today. I have used basically all new products and believe that it is still a special card. It is also a card that would be wonderful to mass produce, as we tend to do with Christmas cards.
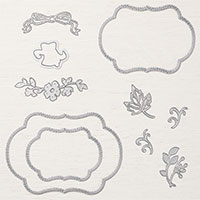
Stitched Season Framelits, 149013
This gorgeous cut out is from the Stitched Season Framelits. Did you notice the stitching around the cutout? The dies also produce stitching on the section that is cut out as well. So you get stitching on both, a one for now and one for later type results. This framelits set is part of a bundle of products that are only going to be available in August. It is these framelits and a super stamp set called Blended Seasons. They definitely compliment one another. I will attach a flyer further down.
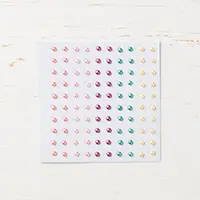
Today’s card is really a great production card. The gorgeous background is the Under The Mistletoe Designer Series Paper. The little banner is the reverse of that sheet as well. And the sentiment is from the Nature Sings stamp set. I love that sentiment. And just to give it a little bling, I added some of the Share What You Love Artisan Pearls to a few of the ornaments.
Thank you for stopping by today. I hope you’ll hop along to the next stop on the bloghop, Rachael Shadeed at Bluebonnet Stampin’. There’s lots of inspiration to be found in this group – and you don’t want to miss it! Also, I have listed all of the supplies used at the bottom of the post.
Thank you for hopping along with us. If you get stuck during the Blog Hop, please use this line-up as a guide:
I hope you are having a Magical, Family, Merriest Christmas!! Hopefully you all received exactly what you wanted for Christmas. As I have gotten older, I enjoy most just being with Friends and Family. So thank you for visiting with me on this special day.
My card is the last Christmas card of the year. I thought it only appropriate for today. It is another simple one, my favorite!!
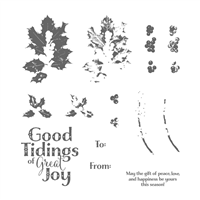
Good Tidings, 144870
For some reason the berries did not photograph well. It may be the operator! But in person they do NOT look like a glob. To very from the total red and green color scheme, I went with the Christmas Around the World DSP and the Pool Party. The reason I love this stamp set, Good Tidings, is that the font and size of the “Good Tidings” is large and a little different. To me that is a stand out on its own. The holly and berries are triple layers and do look beautiful (when photographed properly).
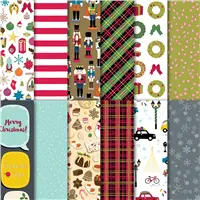
The DSP is one I did not use very much. It is beautiful , it just didn’t fit into the cards I planned. This sheet from the pack reminded me of a snowy sky. Some of you are probably getting a snowy Christmas. But I am in the south and we only get the occasional snow. And yesterday it was 67 here.
Again, I appreciate you every time you visit my blog and view my cards. I hope you are having a wonderful Christmas and have a very blessed new year!
Reminder: There are only a few days left to place your reservation for the stamparatus. You will receive it before it goes live in the 2018 Annual Catalog in June.
The content in this blog is the sole responsibility of Jackie Beers as an Independent Stampin' Up! Demonstrator. The use of and content of classes, services or products offered is not endorsed by Stampin' Up!