I have intended to try the floating object card for quite a while. And today I have given it a shot. I will not say mastered it, but I am happy with the outcome. The Thoughtful Journey DSP is easy to make a great card with.
Papers
The floating picture and the DSP are the stars of this card. This beautiful paper is from the Thoughtful Journey Designer Series Paper. These papers all look like a watercolor painting that have been turned into DSP. And honestly some of Stampin’ Up!s papers are just that. But I am not sure about this pack, so I will not say that is the case. However it was created, the paper is gorgeous. Additionally, this paper is part of the DSP Sale that is almost over!!
To get the card basics, I pulled the colors from the DSP. The card base is Old Olive and is paired with Blackberry Bliss. Sadly the Blackberry Bliss is so dark that you cannot see I used the Fern 3D Embossing Folder on that layer. It really stands out in person.
Dies
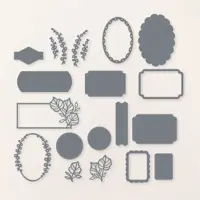
The circle for the floating picture is made using the Everyday Details Dies. I used the largest one and it was the perfect size. This die has circles around the edge and I would have preferred a solid circle. Any circles you have in your stash would work however.
The sentiment Die is a fabulous new one. It is from the Unbounded Love Dies. I die cut the piece twice. Once with Old Olive and once with Basic White. There is no extra cutting involved. The center that I stamped on is cut out when you use the Die. And they piece back together perfectly!
Sentiments
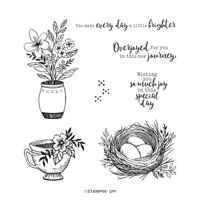
The sentiment is from the Wonderful Thoughts stamp set. I love the beautiful font. It is not shown, but I used another thinking of you type sentiment on the inside with a strip of the same DSP along the bottom. I really need to remember to photograph the inside!!
Extras
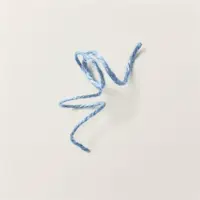
The little bow on the sentiment is from a single strand of the 2023-2025 In Color Twine. I had another card where I pulled the strands apart since it so thick. There are about four strands together. I am really loving the thin and simple bow. The bling is from the Purple Shimmer Gems. A single of the darkest color was added to the sentiment also.
Directions for the Floating Picture
The largest circle from the Everyday Details was used to cut Basic Black card stock. Next I took a piece of the DSP that I cut 3 1/2 X 3 1/2 and then cut it into 1/2″ strips. I began placing the strips at the bottom and used the edges of the Stampin’ Dimensionals. You can use the Foam Strips, but I have a lot of Dimensional sheets with only the edges remainig. I tried to think of a method to equally space the strips, but ultimately ended up just eyeballing it. Once they were all attached, I turned it over and cut around the black circle.
Thank you for stopping by today!!
Designer Series Paper Sale begins on August 6 – 31st.
Papers included in the sale are:
Bright & Beautiful
Countryside Inn
Country Lace
Country Woods
Full of Life
Lily Pond Lane
Mediterranean Blooms
Perennial Lavender
Take To The Sky
Thoughtful Journey
To Market
Unbounded Beauty
Wildly Flowering
Winter Meadow
Online Exclusives
New Online Exclusives have dropped. There are Halloween, Fall, Christmas, and many that are great year round. Of course the new Designer Series Papers and Embellishments are fabulous as well!
You can go directly to these in my Online Store by clicking HERE
HOST CODE
My AUGUST Host Code is NB9XKFUZ. Please use this code for orders under $150.00. I will have a small gift for those with orders over $50.00 in addition to the Perk Rewards Program. You can read all of the information at the top of the page in the Menu Bar under SHOP / Perks.
Thank you for stopping by today. I hope you enjoyed today’s project and will come back. I do read and reply to all of the comments individually. They mean a lot to me. Please reach out if you have a question.
The card I have today is using the same layout / sketch as yesterday’s card. (If you missed that one, you can see it here) However this one left off the smallest of the DSP layers and added a larger focal layer. I hope you like this one.
Stamp and Die
The stamp set with this lovely vase of flowers is the Everyday Details set. It is a carryover from the last Mini Catalog. I love the images of this as they are a great size for being the star of the card. This floral arrangement is stamped using Gray Granite for a lighter outline. And then colored using a variety of Stampin’ Blends. All of these are listed in the Supply List. The Dies are no longer a Bundle, but are still handy ones to have. The set includes circles, squares, and rectangles, as well as a long detail die. I used the largest of the rectangles for this one.
Papers
The beautiful DSP used is from the Unbounded Beauty Designer Series Paper. This paper is included in the current DSP Sale!! There were originally three patterns to be used until I changed the layout and left off the small bottom DSP layer. I pulled all of the colors from the floral bouquet piece on the left. The card base is Summer Splash with a layer of Pretty In Pink. The DSP is layered on Shy Shamrock.
The card base is 4 1/4 X 11 scored and folded at 5 1/2
The pink layer is 4 X 5 1/4
The multi color floral paper is 1 X 4 3/4 with layer of 1 1/8 X 4 7/8
The peach floral paper is 2 1/2 X 4 with layer of 2 5/8 X 4 1/8
Finishes
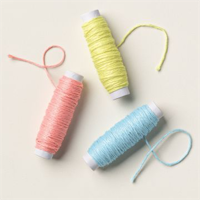
The finishes all add texture to the card, as well as a little bling. For the bow on the vase, I used the Bakers Twine Three Color Pack. This is actually Flirty Flamingo, but it pairs very well. And the bling is the 2024-2026 In Color Shimmer Gems in all of the new In Colors. I spread the gems around. To copy yesterday’s card, I added the two greens and peach at the bottom in a line. But the large flower really needed a shiny center. So by adding the Petunia Pop there, I also needed to use the Pretty In Pink. And by adding the last small one it took my number of gems to 5. I always try to use an odd number.
Thank you for stopping by today!!
Designer Series Paper Sale begins on August 6 – 31st.
Papers included in the sale are:
Bright & Beautiful
Countryside Inn
Country Lace
Country Woods
Full of Life
Lily Pond Lane
Mediterranean Blooms
Perennial Lavender
Take To The Sky
Thoughtful Journey
To Market
Unbounded Beauty
Wildly Flowering
Winter Meadow
Online Exclusives
New Online Exclusives have dropped. There are Halloween, Fall, Christmas, and many that are great year round. Of course the new Designer Series Papers and Embellishments are fabulous as well!
You can go directly to these in my Online Store by clicking HERE
HOST CODE
My AUGUST Host Code is NB9XKFUZ. Please use this code for orders under $150.00. I will have a small gift for those with orders over $50.00 in addition to the Perk Rewards Program. You can read all of the information at the top of the page in the Menu Bar under SHOP / Perks.
Thank you for stopping by today. I hope you enjoyed today’s project and will come back. I do read and reply to all of the comments individually. They mean a lot to me. Please reach out if you have a question.
The beautiful, and varied, Designer Series Papers from Stampin’ Up! are something they are known for. And they are one of my favorite things. Today I have a card made using scraps of DSP. I love to save and use my smaller pieces of leftover DSP. Maybe today’s card will give all of you an idea.
Papers
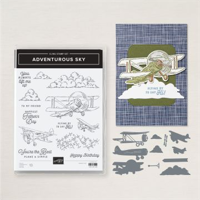
To continue my DSP love, I have used the Take To The Sky Designer Series Paper for this card. These are leftover pieces from previous cards. The clouds and the check are both sides of the same paper piece. And I love the Night of Navy with the plane diagrams. It is from the sheet that has sections of different designs and a tag. Pulling from these three pieces, I paired them with Night of Navy for the card base, a layer of Basic White, and then each piece is layered on Smoky Slate. I have all of the measurements for you below. Plus….this paper is one of the DSPs included in the current Sale with 15% off!
Stamps and Dies
To complete the card I had to play along with the airplane theme. So I used the matching Adventurous Sky Bundle. There are three sizes of airplanes in this set along with clouds and fun sentiments. I used the middle size airplane. It is colored with Stampin’ Blends and then die cut using the matching set of Dies.
To create a fun way of placing the sentiment, I thought of the airplanes pulling banners at the beach. I love the sentiment and it is from the set as well. With the small size of the sentiment I looked for a small Die in my collection. I found this one in a new set. It is from the Greetings of the Season Dies that are an Online Exclusive. These match the stamp set that is all greetings. So there are quite a few fun shapes that can be used as tags also. The tag hole is hidden behind the airplane rear.
Finishes
There was not a lot of room or need for a lot of bling on this card. With all of the different layers I decided for very simple. My choice of bling is the Pecan Pie & Clear Ribbon Adhesive Gems. I used three of the Clear ones and spaced them in the squares of the plaid paper. There is one larger size and then two smaller.
Measurements
This layout is one that I have used previously and will use again. Obviously the sizes of the DSP can be adjusted to fit your leftover pieces. But here are my measurements.
Night of Navy card base is 4 1/4 X 11, scored and folded at 5 1/2
Layer of Basic White is 3 7/8 X 5 1/8
Cloud DSP is 1 X 4 3/4 with a Smoky Slate layer of 1 1/8 X 4 7/8
Navy plane DSP is 2 1/2 X 4 with a Smoky Slate layer of 2 5/8 X 4 1/8
Plaid DSP is 3 X 1 with a Smoky Slate layer of 3 1/8 X 1 1/8
Thank you for stopping by today!!!
Designer Series Paper Sale begins on August 6 – 31st.
Papers included in the sale are:
Bright & Beautiful
Countryside Inn
Country Lace
Country Woods
Full of Life
Lily Pond Lane
Mediterranean Blooms
Perennial Lavender
Take To The Sky
Thoughtful Journey
To Market
Unbounded Beauty
Wildly Flowering
Winter Meadow
Online Exclusives
New Online Exclusives have dropped. There are Halloween, Fall, Christmas, and many that are great year round. Of course the new Designer Series Papers and Embellishments are fabulous as well!
You can go directly to these in my Online Store by clicking HERE
HOST CODE
My AUGUST Host Code is NB9XKFUZ. Please use this code for orders under $150.00. I will have a small gift for those with orders over $50.00 in addition to the Perk Rewards Program. You can read all of the information at the top of the page in the Menu Bar under SHOP / Perks.
Thank you for stopping by today. I hope you enjoyed today’s project and will come back. I do read and reply to all of the comments individually. They mean a lot to me. Please reach out if you have a question.
I love to make Fun cards. Today I have used the Charming Duck Pond Bundle to make a fun birthday card. The colors and the stamps make me smile.
Stamp Bundle
The adorable duck is the star of this card. So I will start with the stamps and dies. Saying that, there really are not a lot of anything used for this creation. It is pretty simple. I did stamp the duck on a scrap of Basic White card stock as well as the wild grass. They both are colored using Stampin’ Blends. The grass has openings in the blades so I filled in with the Pretty Peacock Stampin’ Blends to make the complete blades. The Crushed Curry cat tails are a single stamp that are easy to match up with the grass. And because it was going on the “water” I colored the white background with a Balmy Blue Stampin’ Blend.
The duck is the main guy. I copied his coloring from one in the matching DSP. There are several Stampin’ Blends used and they are all listed in the Supply List at the bottom of the post. Both the duck and grass were cut using matching Dies. And the simple birthday sentiment is from the stamp set as well.
Papers
The lily pads paper is from the matching Lily Pond Designer Series paper. I looked for a simple background for the duck and decided this was a good one. The card base is Pretty In Pink with Balmy Blue as the layer. Both of these were pulled directly from the DSP piece. That makes choosing colors so easy to do. The Lily Pond Lane is part of the DSP sale continuing thru the end of the month. A 15% discount is a good one!
Extras
To add more of the water to the card, I used the large Embossing Folder So Swirly. I really love these swirls. They are great for a lot of specifics like water and wind, even terrain. For a bit more texture the sentiment banner is punched using the Happy Labels punch. I chose the smaller of the two scallops. And to give it a bit more, I used the yellow Bakers Twine from the Bakers Twine Three Color Pack. I simply tied a bow around the end of the banner.
To complete the card there must be bling! This time I went above my normal three pieces of bling. There are five pieces floating around. I used the Pastel Sequins before realizing they are no longer available. You may have some in your stash, or any bling of your choice will work. I added four pink ones to several of the lily pads to match the pink flowers that some already have. And then I added a blue sequin to the opposite end of the sentiment from the bow.
Measurements
The measurements for this card are very simple. I love simple and it makes for easy duplication.
The Pretty In Pink card base is 4 1/4 X 11 scored and folded at 5 1/2
The Balmy Blue embossed layer is 4 X 5 1/4
The Pretty In Pink focal layer is 3 1/4 X 3 1/4
The DSP layer is 3 X 3
The sentiment strip is 3 1/4 X 1/2
Thank you for stopping in today!!
Designer Series Paper Sale begins on August 6 – 31st.
Papers included in the sale are:
Bright & Beautiful
Countryside Inn
Country Lace
Country Woods
Full of Life
Lily Pond Lane
Mediterranean Blooms
Perennial Lavender
Take To The Sky
Thoughtful Journey
To Market
Unbounded Beauty
Wildly Flowering
Winter Meadow
Online Exclusives
New Online Exclusives have dropped. There are Halloween, Fall, Christmas, and many that are great year round. Of course the new Designer Series Papers and Embellishments are fabulous as well!
You can go directly to these in my Online Store by clicking HERE
HOST CODE
My AUGUST Host Code is NB9XKFUZ. Please use this code for orders under $150.00. I will have a small gift for those with orders over $50.00 in addition to the Perk Rewards Program. You can read all of the information at the top of the page in the Menu Bar under SHOP / Perks.
Thank you for stopping by today. I hope you enjoyed today’s project and will come back. I do read and reply to all of the comments individually. They mean a lot to me. Please reach out if you have a question.
There are some wonderfully whimsical stamp sets in the Annual Catalog. And today’s card is using one of those sets. I paired it with some fun and whimsical DSP as well.
Stamp and Die Bundle
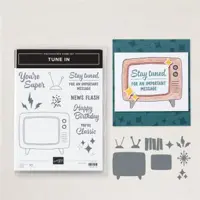
This fun and whimsical, or even retro, stamp bundle is the Tune In Bundle. The television and sentiments are fun but the added details are what really makes it different. The Daffodil Delight stars are what actually makes this a fun card in my opinion. Although I did try to use all the colors and images to make a retro 60’s – 70’s scene.
The stamps used are all from the stamp set. And the dies are all from the matching Dies. I envision using the stars in other projects already. To give the illusion of a TV screen for the front sentiment I used the Light Soft Sea Foam Stampin’ Blend and scribbled to cover the screen. I was very uneven because I did not want it to be totally solid. And I love that the tv screen is separate from the tv itself.
Papers and Colors
To continue with the whimsy and fun, I went with the Bright & Beautiful Designer Series Paper. This paper is also included in the current Sale with 15% off thru the end of the month. Hint, Hint !! The TV is from one of the pieces from the pack that is a variegated pink. Also the two pieces of DSP in the background are both from the pack. They definitely bring in the fun patterns. To bring out more blue from the upper background paper, I stamped the background images with Azure Afternoon. That is not a color I use very often. The knobs and speaker on the tv are all Berry Burst to give some additional brightness.
To the inside of the card I added a fun statement to go along with the Happy Birthday. You’re A Classic goes right along with the look of the front of the card. And adding the old fashioned energy signal just is the topping on the cake. Hopefully some of you are old enough to remember those from the black and white movies.
Finishes
There is so much going on with this card that it really did not need much in the way of extras or bling. But the stars needed a touch of something. I chose some sequins to further go along with the 60-70s look. They are on one of the stars and then a couple more scattered around.
Thank you for stopping by today!! I hope you have a fun weekend.
Designer Series Paper Sale begins on August 6 – 31st.
Papers included in the sale are:
Bright & Beautiful
Countryside Inn
Country Lace
Country Woods
Full of Life
Lily Pond Lane
Mediterranean Blooms
Perennial Lavender
Take To The Sky
Thoughtful Journey
To Market
Unbounded Beauty
Wildly Flowering
Winter Meadow
Online Exclusives
New Online Exclusives have dropped. There are Halloween, Fall, Christmas, and many that are great year round. Of course the new Designer Series Papers and Embellishments are fabulous as well!
You can go directly to these in my Online Store by clicking HERE
HOST CODE
My AUGUST Host Code is NB9XKFUZ. Please use this code for orders under $150.00. I will have a small gift for those with orders over $50.00 in addition to the Perk Rewards Program. You can read all of the information at the top of the page in the Menu Bar under SHOP / Perks.
Thank you for stopping by today. I hope you enjoyed today’s project and will come back. I do read and reply to all of the comments individually. They mean a lot to me. Please reach out if you have a question.
Today’s card began in my mind as a clean and simple look. It does look that way but it ended with a bit longer than simple in the different techniques used. The Playing In The Rain is great for a simple card however.
Stamp set
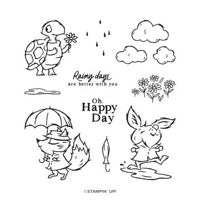
The Playing In The Rain stamp set contains such fun images. All have happy expressions and are thrilled with the rain around them. I used the sweet turtle that is holding a flower for someone. At least that is my thought. I had to google turtles to get a close up view of a turtle for my coloring. The photos are mostly aquatic turtles and I wanted a more country turtles. But I made him my own with Stampin’ Blends.
Background
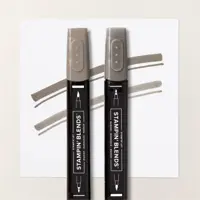
To create the background all it took was a Blending Brush and Pool Party Ink. I added the Pool Party fairly lightly and then stamped the turtle using Memento Tuxedo Black Ink. The blending brushes are a little of a learning process. I find I have better first touch if I ink the brush and then use a paper towel to do my first several strokes. This takes off the darkest part.
Colors and Bling
The clean and simple look goes along with the papers. There is no DSP and only Basic White and Pool Party card stock. The mix of colors on the turtle are Pebbled Path, Gray Granite, Wild Wheat and a trim of Granny Apple Green. And the flower is Petunia Pop with a center of Wild Wheat. All of these are Stampin’ Blends. To complete the card I added a trio of 2024-2026 In Color Shimmer Gems and used one each of three colors to tie in with the turtle colors.
Thank you for stopping by today!!!
Designer Series Paper Sale begins on August 6 – 31st.
Papers included in the sale are:
Bright & Beautiful
Countryside Inn
Country Lace
Country Woods
Full of Life
Lily Pond Lane
Mediterranean Blooms
Perennial Lavender
Take To The Sky
Thoughtful Journey
To Market
Unbounded Beauty
Wildly Flowering
Winter Meadow
Online Exclusives
New Online Exclusives have dropped. There are Halloween, Fall, Christmas, and many that are great year round. Of course the new Designer Series Papers and Embellishments are fabulous as well!
You can go directly to these in my Online Store by clicking HERE
HOST CODE
My AUGUST Host Code is NB9XKFUZ. Please use this code for orders under $150.00. I will have a small gift for those with orders over $50.00 in addition to the Perk Rewards Program. You can read all of the information at the top of the page in the Menu Bar under SHOP / Perks.
Thank you for stopping by today. I hope you enjoyed today’s project and will come back. I do read and reply to all of the comments individually. They mean a lot to me. Please reach out if you have a question.
The content in this blog is the sole responsibility of Jackie Beers as an Independent Stampin' Up! Demonstrator. The use of and content of classes, services or products offered is not endorsed by Stampin' Up!