I have another fun whimsical, animal card today. You know how much I love the funny stamp sets. And today’s is another good one! The bonus is that it is a Fun Fold / Gift Card holder.
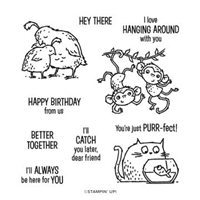
Stamp Set and Dies
Isn’t the face on the cat just perfect? I love it. And of course the sentiment fits right in as well. These are both from the new set in the Mini Catalog named Catch You Later. The set includes various animals with adorable sentiments to match. I love cats, so that was the first one for me to try out. This is a birthday card for someone who also loves cats. Like I needed a reason to use the cat. LOL!!
For a bit of a different look, I did the angled banner for the sentiment. The positioning is a little bit out of the normal, but that is fine to me. To get the great shapes for the stamped images I went to a favorite of mine. They are the Stitched So Sweetly Dies. I love that the shapes are quite different from any of the other die sets. And they surprisingly fit most sentiments and any of the smaller images.
Papers and Fund Fold
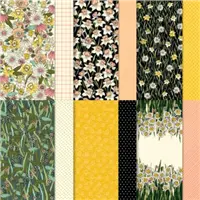
You may not recognize the two DSP patterns I used on this card. They are both the “back” sides of paper in the Sale-A-Bration paper Daffodil Afternoon Designer Series Paper. I love both of these patterns. I paired them with Pale Papaya as the card base. And the unexpected color for a pairing to Pale Papaya is Flirty Flamingo. I would never have put the two together without the plaid pattern using it. Now I am a fan!
As I mentioned, this card is a Fun Fold. And of course, I failed to take a photo of the inside before mailing. However, the measurements are as follows
Card Base is 5 1/2 X 8 1/2 scored on the 8 1/2 side at 2 1/4 from each end.
The Flirty Flamingo layer is 5 1/4 X 2 (x2)
The DSP layer is 5 1/8 X 1 7/8 (x2)
Inside White sentiment layer is 3 3/4 X 4 1/2
Strips for sentiment are 1 X 3 and 3/4 X 2 3/4
To make the Fun Fold, fold on the scoring lines and burnish the folds. The folds are the same size, so it does not matter which is top or bottom. Whichever one you decide is the bottom, add Tear & Tape against the edge on each side and fold up to make the pocket. There is room for the White inside card as well as a gift card. I left the card attached to the little tag they come on and still had room.
Sale-A-Bration is the Best Time of Year!!
HOST CODE
My January Host Code is GR679MMV. Please use this code for orders under $150.00. I will have a small gift for those with orders over $50.00 in addition to the Perk Rewards Program. You can read all of the information at the top of the page in the Menu Bar under SHOP / Perks.
Thank you for stopping by today. I hope you enjoyed today’s project and will come back. I do read and reply to all of the comments individually. They mean a lot to me. Please reach out if you have a question.
Before I get to today’s project, I wanted to let you all know that I am doing a Product Share from the upcoming January – June Mini Catalog. Last catalog I only did the paper. This time I am doing Ribbon shares as well. You can email me if you have questions, or would like to order.
Now for today’s project! This is a Corner Fold card that I have cased from The Paper Pixie. Julie did a video on it that is great, as she always is.
Stamps and Dies
The stamping and die cut star are from the Tidings & Trimmings Bundle of products. I am in love with the star! It looks so delicate and elegant. Both of the stars are included in the bundle. For the background of the stars, I repeatedly stamped the image from the Tidings & Trimmings stamp set. This card is actually a quick and easy one to do.
Paper
I used the stamped image to mimic the berries in the DSP. This piece of Designer Series Paper is from the Painted Christmas DSP. The pop of red goes great against the Evening Evergreen, except it is actually Poppy Parade instead of Red. LOL!! The Soft Succulent background star is pulled from the paper as well. The intricate star is cut from the Gold Metallic paper. This is a two pack of Gold and Rose Metallic papers. To make for ease in adhering the intricate cuts, I added the Adhesive Sheet to the Gold prior to die cutting. The adhesive sheet turns the die cut image into a sticker.
Directions
As I mentioned above, I cased this from The Paper Pixie. Here is a link to her video. Click Here
HOST CODE
My December Host Code is AVHFJFAU. Please use this code for orders under $150.00. I will have a small gift for those with orders over $50.00 in addition to the Perk Rewards Program. You can read all of the information at the top of the page in the Menu Bar under SHOP / Perks.
Thank you for stopping by today. I hope you enjoyed today’s project and will come back. I do read and reply to all of the comments individually. They mean a lot to me. Please reach out if you have a question.
Simple and easy to make gift card holders are the best. When they show off beautiful DSP, they are perfect. That is what I have to share with you today.
And here is the good part.
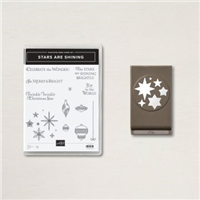
Stamps and Punches
The beautiful stars are punched from DSP using the Starlit Punch which is part of the Stars Are Shining Bundle. I love punch bundles! They are so easy to create multiple cards with. And this one gives multiple stars in one punch. I did not use all of them on the front of this card.
The sentiment is from the Stars Are Shining Stamp Set, the other half of the bundle. There are some great sentiments and stamps in the set. This one fit perfectly with my theme. For the inside sentiment I went to the Christmas To Remember stamp set. This set is all sentiments that are sweet and perfect.
I used the Banner Pick A Punch to cut the sentiment. This may be the first time I have used the single point banner instead of the two point one. Also I used the Label Me Lovely punch to make the finger pocket on the gift card pouch. Although it is not really necessary if you want to skip that step.
Papers
This Whimsy & Wonder Designer Series Paper is one of the prettiest papers this year. I chose the snowflakes because the pink looks beautiful against the Misty Moonlight card base. Afterwards I had the idea to punch the stars from the same paper. The bits of foil in the snowflakes are now in the stars as well. And it was a little scrap of DSP that I used, so no waste. There are a few added Rhinestones for a touch more bling!
Directions and Measurements
The card base is Misty Moonlight cut to 4 1/4 X 5 1/2
The DSP layer is 4 X 5 1/4
The accordion folded White piece is cut 4 1/4 X 9 3/4 and scored at 3 1/4 & 6 1/2
The decorated top Misty Moonlight is cut 4 1/8 X 3 1/8
The gift card pocket Misty Moonlight is cut 4 X 2 and then notched using the Label Me Lovely Punch
The DSP strip across the pocket is cut 4 X 1
HOST CODE
My December Host Code is AVHFJFAU. Please use this code for orders under $150.00. I will have a small gift for those with orders over $50.00 in addition to the Perk Rewards Program. You can read all of the information at the top of the page in the Menu Bar under SHOP / Perks.
Thank you for stopping by today. I hope you enjoyed today’s project and will come back. I do read and reply to all of the comments individually. They mean a lot to me. Please reach out if you have a question.
Today’s card is another Fun Fold that is a super easy one to make. It is a change to soft Christmas Colors with a touch of Whimsey. This will definitely be one of my Christmas cards this year. I CASED it from The Paper Pixie, Julie DiMatteo.
Paper
This card is all about the paper! The gorgeous Whimsey & Wonder Designer Series Paper is such a WOW! I have now fallen in love with all of the soft colors for Christmas in place of the traditional ones. The Blushing Bride card base is pulled from the beautiful paper. And both pieces of the DSP you see are from the Whimsey & Wonder.
Stamps and Dies
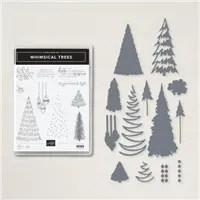
All of the stamps used, with the exception of one, are included in the Whimsical Trees stamp set. I really love the sweet sentiment on the front. It is larger than most front sentiments, but it fit perfectly and is so sweet! The raised swirl is in the stamp set and has a matching die that I used to cut it out with.
This is a view of the card opened. You can still see the beautiful DSP. The same swirl image as on the front, I stamped on the inside as well. Merry Christmas is the only stamp not included in the Whimsical Trees. This one is from the Little Delights stamp set.
Directions:
As I mentioned, this is a CASE from The Paper Pixie. It is truly very easy to do, but here is a link to her video. Click Here
HOST CODE
My October Host Code is HSUBS7GX. Please use this code for orders under $150.00. I will have a small gift for those with orders over $50.00 in addition to the Perk Rewards Program. You can read all of the information at the top of the page in the Menu Bar under SHOP / Perks.
Thank you for stopping by today. I hope you enjoyed today’s project and will come back. I do read and reply to all of the comments individually. They mean a lot to me. Please reach out if you have a question.
I have found another Fun Fold card to share. You may have seen this design from fellow Stampin’ Up! Demonstrator Sue Campfield. She has a couple of posts and videos on it. I fell in love immediately and had to give it a try.
Corner Tuck Fun Fold
As I said at the top of the post, this card is from Susan Campfield and she has a video. I used her basic measurements and added a little bit. The inside of her card did not have an extra layer. To add a bit of carry through, I stamped the Misty Moonlight layer with the stamped tree images. These are from the Perfectly Plaid stamp set. I thought they worked perfectly with the Beauty of the Earth Designer Series Paper.
The other thing I added was the layer of cardstock behind the DSP strip on the left side of the front. It seemed the DSP sort of bled into the base color. I also used that strip to anchor the front square focal layer. I centered and placed the square layer right up against that left strip. That allowed me to better center everything. You can see from the photo that the layer tucks underneath the corner but is still fairly centered on the card.
Here is the view of the open card.
Stamps and Paper
The star of this card, besides the fun fold, is the DSP. I mentioned above that it it the Beauty of The Earth Designer Series Paper. This is what most people would think of as the back side. You know how I love using the back side!! And I love that the corner piece and the other two containing the trees are all from the same sheet of paper. The corner piece is from the top of the paper.
In trying to add some texture and detail to the inside of the card, I decided some matching trees would be the perfect thing. By finding this similar tree in the Perfectly Plaid set, it seemed just meant to be. It is a carryover from the last two holiday catalogs and a favorite of mine. I love the small tree images that work for various seasons and needs.
The sentiments are from the Beauty of Friendship stamp set. These are perfect for any time. We should let people know whenever they inspire us in some way. The mix of fonts are always something that draws me to a sentiment. The front sentiment is cut using a die from the Painted Labels Dies. It is finished off with a Glitter Ribbon to ground it.
Measurements and My Directions
Card base of Night of Navy is cut 4 1/4 X 8 and scored at 2 1/2
Inside layer of Misty Moonlight is cut to 5 1/4 X 4 1/8
Front left Misty Moonlight layer is cut to 1 X 4
Front left DSP layer is cut to 7/8 X 3 7/8
Center Misty Moonlight layer is cut to 3 1/8 X 3 1/8
Center DSP layer is cut to 3 X 3
Inside White layer is cut to 3 X 3
The right corner is Night of Navy cardstock and a piece of DSP. Both are cut to 3 X 3 and then each is cut on the diagonal. Save one half piece from each paper for later.
Glue the triangle of DSP and cardstock together to make a stronger corner. Add dimensionals to each corner.
Stamp the tree image on the Misty Moonlight inside layer using Misty Moonlight Ink that you stamp off first.
Adhere this layer to the inside of the card.
Adhere the corner piece flush against the corners of the inside.
Test fold the front flap and make sure it clears the point of the corner layer. You may need to trim just a fraction off of that end.
Layer and add the Left side strip to the left edge of the front flap. Space it evenly at top, bottom, and left side.
Add the focal layer right up against strip.
Place the White inside sentiment in the center of the inside and it should be hidden by the front flap.
My Paper Share for Upcoming Mini Catalog
This is my first time doing a Paper Share. I opted to only do the paper for this first one. I would love to get you a sample of all of the new paper in the upcoming Mini Catalog as well as the Sale-A-Bration catalog. Click HERE to see what papers are included and to sign up for my shares. I will close this on July 31st.
The picture below shows the Designer Series Papers that are included in the Sale. There are 9 to choose from!!
HOST CODE
My July Host Code is 2GKGF4Q7. Please use this code for orders under $150.00. I will have a small gift for those with orders over $50.00 in addition to the Perk Rewards Program. You can read all of the information at the top of the page in the Menu Bar under SHOP / Perks.
Thank you for stopping by today. I hope you enjoyed today’s project and will come back. I do read and reply to all of the comments individually. They mean a lot to me. Please reach out if you have a question.
Welcome to InKing Royalty’s July Blog Hop! During this year’s blog hops, we are having fun with our stamping favorites – our favorite themes for seasonal cards and projects. This month’s projects feature Christmas! I hope you are in a Holiday mood because there is a lot of Christmas fun headed your way. We are excited to share our creations with you today! After you read my post, I hope you’ll hop over to the next person on the list at the base of this post.
Christmas is my favorite time of year for card making. I am very excited to share with you a card using two of the Christmas sets in the upcoming Mini Catalog.
Stockings
The stockings are so darn cute!! They are from the Stockings Dies as part of the Sweet Stockings Suite of products. For this card I only used the stockings from the suite. I wanted them to be the star of the show. Instead of stamping the design stocking, I used the Greenery Embossing Folder to give them the knitted looking texture. The toe layer is part of the dies as is the front banner looking lever holding the stockings.
I added just a simple sentiment of “Joy” by going with a third stocking. This one is cut from the Tidings of Christmas Designer Series Paper. I then used Cherry Cobbler Ink to stamp the Joy. The Joy and the inside sentiment are both from the Whimsical Trees stamp set. That is another great set!
Colors
The color choices all came from the gorgeous DSP. As mentioned above, it is the Tidings of Christmas Designer Series Paper from the Annual Catalog. I fell in love with this piece immediately. For a different look to my card, I went with Pool Party as the base color. It is not a listed color of the paper stack but works perfectly.
The Sahara Sand also works perfectly with this sheet of paper. I used it to separate the base and DSP. The lever on the front has a little strip of another sheet from the DSP pack. To bring out the Real Red / Cherry Cobbler of the paper, I added that strip to hang the stockings from. And to also stamp the Joy on the center stocking.
Layout and Measurements
This card is one I have seen several times lately. I think of it as an offset gate fold card. I have already played with a variety of different sizes of the folds. Here are the measurements for this one.
Base of Pool Party is cut to 4 1/4 X 11 and scored at 4 & 9 1/2
Sahara Sand is cut to 4 X 3 3/4 and 4 X 1 1/4
DSP is cut to 3 7/8 X 3 5/8 and 3 7/8 X 1 18
Inside White layer is 4 X 5 1/4
Here is a view of the open card. I added an extra stocking there as well.
Reminder that the stockings and sentiments are from the Stockings Dies and the Whimsical Trees (sentiments) stamp set. These products are in the Mini Catalog that goes live on August 3rd.
Thank you for stopping by today. I hope you’ll hop along to the next stop on the blog hop, Marylin Jones at Stamp With MJ. There’s lots of inspiration to be found in this group – and you don’t want to miss it!
Thank you for hopping along with us. If you get stuck during the Blog Hop, please use this line-up as a guide:
The picture below shows the Designer Series Papers that are included in the Sale. There are 9 to choose from!!
HOST CODE
My July Host Code is 2GKGF4Q7. Please use this code for orders under $150.00. I will have a small gift for those with orders over $50.00 in addition to the Perk Rewards Program. You can read all of the information at the top of the page in the Menu Bar under SHOP / Perks.
Thank you for stopping by today. I hope you enjoyed today’s project and will come back. I do read and reply to all of the comments individually. They mean a lot to me. Please reach out if you have a question.
The content in this blog is the sole responsibility of Jackie Beers as an Independent Stampin' Up! Demonstrator. The use of and content of classes, services or products offered is not endorsed by Stampin' Up!