I hope you have been enjoying flipping through the new Annual Catalog and adding to your Wish List, or purchasing these awesome new products. Each time I go through the catalog, see someone else’s projects, or just play with my new items, I fall more in love!
Simply Elegant
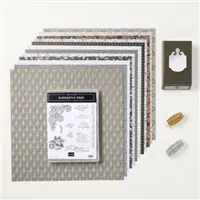
Today I am sharing the Simply Elegant Suite of products. Oh My!!! My first pass or two through the catalog I did not even slow down for page 68 – 69. On the second pass I decided I loved the paper and the punch. Punches are a favorite of mine because they are so quick and easy to do multiples. And the paper is fabulous with both Gold and Silver Foil highlights.
After having seen a few demonstrations with this Suite, I had to look at it again. And then I purchased it. As they say….The rest is History!! I am in love, as usual. LOL!! The sentiments in the stamp set are beautifully scripted and so sweet. The flower reminds me of one from many years ago. I would color it in a variety of colors with Markers direct to rubber. It would always be a simple card that allowed the flower to shine. This flower is going to be another one of those! Although I did not use it on this card.
Today’s Project
Even in the photograph you can see the bronze, gold and silver foil details in this piece of the Simply Elegant Designer Series Paper. The paper and the detail of the Elegant Tag Punch both draw you in. I do have to say that I did not complete my plan on the punched tag. This tag punch is designed to be made any length you wish. The width needs to be 1 3/4″ (actually a smidge narrower) but the length is up to you.
I stamped the sentiment and was so excited that it fit perfectly with the width of the tag. For me the easiest way to feed the paper into the punch was from the top, as you normally would. I then used my Take Your Pick Tool with the piercer end and pulled the bottom edge out as it began emerging into the open area. I then punched, which only punched the top part. The plan was to add a stamped image to the bottom part and then punch the rounded bottom. Well Duh!!! I was so excited about the top that I totally forgot my plan and went ahead and adhered it to the card!! It does not look bad, just not what my plan was. Playing with new products is so exciting! And I have been a demonstrator for 15 years! The fun never diminishes.
One thing I have to point out about this Simply Elegant Suite is the price. The price for Stamps, Punch, Designer Series Paper, Gold & Silver Trim is less than a lot of Bundles where you get stamps and dies. This entire Suite is 59.25. This price would also qualify you for my monthly Free gift for orders over $50.00, as well as a Blue Star Rewards star for more Free products from me.
Measurements and Directions
The card base is Daffodil Delight cut 4 1/4 X 11
The Basic Black layer is cut 4 X 5 1/4
The Smoky Slate layer is cut 3 7/8 X 5 1/8. It is stamped on using Smoky Slate Ink.
The DSP is cut 2 X 5 1/8 and is adhered even with the top , bottom, and left side of the Smoky Slate layer.
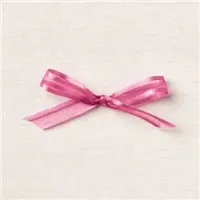
The ribbon is retired Bumblebee In Color Ribbon.
The punched tag is adhered with Stampin’ Dimensionals and has the addition of the Elegant Faceted Gem.
Thank you for stopping by today. I hope you enjoyed today’s project and will come back. I do read and reply to all of the comments individually. They mean a lot to me. Please reach out if you have a question.
Keep Calm and Keep On Stamping,
Jackie
Now Is A Great Time To Join My Team!
It’s a fabulous time to JOIN MY STAMPIN’ UP! TEAM. You get even MORE FREE products in the customizable Starter Kit. From 4–31 May, new team members can get $125 USD $155 USD worth of products for only $99 USD + free business supplies + free shipping + all the fun being a part of Stampin’ Up! If you have an interest I would LOVE to talk with you about all of the Fun!!
HOST CODE
My May Host Code is SGHBX62J Please use this code for orders under $150.00. I will have a small perk for those with orders over $50.00
I have another Fun Fold to share with you today. I received a wonderful card using this Fun Fold in a swap a few months ago from fellow demonstrator Gina Wheeler. I knew as soon as I saw it that it would be a favorite fold.
Pansy Petals Suite
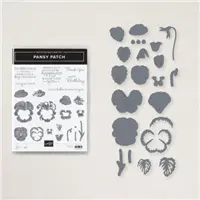
Stampin’ Up! has kept the Suites of Products, but has lessened the number of items in a suite. This also lowers the price (Yay!) The Pansy Petals Suite was one of my first choices in the Annual Catalog. I once read a book that mentioned pansies as being Happy Flowers. I love that and think of it every time I see this Bundle and Paper.
The sentiment on my card is from the Pansy Patch stamp set. It is so simple and just right! The set has a variety of pansies and layers as well as great sentiments. The sentiments are a mix of different fonts, which is always a favorite of mine. There are matching dies for cutting the stamped images and some of the DSP.
The Pansy Petals Designer Series Paper is so vibrant and has such wonderful colors. I believe this is going to lead me to try a variety of different color combinations. I used two different sheets of the paper for this project. The smaller pansies are so pretty in the patterned paper. But I also used one with larger pansies that match one of the dies in the Bundle. You can stamp and then die cut the pansy, I just opted for the easy choice of die cutting the paper.
Fun Fold
Now for the Fun Fold part of the card. It is a few quick cuts that make a great end product. Isn’t that the best kind? The next photo shows the two outer sides open with the center still closed. You can see the cross piece that holds the sentiment layer. This view also highlights the different DSP piece for when the card is opened.
And here is the card totally open to the inside. I added a third of the die cut pansies to the inside layer.
Measurements and Directions
The base layer of Fresh Freesia is cut 8 1/2 X 5 1/2, scored and folded at 4 1/4.
With the card in landscape mode, place the front section of the card on the Paper Trimmer so the scored fold is horizontal on the trimmer.
Measure over 1 1/4″ and cut just down to the score line.
Slide the card over and repeat this cut at 4 1/4″. This gives you the two side sections.
Cut 4 pieces of Soft Sea Foam to 4 1/8 X 1 1/8
Cut 1 piece of Soft Sea Foam to 4 1/8 X 2 7/8
Cut 4 pieces of DSP (2 each of 2 different patterns) 4 X 1
Cut 1 piece of DSP 4 X 2 3/4
Cut 1 White to 4 1/8 X 2 3/4 for inside
Adhere the layers of cardstock and DSP to the appropriate section
Cut a Fresh Freesia scrap to 5 1/2 X 1, this is the cross bar where the sentiment goes.
Adhere that cross piece only to the front of the two outside sections. It Does Not adhere to the center section.
Decorate as you wish.
Finishing
To finish this card I added the sentiment by stamping on White cardstock and using the Banner Pick A Punch to make the flagged end. I also added a single rhinestone to the top pansy flower. As I mentioned earlier I also glued one of the die cut pansies to the inside sentiment section.
Thank you so much for stopping by here today. I hope you enjoyed this Fun Fold project and will stop by again. I do read and reply personally to all comments and questions. So feel free to reach out.
Keep Calm and Keep On Stamping,
Jackie
It’s A Great Time To Join My Team!
It’s a fabulous time to JOIN MY STAMPIN’ UP! TEAM. You get even MORE FREE products in the customizable Starter Kit. From 4–31 May, new team members can get $125 USD $155 USD worth of products for only $99 USD + free business supplies + free shipping + all the fun being a part of Stampin’ Up! If you have an interest I would LOVE to talk with you about all of the Fun!!
HOST CODE
My May Host Code is SGHBX62J Please use this code for orders under $150.00. I will have a small perk for those with orders over $50.00
Welcome to InKing Royalty’s May Blog Hop! During this year’s blog hops, we are having fun with our stamping favorites – our favorite themes for seasonal cards and projects. This month’s projects are centered around Travel & Transportation, so prepare yourself for a fun journey. We are excited to share our creations with you today! After you read my post, I hope you’ll hop over to the next person on the list at the base of this post.
Last week I was “chillin’ on the beach”. So I decided that would become the theme for my card. For me at least there are two relaxing places, the mountains and the beach. I hope you get the Relaxing feeling from this card.
Visualize
Can you see the water in this fabulous paper? This piece is from the Expressions In Ink Designer Series Paper. The patterns and colors truly are beautiful. This is a back side, you know how I love to use the opposite sides, of one with gold highlighting a similar pattern as this. The swirly colors of the Gulf water is what I see here.
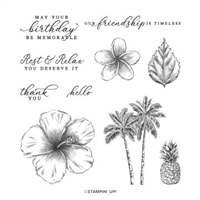
To create the sandy beach, I tore a piece of Sahara Sand cardstock in a rough and rounded direction. The palm trees and other stamps are from the Timeless Tropical stamp set. I used Markers to Red Rubber technique to color the palm trees. After stamping, I did touch up the bark area with a Light Crumb Cake Stampin’ Blend. There are three different greens used for the leaves. They are Just Jade, Soft Succulent, and Evening Evergreen Stampin’ Write Markers. Sadly the Stampin’ Write Markers are not sold individually. They are available in Color Families however.
Highlights
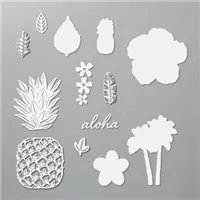
To finish off the beachy scene, I die cut everything using the matching dies named In The Tropics Dies. The flowers are one die that cuts three different flowers. The tiny pieces you see on the beach are the centers of the flowers. They look like miniature flowers and were too cute to discard.
The sentiment is from the Timeless Tropical, as well as all of the stamped images. The tag is from the stand alone dies called Tailor Made Tags Dies. I love these tags. Please check them out if you have not noticed them before. They are so handy!
The finishing touches are the flowers on the beach and the tag. I added the new 2021-2023 In Color Jewels for the flower centers. The ribbon pull on the “luggage tag” is the shimmery Flirty Flamingo Metallic Ribbon. Sometimes having the metallic threads makes the ribbon a bit stiff. This one is very soft and pliable.
Thank you for stopping by today. I hope you’ll hop along to the next stop on the blog hop, Candy Ford at Stamp Candy. There’s lots of inspiration to be found in this group – and you don’t want to miss it!
Thank you for hopping along with us. If you get stuck during the Blog Hop, please use this line-up as a guide:
It’s a fabulous time to JOIN MY STAMPIN’ UP! TEAM. You get even MORE FREE products in the customizable Starter Kit. From 4–31 May, new team members can get $125 USD $155 USD worth of products for only $99 USD + free business supplies + free shipping + all the fun being a part of Stampin’ Up! If you have an interest I would LOVE to talk with you about all of the Fun!!
HOST CODE
My May Host Code is SGHBX62J Please use this code for orders under $150.00. I will have a small perk for those with orders over $50.00
I have a Mother’s Day card to share with you today. And it is a Fun Fold! You know those are my favorite.
I do want to give you a heads up about next week first. I will not be posting next week as I will be sitting on the beach and just relaxing! I cannot wait! Girlfriends on the beach is one of the best pairings. So I will not be posting again until Monday week.
Now, here is today’s card
Fun Fold
This adorable Fun Fold was shared with me in a Team Swap of my Upline. So a shout out to fellow InKing Royalty Demonstrator Joan Brown for this great fold. I will show you the opening pictures first and then explain a bit.
If you can tell from the photo, the center strip is attached only to the right side of the card. The top and bottom strips are attached to only the left side of the card.
I think this truly is a FUN Fold! I have all of the measurements for you further down. I want to tell you about the products I used first.
Designer Series Paper
The DSP I used is the Pansy Petals Designer Series Paper. There are such gorgeous pieces in this pack of paper. And it goes from very soft, like this one, to very vibrant with purple pansies as the star. The gingham on the strips is one of the reverse sides of the paper. You know how much I love those reverse sides as complimentary pieces. And of course, all of my colors were chosen from the DSP!
A great thing about this paper is that it has all of the new In Colors for 2021-2023 included on it. I chose to go with the Fresh Freesia for the layers. The inside of the perfume bottle is the Pale Papaya. Both are wonderful new colors!
Stamp Set
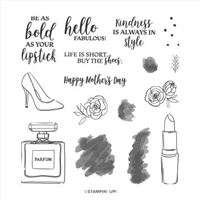
The surprise of this card is the stamps I chose. I used the Dressed To Impress stamp set and matching All Dressed Up dies. This reminds me of my childhood, in that I would always give my Mom perfume or Bath Salts, etc. Things that as I grew older realized she never used. Once I realized that I did begin gifting her things that she did like and use!
One of the purposes of the image is to connect the top and bottom strips. I added an extra piece of the Fresh Freesia cardstock to connect the two strips and then positioned the perfume and rose to cover it. You can see a peek of it at the neck of the bottle in the last photo. That is okay with me.
Measurements and Building
The base of the card is 4 1/4 X 11, scored at 2 3/4 and 8 1/4.
Cut two pieces of Highland Heather to 2 1/2 X 4
Cut two pieces of DSP to 2 3/8 X 3 7/8
Cut three pieces of Fresh Freesia to 1 X 4, plus one more to 1 X 3 1/2 to connect top and bottom pieces
Cut three complimentary DSP to 3/4 X 3 3/4
Stamp and color the perfume bottle and rose with Memento Tuxedo Black Ink and Stampin’ Blends. Then Die Cut.
Layer and adhere the two panels to the card
Layer all of the strips. Add the extra strip to the right end of two strips and line up the edges.
Center the single strip on the card and adhere to only the right side panel
Center the combined strips on the card and with the center strip. Adhere the two strips to only the left side panel.
Add your stamped images.
I hope you like this Fun Fold as much as I do. This was the first time I had seen this one and thought it was a good one. And what better time to make a special card than for Mother’s Day.
Thank you for visiting today! Remember that I will be away next week. Please come back Monday week for more new projects. I have another new Fun Fold to share one day that week as well.
Now Is A Great Time to Join Stampin’ Up! and My Team
It’s a fabulous time to JOIN MY STAMPIN’ UP! TEAM. You get even MORE FREE products in the customizable Starter Kit. From 4–31 May, new team members can get $125 USD $155 USD worth of products for only $99 USD + free business supplies + free shipping + all the fun being a part of Stampin’ Up! If you have an interest I would LOVE to talk with you about all of the Fun!!
HOST CODE
My May Host Code is SGHBX62J Please use this code for orders under $150.00. I will have a small perk for those with orders over $50.00
The Stampin’ Up! Annual Catalog debuted on Tuesday. I am still going through the products from my pre-order. That is a demonstrator perk. I love the catalog and flipping through it, but everything is even better when it is in my hands!! Today’s card is an example of that.
Flowers
The stamped image and the Designer Series Paper are both the Hand Penned Petals. Oh My! I thought it was pretty in the catalog. In person is way more exciting. The paper truly looks as if it is drawn in ink and then lightly watercolored.
For this card I chose the Single flower stem from the Hand-Penned Petals stamp set. Choosing the color was hard, as all of the colors in the DSP would work. I finally decided on the Highland Heather. The image is stamped using Memento Tuxedo Black and I used the fill stamp for the purple flower. The fill stamp left white places, as it shows on the DSP. I decided to try an experiment. Using the Highland Heather Dark Stampin’ Blend, I filled in the white spaces. The look that created is almost like a bleached look. I am happy with that experiment!
Finishing Touches
I put the card together and did not add a sentiment. Then I second guessed myself. I love the mix of fonts in each of the sentiments in this stamp set. As soon as I saw this “Anything is Possible”, I knew it was the correct one to use. That is such a sweet sentiment.
My final touch for the card was to add a Pastel Pearl in the center of the smaller flower. I chose the one that is a light blueish color. It brings out some of the very light blue in the DSP. And I believe the single pearl was enough of embellishments.
Thank you for stopping by today. I really do appreciate you looking at my projects. All of the supplies I used are at the bottom of the post.
Join Stampin’ Up!
It’s a fabulous time to JOIN MY STAMPIN’ UP! TEAM. You get even MORE FREE products in the customizable Starter Kit. From 4–31 May, new team members can get $125 USD $155 USD worth of products for only $99 USD + free business supplies + free shipping + all the fun being a part of Stampin’ Up! If you have an interest I would LOVE to talk with you about all of the Fun!!
HOST CODE
My May Host Code is SGHBX62J Please use this code for orders under $150.00. I will have a small perk for those with orders over $50.00
The New Annual Catalog is HERE !!!! I am so excited to share with you some of the new products. I hope you are as excited about this catalog as I am. Getting the new catalog and sitting down with a beverage is one of my favorite things!
If you do not have a current demonstrator, I would love to assist you with your stamping needs and get a catalog into your hands. Please get in touch with me .
Today’s New Products
I have mixed a Bundle, that includes a punch, with some new border dies. Punches are always a favorite of mine. And I have found that creating pretty edges on my cards are an easy yet special touch. Tomorrow I will share a matching gift bag and tag to this card.
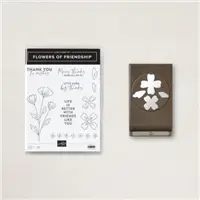
This card began with the Flowers of Friendship Bundle. It is a flower set with a matching punch. But it is so much more than that. The fonts of the sentiments are really nice, and are different from any before. The punch is called Flowers and Leaves Punch. It punches two different single flowers along with leaves.
Layers
I used the large flower from the stamp set and colored it using the Stampin’ Blends. All of my colors are Polished Pink and Soft Succulent. I stamped a couple of the single flowers and colored them as well. One of the flowers I cut into petals and using the Mini Stampin’ Dimensionals, added it over top of the main flower. I love the dimension it gives to the card.
The gorgeous edge of the card is made using one of the Basic Borders Dies. This is also a new set in the Annual Catalog. There are 6 different edging dies that could be used in a variety of ways. For me it is an easy way to give my card a totally different look.
Extras
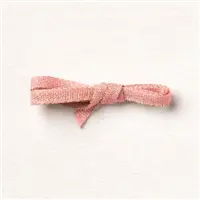
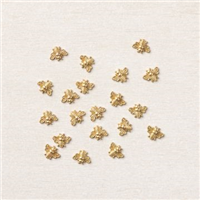
This card has an element that I rarely use. I buy the trinkets, and then never use them. Today I did use the Bumblebee Trinket. All it takes is a single Glue Dot to hold this cute bee into place. And I believe it adds quite a bit to the card. The other extra is the new In Color Open Weave Ribbon. It is a dream to work with and comes in all 5 of the New In Colors.
Thank you for stopping by today. I have all of these new supplies listed at the bottom of the page. You can simply choose the Shop button on the menu bar at the top of the page. It will take you directly to my online store. And I would appreciate your order very much. I have a host code listed just below as well.
New Join Special
It’s a fabulous time to JOIN MY STAMPIN’ UP! TEAM. You get even MORE FREE products in the customizable Starter Kit. From 4–31 May, new team members can get $125 USD $155 USD worth of products for only $99 USD + free business supplies + free shipping + all the fun being a part of Stampin’ Up! If you have an interest I would LOVE to talk with you about all of the Fun!!
HOST CODE
My May Host Code is SGHBX62J Please use this code for orders under $150.00. I will have a small perk for those with orders over $50.00
The content in this blog is the sole responsibility of Jackie Beers as an Independent Stampin' Up! Demonstrator. The use of and content of classes, services or products offered is not endorsed by Stampin' Up!