Having a card ready to go when needed is one of the great things about making a lot of cards. And some stamp sets are a perfect fit for making multiples. Today’s card fits both of those criteria.
Stamps
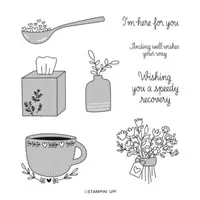
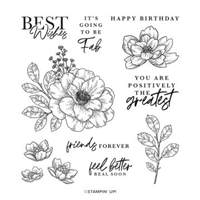
This sweet card uses two different stamp sets. Surprisingly the flowers come from the Speedy Recovery stamp set. This was one I used a few weeks ago with the tissue box. You can see that post by clicking HERE. It was said then how versatile this set really is. These flowers could be for any occasion. Especially with that sweet little tag attached.
For the sentiment, I went to the Shaded Summer stamp set. Just the simplicity of that sentiment made it a great one for a “just in case” type card. And I love having these type cards on hand.
Paper
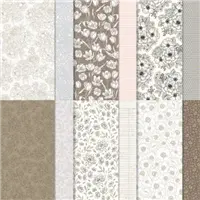
This pretty DSP is from the Hues of Happiness Designer Series Paper. It pairs perfectly with the flowers and allows the brighter colors to pop. Since the strip of DSP is only 2 X 4 7/8, it covers half of the front White layer, a lot of cards could come from one piece of DSP. You get more bang for your buck as well as having sweet cards on hand.
Layers
The focal layer is one that made me happy. The flower is punched out using the Decorative Label Punch. And a wonderful discovery was that the roughly 2 1/2″ Layering Circle Die fits it perfectly. For the final touch I used the Fun Flower Resin Shapes next to the sentiment. The little flower mimics the small flowers in the DSP.
Today is the Last Chance on Retiring Mini Catalog Products
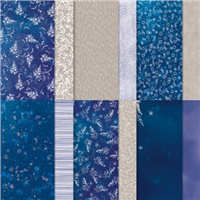
Click on the photo to get the complete PDF of retiring products. Pay close attention to discounted items. It may be less expensive to purchase some items that are part of a bundle separately, than at the bundle price! I want you to get the most for your dollars.
HOST CODE
My June Host Code is B4ZVQK6D. Please use this code for orders under $150.00. I will have a small gift for those with orders over $50.00 in addition to the Perk Rewards Program. You can read all of the information at the top of the page in the Menu Bar under SHOP / Perks.
Thank you for stopping by today. I hope you enjoyed today’s project and will come back. I do read and reply to all of the comments individually. They mean a lot to me. Please reach out if you have a question.
Pretty and easy do not have to be opposites. Today’s project is both of those things starring the Sun Prints Designer Series paper
This Paper is the Star!
Sun Prints is a perfect name for this beautiful Designer Series Paper. It reminds me of a school project where we placed leaves on construction paper and placed in the sun. Except ours was not nearly as pretty. With the beauty of the paper it could be used as I did for any occasion. All you need to do is adjust the sentiment. And who would want to cover up that paper?
The second Paper star here is the vellum. This is something I tend to forget to use. However, my upline Brian King uses it more often and I always tell myself to use it as well. For this card the vellum was perfect. It gives an added layer without taking away from anything.
Stamp Set
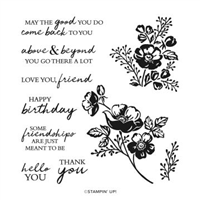
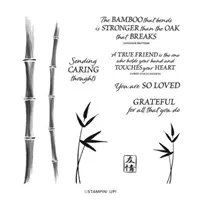
Even though it is only one stamp used from the stamp set, it is a really good one. The set is the Bamboo Beauty stamp set. There are pretty images and caring sentiments. Sadly we need those type sentiment more than we would want.
Layers
There are three card layers of Night of Navy, White , and the DSP. For the sentiment layers the same base colors were used with the added touch of vellum. These layers were all cut using the Layering Circles Dies.
Last Chance on Retiring Mini Catalog Products
Click on the photo to get the complete PDF of retiring products. Pay close attention to discounted items. It may be less expensive to purchase some items that are part of a bundle separately, than at the bundle price! I want you to get the most for your dollars.
HOST CODE
My June Host Code is B4ZVQK6D. Please use this code for orders under $150.00. I will have a small gift for those with orders over $50.00 in addition to the Perk Rewards Program. You can read all of the information at the top of the page in the Menu Bar under SHOP / Perks.
Thank you for stopping by today. I hope you enjoyed today’s project and will come back. I do read and reply to all of the comments individually. They mean a lot to me. Please reach out if you have a question.
Masculine cards do not have to be difficult. With this simple layout it was a piece of cake. Using the Vintage Tools stamp set makes it even easier.
Stamps
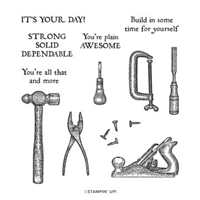
The new Vintage Tools stamp set in the Annual Catalog is amazing! There are a few simple, old fashioned, tools with humorous sentiments. The one on this card may take a minute if you are unfamiliar with the tool. That is my kind of humor since I am somewhat vintage myself!
Punches
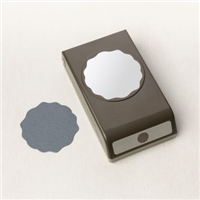
You may have noticed that I have used this Decorative Circle Punch a few times recently. It has become my “go to” punch it seems. The stamped image would look just as good with circles or squares, but the new shape of this punch keeps drawing me in. For the sentiment, you should recognize it as the smaller of the Double Oval Punch. That is another of my “go to” punches. Between the two sizes one or both are generally a perfect fit.
Paper & Layout
This fun and simple layout was a Sketch from Mary Fish. Simple sketches can really help with a creativity block, or a way to use a stamp set with smaller images, like this Vintage Tools. An added bonus for this sketch is the scraps of paper. Who doesn’t have a ton of paper scraps?
The plaid paper you see is one of the new ones from the upcoming June-January Mini Catalog. It is called Gingham Cottage. All of the patterns are like this. In coordinating colors for a masculine card I went with browns and greens. The paper you may have forgotten about is the Kraft Paper. It was a carryover from the last Mini into the new Annual Catalog.
Last Chance on Retiring Mini Catalog Products
Click on the photo to get the complete PDF of retiring products. Pay close attention to discounted items. It may be less expensive to purchase some items that are part of a bundle separately, than at the bundle price! I want you to get the most for your dollars.
HOST CODE
My June Host Code is B4ZVQK6D. Please use this code for orders under $150.00. I will have a small gift for those with orders over $50.00 in addition to the Perk Rewards Program. You can read all of the information at the top of the page in the Menu Bar under SHOP / Perks.
Thank you for stopping by today. I hope you enjoyed today’s project and will come back. I do read and reply to all of the comments individually. They mean a lot to me. Please reach out if you have a question.
Fun Folds are my favorite type of card. The card I am sharing today is very easy to do and extremely versatile. It features the Cottage Rose Suite of products.
Stamps
This gorgeous rose on the front of the card is the star of the Cottage Rose stamp set. There are matching dies, but they were not used on this project. Stamping for this beauty was done using Early Espresso Ink. And the shading was accomplished by using a Blender Pen to pull the color into the pre shaded areas. Soft Succulent Stampin’ Blends were used on the leaves.
2nd Fold
The inside of the card is stamped using the same Cottage Rose stamp set, just using the smaller rose. It is also colored in the same manner as the front rose is. With the dark Early Espresso it is difficult to see how the white is layered. It is a folded piece of Basic White cardstock that is added as if it were simply a layer. There are equal margins all the way around. This makes opening much easier, as well as the placement of the white.
Last Fold
Hopefully it is now clear why this is called a Multi Fold card. The white opens to the center. The sentiment and leaves are from the same Cottage Rose stamp set. How easy is this card? Pretty and simple are a wonderful combination.
Paper and embellishment
The small strip of the Abigail Rose Designer Series Paper is such a beautiful piece. It was chosen for the softness and that it paired well with the dark of Early Espresso on the card base and the soft of the Soft Succulent for the image layer. Not adding a sentiment on the front of the card was a bit of a quandary. The deciding factor was just that it was so very pretty without covering any portion. Adding the trio of different size Champagne Rhinestones seemed a better fit.
Click on the photo to get the complete PDF of retiring products. Pay close attention to discounted items. It may be less expensive to purchase some items that are part of a bundle separately, than at the bundle price! I want you to get the most for your dollars.
HOST CODE
My June Host Code is B4ZVQK6D. Please use this code for orders under $150.00. I will have a small gift for those with orders over $50.00 in addition to the Perk Rewards Program. You can read all of the information at the top of the page in the Menu Bar under SHOP / Perks.
Thank you for stopping by today. I hope you enjoyed today’s project and will come back. I do read and reply to all of the comments individually. They mean a lot to me. Please reach out if you have a question.
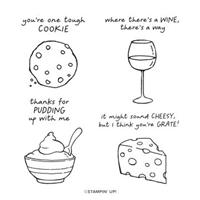
Humorous stamp sets always grab my attention. Today’s project is made with the A Little Cheesy stamp set and is actually a card of encouragement. A Smile is a good thing.
Stamps Set
A friend needs a bit of encouragement so this card is for her. Adding a little humor to most situations is fine. And this is one of those times where it fits perfectly. These type stamp sets draw me in right away. With the perfect name , this one is the A Little Cheesy stamp set . There are fun images of a cookie, bowl of pudding, a wedge of cheese, and the wine. All of the sentiments are similar to this one and just make me Smile! Stamping and coloring this wine was a piece of cake using Pool Party Ink for the glass and Rich Razzleberry stampin’ Blends for the wine.
Layers of Paper
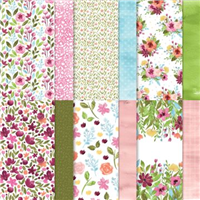
All of the colors were pulled from this piece of the Awash In Beauty Designer Series Paper. If the colors are in the paper, then they are already proven to work wonderfully together. Normally the paper is chosen first. But this one was chosen second. It was actually chosen because it matches the wine. It needed to be bright and colorful to fit the encouragement label also.
Final Additions
To ground the stamped images, I added a strip of the Merry Merlot cardstock. That did not seem quite enough texture. So to add a bit more, I went with a piece of the beautiful Rose Gold & White Striped Ribbon. It fit perfectly on the cardstock strip plus added texture and more depth. For the final touch I used one of the 2021-2023 Opal Rounds next to the glass. The yellow, which is supposed to be Pale Papaya, matches the yellow circles in the paper. That pulls almost all of the colors into the card from the DSP.
Last Chance on Retiring Mini Catalog Products
Click on the photo to get the complete PDF of retiring products. Pay close attention to discounted items. It may be less expensive to purchase some items that are part of a bundle separately, than at the bundle price! I want you to get the most for your dollars.
HOST CODE
My June Host Code is B4ZVQK6D. Please use this code for orders under $150.00. I will have a small gift for those with orders over $50.00 in addition to the Perk Rewards Program. You can read all of the information at the top of the page in the Menu Bar under SHOP / Perks.
Thank you for stopping by today. I hope you enjoyed today’s project and will come back. I do read and reply to all of the comments individually. They mean a lot to me. Please reach out if you have a question.
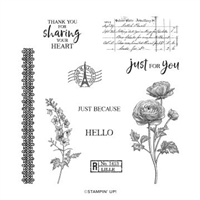
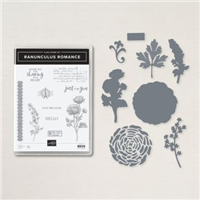
Today’s project is not a card. I have a Sneak Peek for you of a sweet box from the upcoming Mini Catalog. It is paired with the Ranunculus Romance stamp set for a sweet young lady gift.
Stamp Set(s)
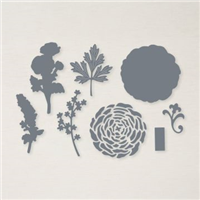
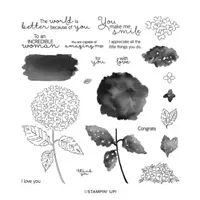
This project began with the Ranunculus Romance stamp set so that is where I am going to start as well. Needing a gift box ,or a card, sometimes leads us down different paths. For this project I wanted to use the “collage” look of the Ranunculus Romance stamp set. (Try saying that , or spelling it, a couple of times!!) Even the little tag was pre-done as I have always loved that little tag from the Hydrangea Dies. The sentiment is from the Hydrangea Haven stamp set.
The Gift Box
After stamping and coloring the flower, there just wasn’t a box I had in my pattern file that seemed to fit. Luckily, I had received my pre-order from the July – January Mini Catalog. And even better was that I had ordered the cute little Envelope Treat Boxes. If you have your catalog already, they are on page 13. They are pre scored and have adhesive already on them. Best yet is there are ten boxes for $8.00.
Instead of having the closure on the top, I decided it needed to be on the bottom. To ensure it stays closed, and to add the pretty flower, I added a Soft Succulent Belly Band. There is a “collage” sort of stamping on what I am calling the top of the box. So here are all of the photos.
You can see the stamping on the box here.
This is what I am using as the bottom of the box with the envelope looking closure.
It also has a second closure, which is wonderful for holding the surprise in place.
And here is the real treat! There are six of the Merci Chocolates, and do you see the dark piece on the bottom? That is a gift card! Yes, it fits a gift card. That is a winner in my book.
Belly Band Measurements
The belly band is loose enough that it slides off easily. Soft Succulent cardstock is cut to 2 1/4 X 7. Then score it at 1 3/8, 2 3/8, 4 3/4, and 5 3/4. It is secured where it overlaps with Tear & Tape.
Last Chance on Retiring Mini Catalog Products
Click on the photo to get the complete PDF of retiring products. Pay close attention to discounted items. It may be less expensive to purchase some items that are part of a bundle separately, than at the bundle price! I want you to get the most for your dollars.
HOST CODE
My June Host Code is B4ZVQK6D. Please use this code for orders under $150.00. I will have a small gift for those with orders over $50.00 in addition to the Perk Rewards Program. You can read all of the information at the top of the page in the Menu Bar under SHOP / Perks.
Thank you for stopping by today. I hope you enjoyed today’s project and will come back. I do read and reply to all of the comments individually. They mean a lot to me. Please reach out if you have a question.
The content in this blog is the sole responsibility of Jackie Beers as an Independent Stampin' Up! Demonstrator. The use of and content of classes, services or products offered is not endorsed by Stampin' Up!