Before we get to the card today, there is a wonderful special coming soon. There is a photo card at the bottom of the post. But the special part is that June 5 – 30, you get an additional 10% off the cost of a Bundle. That makes a total of 20% !! Woohoo!! And the 10% also goes towards either of the Stamp Cut & Emboss Machines as well.
My card today is another version of my new favorite gift card holder. This one was made for a sweet young lady for graduation. It is all about Pink.
Papers
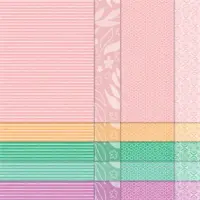
This card really highlights the beautiful Unbounded Beauty Designer Series Papers. These shades of pink all work great together and are easy to mix with other pink shades. I chose to use one sheet as the front and then divide it between the two sections. I showcased this card previously with all of the measurements. And I used the same for this card. You can the previous card and measurements HERE.
The DSP and layers are 4 X 4 and 1 X 4 for the White. Then 3 3/4 X 3 3/4 and 3/4 X 3 3/4 for the DSP. You also need a second 3 3/4 X 3 3/4 White for the inside. Here is that view.
The gift card tucks into the DSP section at the bottom of the card. It will even hold most cards still with the covers on.
Stamps and Bundles
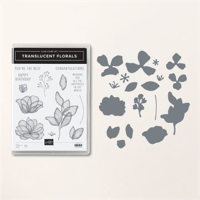
The front flowers are from the Translucent Floral Bundle. This is an Online Exclusive that has carried over from another catalog. It is very popular and one that I find myself drawn to. The flowers are so delicate looking. And with the matching Dies, which also have extra greenery, it is a Win for sure.
The front sentiment is from the Wonderful Thoughts stamp set. I love that elegant script. The inside sentiment is from the Everyday Details stamp set. Graduation is definitely a New Journey!! And the little stamped sprig is from the Translucent Florals. For this card, a greenery can be pink!
Finishes
To complete this card I added different types of bling. First is the Sheer Ribbon Combo Trim in a soft pink. It is a little hard to pick out in the photo. But it helps to ground the sentiment and add a little more softness. And of course, there must be bling! I have scattered several Basic Rhinestone Jewels around the card. Plus I did add just a scrap of the beautiful DSP to the inside of the card as well. Something a little different.
Thank you for stopping in today!!!
Extra 10% on Bundles, and the Stamp Cut & Emboss Machine, both regular and Mini…
HOST CODE
My JUNE Host Code is VGC9HN6B. Please use this code for orders under $150.00. I will have a small gift for those with orders over $50.00 in addition to the Perk Rewards Program. You can read all of the information at the top of the page in the Menu Bar under SHOP / Perks.
Thank you for stopping by today. I hope you enjoyed today’s project and will come back. I do read and reply to all of the comments individually. They mean a lot to me. Please reach out if you have a question.
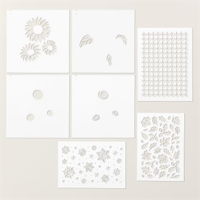
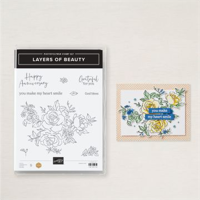
The new Layers of Beauty Bundle is one I am finding myself drawn to. Having not used stencils / masks before, I find these to be so easy to use. I think you will as well.
Stamps
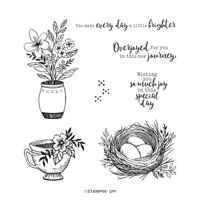
The Layers of Beauty Bundle includes the Stamp set, Dies, and 5 masks. On this card I did not utilize the Dies. I previously used the entire bundle. If you want to see it again you can click HERE. This card was created for a class and I wanted the focus to be on getting the blending done more than die cutting and layers. So I kept everything very simple.
The stamp set also includes a few special sentiments. This one is so sweet. If it looks familiar, I taped off the “for you” and only used the grateful on the Memorial Day card from Monday. You can see that card HERE.
Colors
The lack of DSP is probably a shock to several of you. As I tend to use it on almost every card. But as I mentioned above, I wanted this card to be simple and all about creating the flowers. That said it took several colors to create these flowers. For me as a relatively new student of masks, I find it easier to stamp the outline of the image. This allows me to use the outline to aline the masks properly.
The first step was stamping the image with Memento Tuxedo Black Ink. Next came the first mask, and they are numbered clearly, using Fresh Freesia Ink. The second mask uses Petunia Pop Ink. And the third floral mask uses Berry Burst Ink. Then come the greenery. For the fourth mask I used Granny Apple Green and then finally Garden Green. The variation in colors does not need to be perfect. I love that it is lighter in some places than others. Nature is not perfectly even in colors either.
The card base is Berry Burst with Granny Apple Green as the layer. And to add a touch of bling, as always, I kept that simple as well. There is one of the large Basic Rhinestone Jewels.
Thank you for stopping in today!!! I hope you will give this bundle and masking / blending a try.
May Join Promotion
New demonstrators who join during the month of May will receive the following products in their Starter Kit at no additional cost:
2024–2026 In Color Classic Stampin’ Pad Bundle
2024–2026 In Color 8-1/2″ x 11″ (21.6 x 27.9 cm) Cardstock
2024–2026 In Color 6″ x 6″ (15.2 x 15.2 cm) Designer Series Paper
2024–2026 In Color Stampin’ Write Markers
HOST CODE
My MAY Host Code is 96AT2UNW. Please use this code for orders under $150.00. I will have a small gift for those with orders over $50.00 in addition to the Perk Rewards Program. You can read all of the information at the top of the page in the Menu Bar under SHOP / Perks.
Thank you for stopping by today. I hope you enjoyed today’s project and will come back. I do read and reply to all of the comments individually. They mean a lot to me. Please reach out if you have a question.
I have become obsessed with the Attention Shoppers Bundle. Today I have another similar with just one bag and a surprise gift inside.
Stamp Bundle
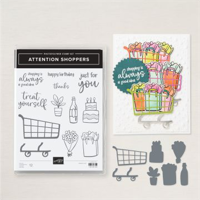
The Attention Shoppers Bundle has become a go to for me lately. I think I could make cards for a week or more using this bundle! In fact I made a similar card last week using the shopping bag. If you missed that one you can see it HERE.
The stamps used on this card are all from the stamp set, with one exception. The “background” of the bag is from the Wild Fern stamp set. That is stamped multiple times using Soft Sea Foam Ink. The bag is stamped onto 2024-2026 In Color Designer Series Paper and Die cut. The tissue paper is colored over with the Dark Summer Splash Stampin’ Blend to help hide the circles. Or at least downplay them. It was a quick and easy way to only stamp one time and still have the DSP.
The bottle of bubbly was also stamped and colored using Stampin’ Blends. And the sentiment is from the stamp set also. It is stamped using Memento Tuxedo Black Ink. I love the boldness of these words and the mixed size and font. Both the bottle and gift bag have matching dies to cut them out.
Layers
To keep this a quick card, I went with Thick Basic White card stock as the base and a layer of Summer Splash to tie into the bag. This color is becoming a quick favorite of the new In Colors. I still think Petunia Pop is number one, but this is edging closer every time I use it! The layer of Summer Splash plays perfectly with the gift bag.
Surprises and Finishes
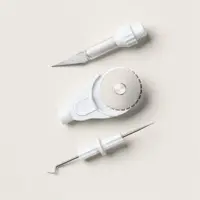
The surprise to this bag is the bottle of bubbly. When this set was demonstrated for us at OnStage in Houston, the demonstrator did my surprise. Using the Take Your Pick Tool Crafter Tips, one of which is a craft blade, I cut a slit in the tissue paper. I pushed the bottle up through the slit from behind as it is wider at the bottom. And this trick gives a very realistic look with a simple technique. Another of the reasons this set is growing on me every day!
To keep the simplicity of the layout, I did not go overboard with the bling. I wanted the bag and sentiment to be the stars. So I restrained my normal zest with the bling and only added one piece. I chose the Summer Splash of the 2024-2026 Shimmer Gems.
Thank you for stopping in today!!!!
May Join Promotion
New demonstrators who join during the month of May will receive the following products in their Starter Kit at no additional cost:
2024–2026 In Color Classic Stampin’ Pad Bundle
2024–2026 In Color 8-1/2″ x 11″ (21.6 x 27.9 cm) Cardstock
2024–2026 In Color 6″ x 6″ (15.2 x 15.2 cm) Designer Series Paper
2024–2026 In Color Stampin’ Write Markers
HOST CODE
My MAY Host Code is 96AT2UNW. Please use this code for orders under $150.00. I will have a small gift for those with orders over $50.00 in addition to the Perk Rewards Program. You can read all of the information at the top of the page in the Menu Bar under SHOP / Perks.
Thank you for stopping by today. I hope you enjoyed today’s project and will come back. I do read and reply to all of the comments individually. They mean a lot to me. Please reach out if you have a question.
Happy Memorial Day!! And in honor of those who this day is for, I have a simple Gratitude card. My city holds a Memorial Day Parade every year. And my card sort of reflects the Hometown feel of that.
Stamps
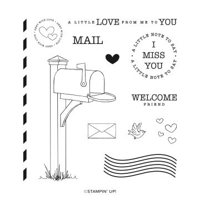
There is a real mix of stamp sets for this card. My first idea was for a flag. The only thing I could find was the Sending Love stamp set and the post mark wavy lines. I got creative and made a flag from that. I added the stars square and cut out just a section of the lines. My stars are dabs of White Craft Ink dotted on the blue with the tip of the smallest scoring ball from the Take Your Pick tool. It is not perfect, but I thought it was pretty good.
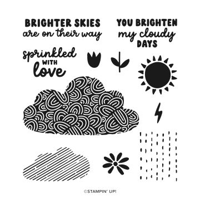
Then it was figuring out what to place the flag on. With the Sending Love set out, I thought why not a mailbox. And so the card was born. The mailbox is from the same set. I added flowers, sun, and clouds from the Bright Skies stamp set. And the Grateful is from the Layers of Beauty set. I masked of the “for you” which is underneath grateful, inked, removed the tape, and stamped only the one word. Not sure about you, but I always hold my breath for that stamping, afraid more than what I want will stamp!
Colors
The colors used are the traditional Red, White, and Blue. But with the added green grass and yellow sun. Real Red and Night of Navy are beautiful traditional colors and help this card to pop. And you know I love to color, so the red and blue mailbox was an easy choice for me.
Thank you for stopping in today! I hope you can have an enjoyable family and friends gathering.
May Join Promotion
New demonstrators who join during the month of May will receive the following products in their Starter Kit at no additional cost:
2024–2026 In Color Classic Stampin’ Pad Bundle
2024–2026 In Color 8-1/2″ x 11″ (21.6 x 27.9 cm) Cardstock
2024–2026 In Color 6″ x 6″ (15.2 x 15.2 cm) Designer Series Paper
2024–2026 In Color Stampin’ Write Markers
HOST CODE
My MAY Host Code is 96AT2UNW. Please use this code for orders under $150.00. I will have a small gift for those with orders over $50.00 in addition to the Perk Rewards Program. You can read all of the information at the top of the page in the Menu Bar under SHOP / Perks.
Thank you for stopping by today. I hope you enjoyed today’s project and will come back. I do read and reply to all of the comments individually. They mean a lot to me. Please reach out if you have a question.
I have a quick card showcasing the Attention Shoppers Bundle. This is such a fun set and has pieces that can be used for almost any occasion. I have added some paper piecing to my card, but it is a really simple layout still.
Stamps
The stamps used are all from the Attention Shoppers set. There are some fun images as well as great sentiments. This sentiment is so perfect!! And the shopping bags can be made and used in a variety of ways. I stamped them onto the 2024-2026 In Color DSP in Shy Shamrock and Summer Splash. Plus I stamped the upper half on a scrap of Basic White card stock. I went monochromatic with the colors and made the tissue the same color as the bags. To do that I colored the tissue paper and the handles and then fussy cut them. They are then layered over top of the bag stamped on the DSP. A pretty easy and simple way to add different tissue to the bags.
Papers
The 2024-2026 In Color Designer Series Paper is an easy way to get coordinating bags in fun colors. I opted for the Summer Splash and Shy Shamrock to keep the green going. By using Thick Basic White as the card base and then a layer of Basic White, the card really pops with the bags and ribbon. I did add a scrap of Shy Shamrock as the background tag to help the tag stand out a little.
Extras
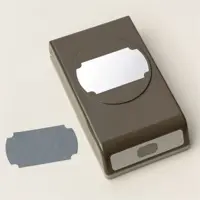
There are a few extras to help complete this card. First is the tag. This is the new Labeled With Love Punch. That stamp set gives you the choice of either a Die set or a Punch for the bundle. I opted for the punch. To help the tag stand out, I punched the sentiment and then punched a second one in Shy Shamrock. I then cut the Shy Shamrock tag in half. By adding the two halves just to each end, it helps ground the tag.
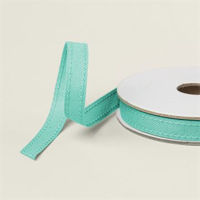
The colors used on the bags was also used for the ribbon and another focal point, and to ground the tag. I wrapped both Shy Shamrock and Summer Splash ribbon around the card and tied a knot. Again they really pop against the Basic White, And to finish, I added a trio of the 2024-2026 In Color Shimmer Gems. I used both of the greens once again with the gems.
Thank you for visiting today!!!
May Join Promotion
New demonstrators who join during the month of May will receive the following products in their Starter Kit at no additional cost:
2024–2026 In Color Classic Stampin’ Pad Bundle
2024–2026 In Color 8-1/2″ x 11″ (21.6 x 27.9 cm) Cardstock
2024–2026 In Color 6″ x 6″ (15.2 x 15.2 cm) Designer Series Paper
2024–2026 In Color Stampin’ Write Markers
HOST CODE
My MAY Host Code is 96AT2UNW. Please use this code for orders under $150.00. I will have a small gift for those with orders over $50.00 in addition to the Perk Rewards Program. You can read all of the information at the top of the page in the Menu Bar under SHOP / Perks.
Thank you for stopping by today. I hope you enjoyed today’s project and will come back. I do read and reply to all of the comments individually. They mean a lot to me. Please reach out if you have a question.
Today is Free Shipping!!! I will probably have already placed my order by the time you are reading this. Free Shipping can save enough for an extra pack of DSP.
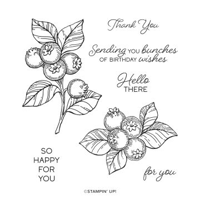
Today’s card is a Fun Fold featuring the Blueberry Bunches stamp set. This set carried over and I love it. It is an easy set to work with and to color.
Stamp Set
The Blueberry Bunches set contains two different bunches of blueberries. This is the smaller bunch. The other also has a stem attached. I wanted this one to go across the front of the card, so opted for the smaller ones. The berries are stamped using Memento Tuxedo Black Ink and then colored with Stampin’ Blends. I used Boho Blue, Balmy Blue and Night of Navy on the berries. And Granny Apple Green was used for the leaves. The inside sentiment is also from the set. I think it is just right on the “sweetness” level!
Papers
The beautiful tile DSP is from the Mediterranean Blooms Designer Series Paper. Each of the sheets has citrus plants on one side and different blue tiles on the other. I chose to go with the blue tiles for today. The card base is Night of Navy. For the inside card, I used a Basic White half card that I cut down just a little. At the 4″ wide it made the card to “full” and difficult to keep closed. You can see from the second view that I edged it over to the right more than the left. This keeps the closed borders equal.
Finishes
There is no sentiment on the front of this card. I was being a little different. But it needed a bit of something extra. So I added a bow wrapped around the blueberry layer made with the Iridescent Striped Trim. This is a great ribbon to work with and adds shine! For the final touch my Bling is blue to match the card. These are from the new Opal Rounds.
Measurements
The card base is 6 1/4 X 5 1/2, scored at 2″ on the 6 1/4″ side. For the inside card the Basic White is cut to 3 3/4 X 11 and folded at 5 1/4. It is placed towards the outer edge to keep the borders even with the card closed. The front DSP is 1 3/4 X 5 1/4. I totally covered the inside White card so the DSP is cut 3 3/4 X 5 1/4. I failed to measure the White on the blueberries. But the Night of Navy base is 4 7/8 in width. It goes from the DSP on the flap to the right edge DSP. The height can be adjusted to fit your choice of focal image.
Thank you for stopping by today!!
May Join Promotion
New demonstrators who join during the month of May will receive the following products in their Starter Kit at no additional cost:
2024–2026 In Color Classic Stampin’ Pad Bundle
2024–2026 In Color 8-1/2″ x 11″ (21.6 x 27.9 cm) Cardstock
2024–2026 In Color 6″ x 6″ (15.2 x 15.2 cm) Designer Series Paper
2024–2026 In Color Stampin’ Write Markers
HOST CODE
My MAY Host Code is 96AT2UNW. Please use this code for orders under $150.00. I will have a small gift for those with orders over $50.00 in addition to the Perk Rewards Program. You can read all of the information at the top of the page in the Menu Bar under SHOP / Perks.
Thank you for stopping by today. I hope you enjoyed today’s project and will come back. I do read and reply to all of the comments individually. They mean a lot to me. Please reach out if you have a question.
The content in this blog is the sole responsibility of Jackie Beers as an Independent Stampin' Up! Demonstrator. The use of and content of classes, services or products offered is not endorsed by Stampin' Up!