Fun Fold cards are my favorite to make. And cute animals are a close second in favorites. So today I joined the two using Christmas Friends Bundle.
STAMPS
The star of this card is the Christmas Friends Bundle and this adorable Moose. He looks so happy ice skating through the woods with his warm scarf. I stamped him using Early Espresso Ink and then colored with Stampin’ Blends. All of the colors are in the Supply List at the bottom of the post. The trees and stars are also part of the stamp set and matching Dies. The garland at the bottom, as well as the circle, are also part of the Die set. There are a lot of goodies here that you should check out.
There are two additional stamp sets for the sentiments. This front one is from the Humble Home stamp set. I love the small and simple handwriting look to the Merry Christmas. And the inside sentiment is from the Peaceful Season stamp set.
PAPERS
The DSP is where all of the other papers were pulled from. These pretty snowflakes are from the Snowy Scenes Designer Series Paper. This sheet has the snowglobes on the reverse side. From this I pulled the Garden Green as the card base. The small card is Pool Party which is also part of the DSP.
EXTRAS
The bling for this card is a bit brighter than usual. At least it stands out in the photo very well. They are a trio of the Earth Tone Shimmer Gems from the Mini Catalog. I thought the darker green would pop better and highlight the card base. And I believe they do.
Fun Fold Directions
To create this card you begin with a piece of cardstock measuring 5 1/2 X 8 1/2. Score it at 4 1/4. Then with the 8 1/2 along the top and the score line down the center, place the score line on the trimmer cutting channel. Hold that in place and rotate the cardstock so that the left side bottom point is also in the cutting channel. Cut that angle off. Next is the DSP. The inside panel measures 4 X 5 1/4. Cut two of these. One goes on the inside of the card. The other gets cut at an angle to go on the front of the card. Cut from the top right to the bottom left.
The small card measures 3 X 8 and is scored at 4. And the inside Basic White measures 2 3/4 X 3 3/4. Here are photos of the two other views of the card.
When the small card is added, align it with equal borders as you would any layer. Just ensure the front flap will close. I suggest doing a dry fit before adding adhesive. Please let me know if you have any questions.
HOST CODE
My DECEMBER Host Code is SAQE7VYU. Please use this code for orders under $150.00. I will have a small gift for those with orders over $50.00 in addition to the Perk Rewards Program. You can read all of the information at the top of the page in the Menu Bar under SHOP / Perks.
Thank you for stopping by today. I hope you enjoyed today’s project and will come back. I do read and reply to all of the comments individually. They mean a lot to me. Please reach out if you have a question.
Smile and Keep On Stamping,
Jackie
New Scrapbooking Catalog
The newest addition to Stampin’ Up! is an Online catalog of Scrapbooking products. You can see the catalog by clicking the photo below and save it to your computer.
Online Exclusives
New Online Exclusives have dropped. There are Halloween, Fall, Christmas, and many that are great year round. Of course the new Designer Series Papers and Embellishments are fabulous as well!
You can go directly to these in my Online Store by clicking HERE
Today’s card is a bit different than my usual ones. I have created a “window” scene. This one is like looking through the trees.
Stamp and Die Bundle
This card was created using the Reindeer Fun Bundle. Not only are there Dies to cut the adorable reindeer from, but also this beautiful little “window” you can create. I cut through the front layer of the card and added the DSP with Stampin’ Dimensionals to give it some depth. It makes me think of some of the Christmas cartoon movies where you are seeing the animals decorating trees and having fun.
The sentiment is also from the stamp set. I really debated how to showcase it. There are several layer Dies that would fit this larger sentiment, but I felt they would take away from the “window”. So I opted to go extremely simple and just Fussy Cut it. By going along with the shapes in the wording it gave the sentiment a different look. It may not have been the best choice, but it works.
Papers
The card base of Mossy Meadow was pulled from the DSP you see. Plus the Mossy Meadow is an appropriate color for the fir tree looking branches of the “window”. This fun DSP is a sheet from the Reindeer Days Designer Series Paper. Here is a look that you see on the inside of the card. I also added a touch of lights from a different sheet in the pack to enhance the tree decorating idea.
I love seeing that bold plaid on the inside. And you see the sentiment from yesterday’s little mouse card. The only finishes are the Earth Tone Shimmer Gems that I used to decorate the front sentiment. They look like they have nailed it down for me.
Thank you for stopping in today!!!
Kit Sale
October Starter Kit promotion…..
New Scrapbooking Catalog
The newest addition to Stampin’ Up! is an Online catalog of Scrapbooking products. You can see the catalog by clicking the photo below and save it to your computer.
Online Exclusives
New Online Exclusives have dropped. There are Halloween, Fall, Christmas, and many that are great year round. Of course the new Designer Series Papers and Embellishments are fabulous as well!
You can go directly to these in my Online Store by clicking HERE
HOST CODE
My OCTOBER Host Code is 2C9JH3D9. Please use this code for orders under $150.00. I will have a small gift for those with orders over $50.00 in addition to the Perk Rewards Program. You can read all of the information at the top of the page in the Menu Bar under SHOP / Perks.
Thank you for stopping by today. I hope you enjoyed today’s project and will come back. I do read and reply to all of the comments individually. They mean a lot to me. Please reach out if you have a question.
I have been holding off on Christmas cards for a bit. There are so many Fall ones to make. But I finally have given in and gotten start on Christmas. If you know me, then you know my first one is one of the sweet animals!
Stamps
The Christmas Friends set was the first on my list from the Mini Catalog. You all know how much I love the animals the Stampin’ Up! designers create. This set is a keeper for sure. In real life, mice are one of the things that seriously give me the creeps. However, this little guy is just precious! He is stamped with Memento Tuxedo Black Ink and then colored using Stampin’ Blends. They are listed in the supply list at the bottom of the post.
Papers
This sweet paper, that matches the bell on the mouse’s tail, is fabulous! This is a sheet from the Reindeer Days Designer Series Paper. Somehow when doing my preorder I missed this paper. So once I received a pack I was ready to begin my Christmas cards. Since this is a fun card, I used Granny Apple Green to pair with the Real Red of the DSP sheet. A thin Basic White layer helps make the DSP pop. I also used those colors for the song book the mouse is holding. And of course his bell had to be Real Red with a Granny Apple Green bow.
Extras
To make this a card that could easily be made in multiples, I used punches for the focal layers. I used the 2″ and 2 3/8″ Circle punches for the circles behind the mouse. These are so easy to simply punch away! This sentiment is also from the Reindeer Fun stamp set. It is one long sentiment and that did not work on this layout. So I cut it in half and then did a tad bit of fussy cutting around the “R” and “S” of Christmas. Now I liked how the sentiment fit.
To complete the card there had to be bling! So I added a single Rhinestone Basic Jewel next to the mouse. For a little more texture, I added a double strand of the Real Red & White Bakers Twine with a double bow. It doesn’t show a ton, but does give some texture and help ground the circles.
Thank you for visiting today!!!
Kit Sale
October Starter Kit promotion…..
New Scrapbooking Catalog
The newest addition to Stampin’ Up! is an Online catalog of Scrapbooking products. You can see the catalog by clicking the photo below and save it to your computer.
Online Exclusives
New Online Exclusives have dropped. There are Halloween, Fall, Christmas, and many that are great year round. Of course the new Designer Series Papers and Embellishments are fabulous as well!
You can go directly to these in my Online Store by clicking HERE
HOST CODE
My OCTOBER Host Code is 2C9JH3D9. Please use this code for orders under $150.00. I will have a small gift for those with orders over $50.00 in addition to the Perk Rewards Program. You can read all of the information at the top of the page in the Menu Bar under SHOP / Perks.
Thank you for stopping by today. I hope you enjoyed today’s project and will come back. I do read and reply to all of the comments individually. They mean a lot to me. Please reach out if you have a question.
Fun Fold cards are my favorites. And this one is a fun twist on a simple fold. I cased from another demonstrator, Elizabeth Price, and she named it a Kickstand card.
The Fun Fold
This fold is quick to create. It begins with a 5 1/2 X 8 1/2 card stock that is scored at 4 1/4. I used Boho Blue for my card base. The “fun” part comes next. Place one end that measures 5 1/2 on the Paper Trimmer at 1 1/4″ and cut down to the score line. Flip the card over and cut at 1 3/4 on the opposite side. You are making the top section of your card into three sections. (NOTE: You do not have to make the cuts the same as mine with one side larger. They could be 1 1/2 on each side.) The photo above shows the center section with the focal layer attached. And here is the open view.
To create the the center flap or kickstand, add DSP measuring 5 1/2 X 4 1/4 to the top of the other two sections. You can see what I am describing in this above photo and the next one. The plaid paper is the back side of the clouds.
The kickstand , the DSP adhered to the cut sections, and then the opposite side of the DSP allows you to have three places to decorate. That is in addition to the inside sentiment / signature part. More is generally better in my book.
Stamps and Dies
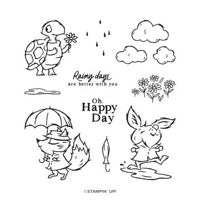
The stamps used are from the Playing In The Rain stamp set. They are stamped using Memento Tuxedo Black Ink and then colored with a variety of Stampin’ Blends. For the sentiment White layer, I added some rain, which is included in the stamp set. As well as the sentiment from it. The rain is stamped using Pool Party Ink. There are matching Dies for animal shapes and a few extras. The circles are from the Spotlight On Nature Dies. These are just large enough to fit the characters and then layer well to not see the one on the lower layer. I did use a punch as well. The strip of extra paper for the flower layer is punched on each end using the Happy Labels Punch.
Papers
The DSP was chosen as part of the theme of playing in the rain. I thought these clouds fit perfectly. This sheet of DSP is from the Take To The Sky Designer Series Paper. The inside gray plaid does not really fit the theme, but works with the other colors. Boho Blue was my choice of colors to pull from the clouds and as the card base. To emphasize the smaller flower layer, I added a strip from the Country Lace Designer Series Paper as a grounding piece for it. The soft tone matches the plaid.
This card is a bit on the thicker side with the different layers of added focal points. So I kept the bling to some thin ones. The clear bling on the front layer is from the Pecan Pie & Clear Ribbon Dots.
Thank You for stopping by today!!
Kit Sale
October Starter Kit promotion…..
New Scrapbooking Catalog
The newest addition to Stampin’ Up! is an Online catalog of Scrapbooking products. You can see the catalog by clicking the photo below and save it to your computer.
Online Exclusives
New Online Exclusives have dropped. There are Halloween, Fall, Christmas, and many that are great year round. Of course the new Designer Series Papers and Embellishments are fabulous as well!
You can go directly to these in my Online Store by clicking HERE
HOST CODE
My OCTOBER Host Code is 2C9JH3D9. Please use this code for orders under $150.00. I will have a small gift for those with orders over $50.00 in addition to the Perk Rewards Program. You can read all of the information at the top of the page in the Menu Bar under SHOP / Perks.
Thank you for stopping by today. I hope you enjoyed today’s project and will come back. I do read and reply to all of the comments individually. They mean a lot to me. Please reach out if you have a question.
Everyone knows I love the cute animals that the Stampin’ Up! Designers create. I have used one of those sets for a sweet birthday card to share with you. A smile and a hug are good things on your birthday.
Stamps
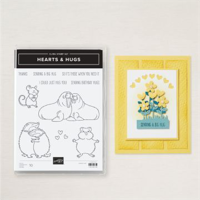
This is a one stamp set card, which I comment on all the time. It is nice on occasion to simply pick everything from one set. This Hearts & Hugs stamp set has adorable huggable animals and sweet matching sentiments. The simple sentiment is perfect for this rather large Hug! So why not use it. Right!!
The walruses are stamped with Gray Granite ink and then colored using both Smoky Slate Stampin’ Blends. I tried to add different shades of the gray in their bodies to give a more natural look. Playing around with the Blends in my coloring is something I really enjoy. One day I may get it to a good spot.
Dies
The large walruses were a challenge to decide how to frame them. Then I remembered the Nested Essentials Dies. This was a perfect fit! I called this shape the oblong diamond. LOL!! I am not sure what it is actually called but it remind me of that. These are the two largest of this shape. They fit the card as well as the image. Since the sentiment was much smaller, I was not able to use the flag dies included in the Die set. So I made my own layered flag by clipping the white layer, adhering to the Night of Navy, and then clipping the Navy layer to match. It is not perfect, but close enough.
Papers
The card base was chose to match the walruses. It is Smoky Slate cut to 5 1/2 X 8 1/2 and folded at 4 1/4. I added the thin layer of Basic White at 5 1/4 X 4. And then this fun piece of DSP is 5 1/8 X 3 7/8. The papers needed to be larger due to the size of the image.
The wonderful blue plaid DSP is from the Take To The Sky Designer Series Paper. It seemed a great match for the images by adding a bright color without being too busy. Of course the Night of Navy layer came from this paper.
Finishes
There are not a lot of finishes needed or really room for them. So I kept it simple and added a trio of bling. This time I went with the Adhesive Back Sparkle Gems. These are a trio of basic colors. I used the silver sparkle. There is also a gold and a black sparkle gem in this pack. It is a good one to have for masculine cards especially. Plus they are flat embellishments as well.
Thank you for stopping by today!! I hope you have a fun weekend.
New Scrapbooking Catalog
The newest addition to Stampin’ Up! is an Online catalog of Scrapbooking products. You can see the catalog by clicking the photo below and save it to your computer.
Online Exclusives
New Online Exclusives have dropped. There are Halloween, Fall, Christmas, and many that are great year round. Of course the new Designer Series Papers and Embellishments are fabulous as well!
You can go directly to these in my Online Store by clicking HERE
HOST CODE
My SEPTEMBER Host Code is S9CRPBZ4. Please use this code for orders under $150.00. I will have a small gift for those with orders over $50.00 in addition to the Perk Rewards Program. You can read all of the information at the top of the page in the Menu Bar under SHOP / Perks.
Thank you for stopping by today. I hope you enjoyed today’s project and will come back. I do read and reply to all of the comments individually. They mean a lot to me. Please reach out if you have a question.
I love to make Fun cards. Today I have used the Charming Duck Pond Bundle to make a fun birthday card. The colors and the stamps make me smile.
Stamp Bundle
The adorable duck is the star of this card. So I will start with the stamps and dies. Saying that, there really are not a lot of anything used for this creation. It is pretty simple. I did stamp the duck on a scrap of Basic White card stock as well as the wild grass. They both are colored using Stampin’ Blends. The grass has openings in the blades so I filled in with the Pretty Peacock Stampin’ Blends to make the complete blades. The Crushed Curry cat tails are a single stamp that are easy to match up with the grass. And because it was going on the “water” I colored the white background with a Balmy Blue Stampin’ Blend.
The duck is the main guy. I copied his coloring from one in the matching DSP. There are several Stampin’ Blends used and they are all listed in the Supply List at the bottom of the post. Both the duck and grass were cut using matching Dies. And the simple birthday sentiment is from the stamp set as well.
Papers
The lily pads paper is from the matching Lily Pond Designer Series paper. I looked for a simple background for the duck and decided this was a good one. The card base is Pretty In Pink with Balmy Blue as the layer. Both of these were pulled directly from the DSP piece. That makes choosing colors so easy to do. The Lily Pond Lane is part of the DSP sale continuing thru the end of the month. A 15% discount is a good one!
Extras
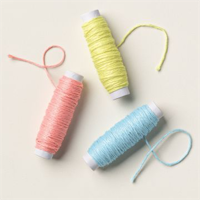
To add more of the water to the card, I used the large Embossing Folder So Swirly. I really love these swirls. They are great for a lot of specifics like water and wind, even terrain. For a bit more texture the sentiment banner is punched using the Happy Labels punch. I chose the smaller of the two scallops. And to give it a bit more, I used the yellow Bakers Twine from the Bakers Twine Three Color Pack. I simply tied a bow around the end of the banner.
To complete the card there must be bling! This time I went above my normal three pieces of bling. There are five pieces floating around. I used the Pastel Sequins before realizing they are no longer available. You may have some in your stash, or any bling of your choice will work. I added four pink ones to several of the lily pads to match the pink flowers that some already have. And then I added a blue sequin to the opposite end of the sentiment from the bow.
Measurements
The measurements for this card are very simple. I love simple and it makes for easy duplication.
The Pretty In Pink card base is 4 1/4 X 11 scored and folded at 5 1/2
The Balmy Blue embossed layer is 4 X 5 1/4
The Pretty In Pink focal layer is 3 1/4 X 3 1/4
The DSP layer is 3 X 3
The sentiment strip is 3 1/4 X 1/2
Thank you for stopping in today!!
Designer Series Paper Sale begins on August 6 – 31st.
Papers included in the sale are:
Bright & Beautiful
Countryside Inn
Country Lace
Country Woods
Full of Life
Lily Pond Lane
Mediterranean Blooms
Perennial Lavender
Take To The Sky
Thoughtful Journey
To Market
Unbounded Beauty
Wildly Flowering
Winter Meadow
Online Exclusives
New Online Exclusives have dropped. There are Halloween, Fall, Christmas, and many that are great year round. Of course the new Designer Series Papers and Embellishments are fabulous as well!
You can go directly to these in my Online Store by clicking HERE
HOST CODE
My AUGUST Host Code is NB9XKFUZ. Please use this code for orders under $150.00. I will have a small gift for those with orders over $50.00 in addition to the Perk Rewards Program. You can read all of the information at the top of the page in the Menu Bar under SHOP / Perks.
Thank you for stopping by today. I hope you enjoyed today’s project and will come back. I do read and reply to all of the comments individually. They mean a lot to me. Please reach out if you have a question.
The content in this blog is the sole responsibility of Jackie Beers as an Independent Stampin' Up! Demonstrator. The use of and content of classes, services or products offered is not endorsed by Stampin' Up!