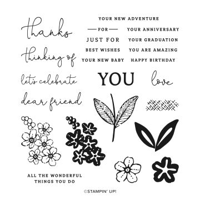
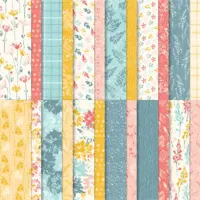
I have a preview of a set from the upcoming September – December 2023 Mini Catalog today. This is a set that was available to demonstrators for a SU online event. So you may have already seen samples with it. It is Translucent Florals.
And I forgot to say that it is a fun fold. Actually it is a Double Z FunFold card.
Bundle
The Translucent Florals stamp bundle is a great one! The images have a solid outline with a softer “filling” of the image. I love the look very much. And everyone in my Club and Class that made this card loved it as well. All of the images on here are die cut using the matching Translucent Florals Die set. I used two flowers and a set of double leaves, as well as the greenery piece. Everything is glued in place with the exception of the top larger flower and it has dimensionals. The little stamen stamp in the center of the large flower really makes a difference to the look.
There is one smaller flower stamped on the inside large White layer that is not die cut. You could place a complimentary piece of DSP there as well. And I stamped the double leaf stamp on the inside sentiment piece just for an additional pop of color.
Additional Stamps
The two sentiments that you see are not from the Translucent Florals set. They are from the Sentimental Park stamp set. I wanted simple greetings and the Translucent ones were more wordy. These two fit perfectly where I needed them.
Colors
The colors for this card were more chosen by the greenery color. And that is Pretty Peacock. The strip of DSP is a reverse side of one from the Fresh As A Daisy Designer Series Paper. It has the variegated look that works great and makes the Basic White sections pop. The flowers are all stamped using Calypso Coral Ink with the Pretty Peacock for all of the greenery and card base. For my bling I used the Iridescent Pearls and colored them using the Dark Calypso Coral Stampin’ Blend. The softer look seemed perfect.
Layout Measurements
The Double Z Fold is created with a piece of Pretty Peacock measuring 5 1/2 X 8 1/2 that is scored at 2 1/8 and 4 1/4. The smaller Z is made also with Pretty Peacock and measures 2 3/4 X 8 1/2 with the same scoring measurments. After folding and burnishing the card base. Add the large Basic White piece that is 4 X 5 1/4. And the Basic White layer that is 1 7/8 X 5 1/4. The DSP layer is 1 3/4 X 5 1/8.
The Basic White of the smaller Z measures 4 X 2 5/8 for the front and the two sections are each 2 X 2 5/8. Before adding the smaller Z to the base, you can stamp first and add the White layers. Make sure the Z and layers are positioned properly. The smaller Z is opposite folds to the large. To add the two together I found the easiest way was to close both pieces and lay the smaller on top. The ends of the smaller should go all the way to the edge on both sides of the card base. Once you have it in the location you want, add adhesive to only one side at a time. Please let me know if you have any questions.
Thank you for stopping by today!!!
Reminder that Bonus Days ends on Monday…….
Bonus Days for the remainder of July!
For every increment of $50.00 in product per order you will receive a Coupon for $5.00. There is no limit to the number of coupon codes you can receive. Then you can redeem all of your codes during the month of August! Additionally, my Blue Star Rewards are for every $50.00 in product per order. So you would also be earning my rewards as well.
Online exclusives are here to stay! Click on the photo and be taken directly to them in my online store. If you place an order, please use my Host Code listed just below.
HOST CODE
My July Host Code is MXQY2UE9. Please use this code for orders under $150.00. I will have a small gift for those with orders over $50.00 in addition to the Perk Rewards Program. You can read all of the information at the top of the page in the Menu Bar under SHOP / Perks.
Thank you for stopping by today. I hope you enjoyed today’s project and will come back. I do read and reply to all of the comments individually. They mean a lot to me. Please reach out if you have a question.
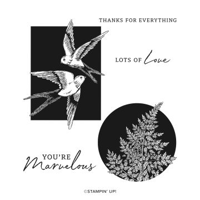
My card for today is one that is super simple and gives an optical illusion at first glanced. It stars the wonderful Marvelous Nature stamp set.
Stamps set
This is a one stamp set card! I love these because I feel like a new stamper could make a pretty card with minimal outlay to begin. And it makes them pretty quick and easy to do as well. This card has the image stamped using Lost Lagoon and it appears to be a cut out of the Basic White with the Lost Lagoon card stock showing through. I think that is a wonderful look and Stampin’ Up! has very talented artists to create these stamps.
The sentiment is included in the stamp set and is stamped using Memento Tuxedo Black Ink. I suggest stamping the sentiment first so you can then evenly place the focal stamp. Mine is a tad low.
Papers
The papers used here are pretty monotone. I knew I wanted the Lost Lagoon for a soft looking fern. And in flipping through DSP I found this piece from the Hello Irresistible Designer Series Paper. It is a reverse side and had shades of the Lost Lagoon. Actually it is Lost Lagoon and Soft Sea Foam. By adding the thin layer of Soft Sea Foam everything ties together perfectly.
Finishes
The finish on this card is a single butterfly. I wanted to keep it quick and easy and that little butterfly is pretty and stands out all alone. Even the layers of this card are simple. Everything is glued down. Nothing is raised or embossed. Simply “simple stamping” and a pretty card is made. #simplestamping
Thank you for stopping by today!!
Bonus Days for the remainder of July!
For every increment of $50.00 in product per order you will receive a Coupon for $5.00. There is no limit to the number of coupon codes you can receive. Then you can redeem all of your codes during the month of August! Additionally, my Blue Star Rewards are for every $50.00 in product per order. So you would also be earning my rewards as well.
Online exclusives are here to stay! Click on the photo and be taken directly to them in my online store. If you place an order, please use my Host Code listed just below.
HOST CODE
My July Host Code is MXQY2UE9. Please use this code for orders under $150.00. I will have a small gift for those with orders over $50.00 in addition to the Perk Rewards Program. You can read all of the information at the top of the page in the Menu Bar under SHOP / Perks.
Thank you for stopping by today. I hope you enjoyed today’s project and will come back. I do read and reply to all of the comments individually. They mean a lot to me. Please reach out if you have a question.
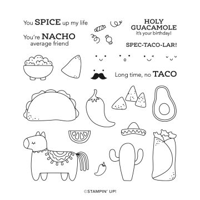
The card I have today is one for a Team Member’s 5th Anniversary with me. I wanted a fun card and this one is with the Taco Fiesta set.
Stamp Sets
The very fun set of Taco Fiesta is a great set for anyone. And I do love that it will work for men, women, and children, since most people like Mexican food. I know I do! So I made a bright and happy card with the images. All of the images are stamped and then colored with Stampin’ Blends. They are all fussy cut, but all of the images are easy to cut out. The confetti is done in the different paper colors of the card for some added brightness.
The second set used is the Brewed For You set. A margarita is a nice compliment to some tacos I believe!
And the final stamp set is the Biggest Wish. This one has the different sizes of a few sentiments. I chose the Thanks for this card.
Colors
The brightness of the Bright & Beautiful Designer Series paper fits great with the fun theme. And of course the other colors can easily be pulled from those bright stripes. I used Lemon Lime Twist, Bubble Bath and of course Basic White. Although the first two are not ones that you would normally put together! There is also the Azure Afternoon for the “thanks” sentiment. I love bright and happy and this one fits the bill!
Finish
To help the taco images pop a bit, I added a 1 3/4 Circle of the striped DSP. Then with the fun sentiment simply stamped on white, it needed a little something. I used the Sheer Ribbon Combo in the blue attached to the back of the strip to ground it and let it pop against the other white. There are also a scattering of the Tinsel Gem 4 pack embellishments.
Thank you for stopping in today!!
Bonus Days for the remainder of July!
For every increment of $50.00 in product per order you will receive a Coupon for $5.00. There is no limit to the number of coupon codes you can receive. Then you can redeem all of your codes during the month of August! Additionally, my Blue Star Rewards are for every $50.00 in product per order. So you would also be earning my rewards as well.
Online exclusives are here to stay! Click on the photo and be taken directly to them in my online store. If you place an order, please use my Host Code listed just below.
HOST CODE
My July Host Code is MXQY2UE9. Please use this code for orders under $150.00. I will have a small gift for those with orders over $50.00 in addition to the Perk Rewards Program. You can read all of the information at the top of the page in the Menu Bar under SHOP / Perks.
Thank you for stopping by today. I hope you enjoyed today’s project and will come back. I do read and reply to all of the comments individually. They mean a lot to me. Please reach out if you have a question.
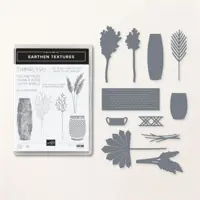
The Earthen Textures Bundle is a very unique set and one that has so many possibilities. There can be very detailed and textured cards or a little less detailed that are just a special. I went for a little less on today’s card.
Bundle
It may not appear that I have used the Earthen Textures stamp set. I did, but it is on the inside. The front is all from the Earthen Textures Die set. My favorite is the Copper Clay fan shaped die cut. It is unique, has great shape, and can be folded on the creases for even more definition. The two palm frond looking pieces are the same die just done in Misty Moonlight and Mossy Meadow.
The fun part of the card is the vase. The vase is die cut from the Earthen Elegance DSP. This paper was made by a Stampin’ Up! Artist who used clay tiles, some carving, and glazing to then photograph for these papers. Amazing!!! But to give more strength to the vase, since the DSP is quite thin, I also cut a second vase from Misty Moonlight. I then offset it just a bit like there is a shadow of the vase. You might not be able to see if on the left of the vase, but I know it is there. 🙂
Papers
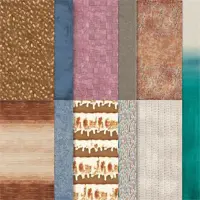
The papers and colors came from the colors I chose for the foliage. That is definitely different for me. The blue DSP is a reverse side of one of the Earthen Elegance Designer Series Paper patterns. I like the crosshatch / roughness of it for the foliage. The other colors used are to go along with the foliage as well.
Finishes
The sentiment is a fun font from the Darling Details stamp set. It is stamped using the Mossy Meadow. And the trio of Dots are all from the 2023-2025 In Color Dots. I liked the look of the different colors and it plays with the different colors of the card. Mixing and Matching is a good thing with Stampin’ Up! since most of the colors work very well together.
Thank you for stopping by today!!
Bonus Days for the remainder of July!
For every increment of $50.00 in product per order you will receive a Coupon for $5.00. There is no limit to the number of coupon codes you can receive. Then you can redeem all of your codes during the month of August! Additionally, my Blue Star Rewards are for every $50.00 in product per order. So you would also be earning my rewards as well.
Online exclusives are here to stay! Click on the photo and be taken directly to them in my online store. If you place an order, please use my Host Code listed just below.
HOST CODE
My July Host Code is MXQY2UE9. Please use this code for orders under $150.00. I will have a small gift for those with orders over $50.00 in addition to the Perk Rewards Program. You can read all of the information at the top of the page in the Menu Bar under SHOP / Perks.
Thank you for stopping by today. I hope you enjoyed today’s project and will come back. I do read and reply to all of the comments individually. They mean a lot to me. Please reach out if you have a question.
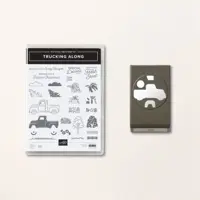
My post today stars the so very loved Trucking Along Bundle. It was so loved that it sold out twice. The stamp set is still available and the punch will be returning as quickly as is possible. So please do not give up on this fun set.
Stamp Bundle
This card originated with the layout. But I am going to begin with the fun part. All of the stamped images are from the Trucking Along stamp set.The Truck is stamped with Memento Tuxedo Black Ink and colored using the Lost Lagoon Stampin’ Blends. The addition of the flowers in the bed of the truck were stamped the same and colored with the Daffodil Delight and Old Olive Stampin’ Blends. This color struck a cord with me for the truck. In my High School parking lot there were probably a dozen trucks that were about that shade of green. Apparently it was a favorite truck color in the 70″s. LOL!!!
To finish the truck scene, I used a strip of Daffodil Delight card stock that measures 4 1/4 X 3/4. It is flagged on each end using the Banners Pick A Punch. The sentiment is from the stamp set and stamped lower than usual on the strip. This is to accommodate the “shadow” stamp for beneath the truck. I used the Truck Builder Punch to cut the truck, but the flowers in the bed must be fussy cut. However I have a great tip for you!! Do not cut straight across the bottom of the flowers. I only cut in a tiny bit on each side of the bottom and then left a part of the scrap that is maybe a 1/4″ by 1/4″ tab. By adding a glue dot to that tab, it makes it extremely easy to add it to the bed of the truck!
Papers
The color choices were made from the DSP. I know you have heard that from me before! When I saw this Lost Lagoon it reminded me of the truck color I mentioned at the top. So that was where I went with this card. The gorgeous DSP is from the Inked Botanicals Designer Series Paper. I love this entire pack! The piece is a square that measures 2 7/8 X 2 7/8 and then is cut on the diagonal. Thankfully it is not a directional pattern. And I will not say how long it took me to find the right measurement to fit the ends of the Basic White layer. 🙂
The Basic White layer is embossed using one of the Basics 3D Embossing Folders. These are only available in the Online Exclusives. As the name implies there are three folders in one pack. This one is what I call the crosshatch one. It is by far my favorite. To finish the card, I raised the truck with Stampin’ Dimensionals and then scattered a few of the Glossy Dots around the White layer.
Bonus Days are winding down……
Please do not forget that Bonus Days will end on July 31st. So you have a week to add to your Coupon collection. Then in August you can redeem those sweet things for items on your wish list.
Bonus Days for the remainder of July!
For every increment of $50.00 in product per order you will receive a Coupon for $5.00. There is no limit to the number of coupon codes you can receive. Then you can redeem all of your codes during the month of August! Additionally, my Blue Star Rewards are for every $50.00 in product per order. So you would also be earning my rewards as well.
Online exclusives are here to stay! Click on the photo and be taken directly to them in my online store. If you place an order, please use my Host Code listed just below.
HOST CODE
My July Host Code is MXQY2UE9. Please use this code for orders under $150.00. I will have a small gift for those with orders over $50.00 in addition to the Perk Rewards Program. You can read all of the information at the top of the page in the Menu Bar under SHOP / Perks.
Thank you for stopping by today. I hope you enjoyed today’s project and will come back. I do read and reply to all of the comments individually. They mean a lot to me. Please reach out if you have a question.
The content in this blog is the sole responsibility of Jackie Beers as an Independent Stampin' Up! Demonstrator. The use of and content of classes, services or products offered is not endorsed by Stampin' Up!