The card I have today is one made from a card sketch I received at Stampin’ Up! Convention. One of the wonderful additions to the next catalog is a line of sketches for you to use for inspiration. The one I am using was circles and I have changed it to hexagon shapes.
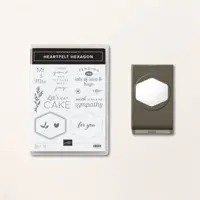
Stamp and Punch Bundle
The Heartfelt Hexagon Bundle is one I love. Punches are generally my preference for quick cards. And that was what I was going for here. As I mentioned above, this card is a copy of a sketch, except think circles where my hexagons are. I am aware that my angled layers are not for everyone. I am fine with cattywampus placement and I know several stampers who much prefer everything evenly spaced. Sorry for those of you who are cringing !!! LOL!!!
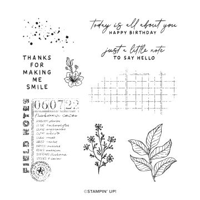
The stamps are all from the Heartfelt Hexagon stamp set with the exception of the banner sentiment. That sentiment is from Notes of Nature stamp set. I cut both pieces, the flower and the love & hugs layers with the matching Hexagon Punch. The banner is clipped on each end with paper snips.
Papers and Colors
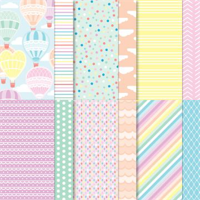
This card base is a Basic White one to highlight the DSP colors. The soft pastel stripes layer is from the Lighter Than Air Designer Series Paper. All of the other colors are pulled from that paper of course. I added a layer behind the DSP of Fresh Freesia card stock. And stamped with Azure Afternoon and Pool Party, with the flower petals being Highland Heather Blends.
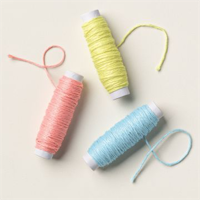
To finish the colors, I added the yellow twine from the Baker’s Three Color Pack. This was the added pop and texture the card needed. Of course I have to add bling. In this case it is more pastel colors instead of bright and shiny. The scattering of little dots are from the Rainbow Dots embellishments. I used ones matching the DSP and that would show well.
Thanks for stopping in today!!!
Last Chance Lists for the January – April Mini and the Annual Catalog.
Click here for the January – April Mini Catalog list:
And here for the Annual Catalog Last Chance List
HOST CODE
My MARCH Host Code is GBUE3X7H. Please use this code for orders under $150.00. I will have a small gift for those with orders over $50.00 in addition to the Perk Rewards Program. You can read all of the information at the top of the page in the Menu Bar under SHOP / Perks.
Thank you for stopping by today. I hope you enjoyed today’s project and will come back. I do read and reply to all of the comments individually. They mean a lot to me. Please reach out if you have a question.
The last chance lists are now available. I have both lists from the Mini and Annual Catalogs. Simply click on the photo of the list you want and you will get the complete list for that catalog in PDF. Please reach out if you have any questions.
HOST CODE
My MARCH Host Code is GBUE3X7H. Please use this code for orders under $150.00. I will have a small gift for those with orders over $50.00 in addition to the Perk Rewards Program. You can read all of the information at the top of the page in the Menu Bar under SHOP / Perks.
Thank you for stopping by today. I hope you enjoyed today’s project and will come back. I do read and reply to all of the comments individually. They mean a lot to me. Please reach out if you have a question.
I am home from the Stampin’ Up! Convention. And a wonderful time was had by all!! Having an in person full convention was awesome. Stampin’ Up! knows how to put on a party and it was so fun. Nothing beats the atmosphere to get everyone in a great mood. And ranking right at the top is seeing friends from all over the country. I am tired and very happy!! Oh, you are going to LOVE the new products in the Annual Catalog!! I feel like I have already worn out my copy.
To get back into the routine, I have my swap card to share with you today. It is the card I swapped in our group. Later in the week I will share the ones I received with you. My card showcases the Nature’s Sweetness DSP as the star.
Papers
The paper is the star of this card in my opinion. I love these sheets from the Natures Sweetness Designer Series Paper. By using two thin strips of the DSP, I was able to get more cards and showcase the two complimentary pieces. As I made these cards, I became more in love with these two colors of card stock.
The Pebbled Path card stock seems to have a little bit of sheen to it and looks very rich with the Wild Wheat. I do love the Wild Wheat. And I love stamping with it, although I did not stamp with it here. When I first saw these two In Colors last year I would have never thought of them as having a touch of elegance. After this card, I think can be very elegant. Especially when paired with the touch of Vellum card stock. The Vellum piece was the finishing touch to bring this card together. That final “this is it” took a while!!
Stamps
The sentiments are the only stamping on this card. And that feels a bit strange. The sentiment on the front is from the Lovely & Sweet stamp set. We should definitely share more love to our friends and family. And this little sentiment does it in such a sweet way. I failed to show the inside of the card. That sentiment is from the Notes of Nature stamp set and says “Thanks for making me smile”. I also added the splatter stamp from Notes of Nature in the Wild Wheat ink, but stamped off. It mimics the gold splatter on the DSP.
Dies
The Die set used is from the Thoughtful Expressions Dies. There are layering dies in an oblong design and these fabulous circles. These circles seem to have just enough size difference to show off the details of each layer. I really did have a difficult time figuring out a finish for this card regarding the sentiment. After deciding on the Wild Wheat behind the Basic White sentiment, it still needed something. The Vellum card stock was the answer and happily it shows the detail of the die as well as the card stock.
Finishes
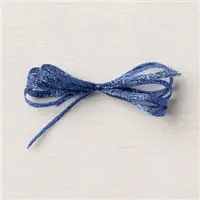
This card has quite a bit of highlights between the layered sentiment and the gold of the DSP. But there still must be bling! I added a single gold pearl from the Festive Pearls embellishments. Yes it was difficult for me to only add one bling! However I added a bit more bling by making a small bow from the Gold & Silver Simply Elegant Trim. That little thin bow was the final touch.
Measurements
The Pebbled Path card base is cut 4 1/4 X 11, scored and folded at 5 1/2. Wild Wheat makes a thin border layer and is cut 3 7/8 X 5 1/8. The left panel is cut 2 X 5, with the right panel at 1 3/4 X 5. I opted for two different sizes to make cutting faster.
The Retiring List / Last Chance List will be available this afternoon. I will make an extra post to share that with you as soon as I can.
Thank you for stopping by today!!
HOST CODE
My MARCH Host Code is GBUE3X7H. Please use this code for orders under $150.00. I will have a small gift for those with orders over $50.00 in addition to the Perk Rewards Program. You can read all of the information at the top of the page in the Menu Bar under SHOP / Perks.
Thank you for stopping by today. I hope you enjoyed today’s project and will come back. I do read and reply to all of the comments individually. They mean a lot to me. Please reach out if you have a question.
Before I get to today’s card, I want to let you know that I will be absent for the rest of the week. I am attending the Stampin’ Up! Convention in Houston. This is the first full convention since pre-Covid and I could not be more excited!! Seeing other demonstrator friends from around the country creates tons of excitement. Plus we get to see the upcoming Annual Catalog early! Oh My !!! But I will be back with you on Monday. Hubby is staying home with the kitties to keep everyone here happy.
Today’s card is a great use of DSP strips. I made this for my club and there are eight members. This can be a bit difficult in using DSP to have enough. However with these strips that is not a problem!
Paper
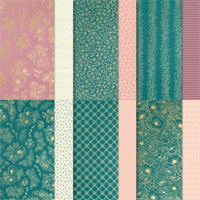
The paper to create these strips was the beginning of the card. I had the strips idea and in looking through all of the DSP, I stopped when I came to the Forever Love Designer Series Paper. These Pretty Peacock and gold designs are beautiful! There was debate on doing a mix of colors, but I decided this was the best option. I love the same color with just the change of design on each.
The layer of Very Vanilla measures 4 X 5 1/4. Each of the strips is 4 X 1 1/4. And I just eyeballed the placement of the middle one. (With a little help from the grid paper!!) Then added the top and bottom pieces. (Note: To be safe, add the strips to the Very Vanilla prior to adhering the Vanilla tot he card base. This allows you to easily trim your strips if they are a tad long.) To continue with the tone on tone colors, I added the focal layers in the same colors.
Dies
These wonderfully shaped layers for the focal area are the Nested Essentials Dies. They are the second and third from smallest size. I love the different shape from circles and squares. And the stitching around the edges is just enough decoration. I will note that I found it easier to die cut the Very Vanilla piece prior to stamping. It was easier for me to place the flower knowing how much room I had. Since I tend to use scraps for this size cut, I was afraid I would stamp and then not have enough space to die cut.
Stamps
The stamps are not the last thing I generally mention. In this case, it is not the star of the show! This pretty rose is from the Adoring Hearts stamp set. The size was perfect for the space and it is detailed enough to be just right. I colored it using Highland Heather Stampin’ Blends for the flower and Pretty Peacock Stampin’ Blends for the leaves and stem. There is no sentiment because I thought this card could be used for any occasion. And changing the paper would make this layout great for anything as well. I did stamp the inside, but again no sentiment there This one will wait for the perfect occasion.
Finishes
To finish off the card did not require much at all. I added a couple of the Iridescent Foil Gems since they include gold in the little dot. And I placed a swirl of Gold Elegant Trim behind the card. This was to highlight more of the gold foil. Some of my club ladies opted to leave off the trim and it looked great that way as well. Let me know what you think!
Thanks for stopping by today and I will see you on Monday.
HOST CODE
My MARCH Host Code is GBUE3X7H. Please use this code for orders under $150.00. I will have a small gift for those with orders over $50.00 in addition to the Perk Rewards Program. You can read all of the information at the top of the page in the Menu Bar under SHOP / Perks.
Thank you for stopping by today. I hope you enjoyed today’s project and will come back. I do read and reply to all of the comments individually. They mean a lot to me. Please reach out if you have a question.
The card I have for you today was a total surprise when finished. And that is a very Happy Surprise. This is really outside of my comfort zone and I love the outcome.
Stamps 1
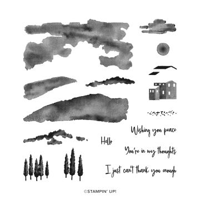
This card utilized A Lot of stamps. It may be an all time record! But it was so fun to create and see it come to life. The majority of the stamps are from the Hills Of Tuscany stamp set. This is one that I overlooked a couple of times in the Mini Catalog. I am so happy that I finally ordered it. These stamps are distinctive, which means they have lighter sections in each stamp.
To create the Hills, I used the large hill stamp. It is inked with Lost Lagoon Ink and randomly stamped across the lower half of the card. I went from one side of the layer to the other. And even turned the stamp upside down to fill in spaces. The outcome, surprisingly, reminds me of rolling hills. Next came the clouds in Balmy Blue, followed by the trees. The tree stamp is three trees together. They are stamped using Shaded Spruce and the lighter ones are where I stamped twice without re-inking.
Stamps 2 & 3
The sentiment is from the fabulous Perennial Postage stamp set for set number 2. I love the message, but also the mix of fonts. And the last stamp set is the Painted Lavender set. The Gorgeous Grape flowers are from that set. As is the greenery behind them. I wanted the flowers to pop more than the greenery, so I stamped the greenery in the same Lost Lagoon as the hills.
Papers and Finishes
There is no Designer Series Paper for the second day ! Oh My!!! 🙂 However, the Gorgeous Grape really pops the flowers from the scene and that is enough. I must confess that I had intended for the layer to be Lost Lagoon and accidentally pulled Pool Party instead. When I realized my mistake, I decided I liked the Pool Party.
To complete the card I punched the sentiment from Pool Party with the larger oval of the Double Oval Punch. Behind it I placed two little strips of the Orchid Oasis Metallic Ribbon. I love this ribbon and all of the colors available! The final touch is a scattering of the beautiful Purple Shimmer Dots.
Thank you for stopping by today!!!
HOST CODE
My MARCH Host Code is GBUE3X7H. Please use this code for orders under $150.00. I will have a small gift for those with orders over $50.00 in addition to the Perk Rewards Program. You can read all of the information at the top of the page in the Menu Bar under SHOP / Perks.
Thank you for stopping by today. I hope you enjoyed today’s project and will come back. I do read and reply to all of the comments individually. They mean a lot to me. Please reach out if you have a question.
The content in this blog is the sole responsibility of Jackie Beers as an Independent Stampin' Up! Demonstrator. The use of and content of classes, services or products offered is not endorsed by Stampin' Up!