Pretty Designer Series Paper can be difficult to cut. A Fun Fold card with a different front view requiring less cutting is the solution.

Paper
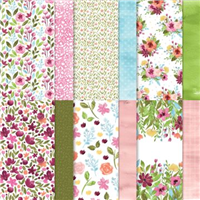
As you can see from the photo, this card is all about the paper! The Awash In Beauty Designer Series Paper is gorgeous. This pattern used is my favorite. Bold colors and flowers will always be my favorite and this fits the bill. Because this piece of the DSP is so pretty I did not want to cut it. (Have you ever had that though?) So the next best thing was to use as much of the sheet as I could. And I should say that this started as a leftover 6X6 piece from my paper shares.
What you see on the front is a 4 X 5 1/4 piece that I then cut 1 1/4 off of the right side. This card began as a Fun Fold, and you will see that when I share the open view. (Hopefully that helps to explain your confusion after my comment on cutting off a section.) The piece that was cut is adhered to the right side of the 4 X 5 1/4 inside layer. And here is the inside view.

Fun Fold
After seeing the open view I hope it makes my explanation of the front layer a bit clearer. The idea was for it to appear as a solid piece of the pretty DSP when closed. And then you see the Fun part when you open it. This fold is not a new one, but the way the DSP is adhered is not one I have seen previously. As I mentioned earlier, it came to me as a way to share more of the pretty paper.
To get this Fold, cut the base of Merry Merlot to 8 1/2 X 5 1/2, then score on the 8 1/2 side at 2 1/8 and 4 1/4. Basically it is a regular fold, the 4 1/4, and you then fold the front flap back on itself. To have the DSP layers meet properly, I layered the left side of DSP first. By aligning the top, bottom, and left side equally it was fairly easy. Next add the DSP strip to the right side of the White inside layer. Add your adhesive to the White layer and carefully slide it into the card while bring the top over. By using Multipurpose Liquid Glue I had a little wiggle room. I was able to match up the two pieces of DSP and make sure they were properly aligned.
Stamps and Dies
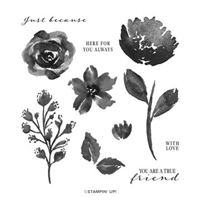
There is not a sentiment on the inside of the card as I sometimes leave them until needed. Especially for an outside sentiment as this one with the Just Because. But it could not be blank inside, even with the gorgeous DSP. So I added a flower from the set. This was created using the Balmy Blue and Mossy Meadow Stampin’ Write Markers. These are not available individually, but are available as a Color Family. And in my opinion they are a must have for adding more than one color to a Red Rubber stamp.
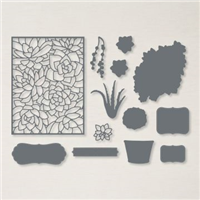
For the front sentiment I needed a layer, or layers, that would not take over from the DSP. These layers used were found in the Potted Succulent Dies. It was a great surprise that the sentiment fit perfectly in that slim die piece. And the fun shapes with stitching were just an added bonus. To finish off the card there had to be bling! Sometimes it is difficult for me to just use one bling. This was definitely one of those times with the flowers needing some love as well as the sentiment. So three Rhinestones were spread among the two flowers and the sentiment for equal bling.
Mini Catalog and Sale-A-Bration
Click on either catalog photo and you will be taken to my Online Store where you can download either or both catalogs.


HOST CODE
My July Host Code is ZMG9Q7EX. Please use this code for orders under $150.00. I will have a small gift for those with orders over $50.00 in addition to the Perk Rewards Program. You can read all of the information at the top of the page in the Menu Bar under SHOP / Perks.
Thank you for stopping by today. I hope you enjoyed today’s project and will come back. I do read and reply to all of the comments individually. They mean a lot to me. Please reach out if you have a question.
Smile and Keep On Stamping,
Jackie

SUPPLIES: