
Welcome to the Stampin’ Pretty Pals’ Blog Hop! This month, the theme is Fantastic Fun Folds and 3D Projects. We really hope that you enjoy and will be inspired by them! As you hop from blog to blog, don’t forget to leave comments because we love hearing from you. You will find the lineup at the end of my post to help you “hop” along from Pal to Pal.
The card I have made to share with you today is technically a Fun Fold. There are options for making it and I went with a simple version. My version removes part of the “Fold” making it more of a Fun Cut than Fold. LOL!! Of course I would be different. But I hope you like it.

Fun Fold
This fold is called an Envelope Fold. I got the fold idea from a Splitcoast Stamper post of Dina Kowal. It can be either cut into a point on the front, like I have done. Or it can be scored and folded , where I cut off those sides, and then the DSP triangle is added over the folded sections creating a pocket. I wanted the clean look of the point for the front of the card.
Here is a look at the inside of the card. I have a PDF for the card further down in the post.

The corner DSP pieces are what you also see on the front. I love that this fold still allows plenty of room for your inside stamping and writing.
Stamps, Dies and Ink
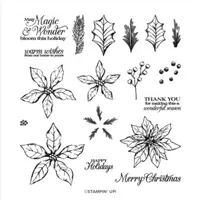
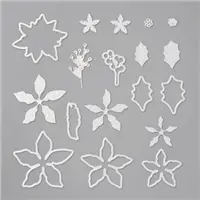
The stamp set is what used to be a Bundle. It is the Poinsettia Petals stamp set and matching Poinsettia Dies. All of the stamping is done using Cherry Cobbler Ink. The poinsettia on the inside is “stamped off” first to create a bit lighter color.
I used Cherry Cobbler cardstock for the die cut flowers on the front of the card. The Poinsettia Dies are awesome in the details they give to the flowers. There are two separate dies for each flower. They can be used singly or together, as I did.
Paper and Embellishments
For me, the beginning of most cards is the Designer Series Paper. For this card, other than the Fun Fold, that was the case. I love the Tidings of Christmas 6X6 paper stack. And the piece I used is my favorite. The mix of soft and regals colors are perfect.
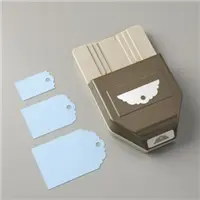
To finish with some bling, I added the flower centers by using the awesome Gold Metallic Specialty Paper. It comes paired with a Rose color as well. They are beautiful and have awesome details. The die used is included in the die set. For the smallest flower, I used the ribbon hole on the Delightful Tag Topper Punch to make a center.
Directions
Instead of me trying to explain everything in the post, I have created a PDF for you. Please forgive any grammatical errors. And let me know if you have any questions. Click on the picture below and it will open the PDF.

More inspiration awaits, so use the lineup below to visit the rest of the Design Team. The Pals are excited to show you what they’ve created! Then, please mark your calendars for our next blog hop on November 10th. Our theme will be “Home for the Holidays” when our Design Team creates a project to celebrate the upcoming holidays. Until then, have fun in your craft space.
Stampin’ Pretty Pals Blog Hop
- Mary Fish at Stampin’ Pretty
- Pamela Sadler at Stampin Pink Rose
- Michelle Quinno at Shell Stamps
- Stesha Bloodhart at Stampin’ Hoot!
- Melissa Seplowitz at The Stamping Ninja
- Windy Ellard at Windy’s Wonderful Creations
- Jackie Beers at Blue Line Stamping
- Su Mohr at Aromas And Art
- Jill Loveland at Simple Stamping
- Tricia Chuba at ButterDish Designs
- Ann Murray at Murray Stamps INK
- Beth McCullough at Stamping Mom
- Diana Carr at Secret Life of Paper
- Jennifer Roque at Stamp Camp with Jen
- Karen Hallam at Karen’s Stamping Habit
- Peggy Noe at Pretty Paper Cards
- Rae Harper Burnet at Wild West Paper Arts
- Deb Walker at Deb Stamps Life
- Debbie Mageed at Secrets to Stamping
- Lisa Ann Bernard at Queen B Creations
- Lori Webb at Clever Copies
- Lori Pinto at LollyPop Paper and Ink
- Mary Hanson at Up North Stampin’
- Amanda Howard at Papercrafting With Amanda
Thank you for stopping by today. I hope you enjoyed today’s project and will come back. I do read and reply to all of the comments individually. They mean a lot to me. Please reach out if you have a question.
Smile and Keep On Stamping,
Jackie

SUPPLIES:


Beautiful card. I love the way it is cut.
Such a pretty card and fold, Jackie! I will have to try this one.
Very pretty. And I love the clean look at the point too.
This is a VERY festive card. I love your envelope fold and will be using it soon. Thanks!
Beautiful colors in the fun fold Jackie! Great to see how you put your own stamp on our hop Pal!
I’ve never seen this fun fold before — it’s super! So pretty – thanks for sharing!
HI Jackie. Love it. Doesn’t look too time consuming. Is it? I need to punch out about 120 Christmas cards or so. I want to create something simply elegant.
HI Jackie. Love it. Doesn’t look too time consuming. Is it? I need to create a simply elegant Christmas card as I need to punch out about 120.
Jackie, a fold I haven’t seen! Wonderful with the poinsettias!
Love this version of your fun fold Jackie! So Pretty!!
Love it! I designed one of my Christmas card for classes next week with this fold thanks to you. It will post next week with the Snowman Season set. 🙂
I really like your card. Got to give this one a try. Thank you for sharing.
Many Blessings, Bev
Beautiful card and definitely a fun fold!
Jackie, I love this fun, fun-fold card. It will be a great addition to my Christmas card designs. Enjoy your week!
What a beautiful fun fold holiday card, Jackie! It’s definitely up my alley for a card that anyone would love to make. Thank you for joining the Blog Hop this month!
Love it! Thanks for hopping with us this month Jackie.
Love the colors on this card! I can’t wait to try it.