I have found another Fun Fold card to share. You may have seen this design from fellow Stampin’ Up! Demonstrator Sue Campfield. She has a couple of posts and videos on it. I fell in love immediately and had to give it a try.

Corner Tuck Fun Fold
As I said at the top of the post, this card is from Susan Campfield and she has a video. I used her basic measurements and added a little bit. The inside of her card did not have an extra layer. To add a bit of carry through, I stamped the Misty Moonlight layer with the stamped tree images. These are from the Perfectly Plaid stamp set. I thought they worked perfectly with the Beauty of the Earth Designer Series Paper.
The other thing I added was the layer of cardstock behind the DSP strip on the left side of the front. It seemed the DSP sort of bled into the base color. I also used that strip to anchor the front square focal layer. I centered and placed the square layer right up against that left strip. That allowed me to better center everything. You can see from the photo that the layer tucks underneath the corner but is still fairly centered on the card.
Here is the view of the open card.

Stamps and Paper
The star of this card, besides the fun fold, is the DSP. I mentioned above that it it the Beauty of The Earth Designer Series Paper. This is what most people would think of as the back side. You know how I love using the back side!! And I love that the corner piece and the other two containing the trees are all from the same sheet of paper. The corner piece is from the top of the paper.
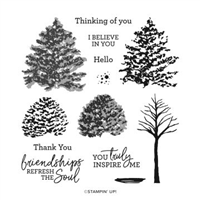
In trying to add some texture and detail to the inside of the card, I decided some matching trees would be the perfect thing. By finding this similar tree in the Perfectly Plaid set, it seemed just meant to be. It is a carryover from the last two holiday catalogs and a favorite of mine. I love the small tree images that work for various seasons and needs.
The sentiments are from the Beauty of Friendship stamp set. These are perfect for any time. We should let people know whenever they inspire us in some way. The mix of fonts are always something that draws me to a sentiment. The front sentiment is cut using a die from the Painted Labels Dies. It is finished off with a Glitter Ribbon to ground it.
Measurements and My Directions
- Card base of Night of Navy is cut 4 1/4 X 8 and scored at 2 1/2
- Inside layer of Misty Moonlight is cut to 5 1/4 X 4 1/8
- Front left Misty Moonlight layer is cut to 1 X 4
- Front left DSP layer is cut to 7/8 X 3 7/8
- Center Misty Moonlight layer is cut to 3 1/8 X 3 1/8
- Center DSP layer is cut to 3 X 3
- Inside White layer is cut to 3 X 3
- The right corner is Night of Navy cardstock and a piece of DSP. Both are cut to 3 X 3 and then each is cut on the diagonal. Save one half piece from each paper for later.
- Glue the triangle of DSP and cardstock together to make a stronger corner. Add dimensionals to each corner.
- Stamp the tree image on the Misty Moonlight inside layer using Misty Moonlight Ink that you stamp off first.
- Adhere this layer to the inside of the card.
- Adhere the corner piece flush against the corners of the inside.
- Test fold the front flap and make sure it clears the point of the corner layer. You may need to trim just a fraction off of that end.
- Layer and add the Left side strip to the left edge of the front flap. Space it evenly at top, bottom, and left side.
- Add the focal layer right up against strip.
- Place the White inside sentiment in the center of the inside and it should be hidden by the front flap.
My Paper Share for Upcoming Mini Catalog
This is my first time doing a Paper Share. I opted to only do the paper for this first one. I would love to get you a sample of all of the new paper in the upcoming Mini Catalog as well as the Sale-A-Bration catalog. Click HERE to see what papers are included and to sign up for my shares. I will close this on July 31st.

The picture below shows the Designer Series Papers that are included in the Sale. There are 9 to choose from!!

HOST CODE
My July Host Code is 2GKGF4Q7. Please use this code for orders under $150.00. I will have a small gift for those with orders over $50.00 in addition to the Perk Rewards Program. You can read all of the information at the top of the page in the Menu Bar under SHOP / Perks.
Thank you for stopping by today. I hope you enjoyed today’s project and will come back. I do read and reply to all of the comments individually. They mean a lot to me. Please reach out if you have a question.
Smile and Keep On Stamping,
Jackie

SUPPLIES:

Sale: $9.78
Price: $11.50