
Welcome to the Pals’ Blog Hop! While the COVID 19 pandemic is adding stress to our lives, we Pals hope this blog hop will help to lift your spirits. Let us inspire you to take a creative break and relax for a little while. This month our theme is “Special Occasions” where we have made a project for just about any occasion you can think of! You’ll find the full line-up below to help you “hop” along from Pal to Pal.
My choice for a Special Occasion card is a Graduation Card. I feel badly for all of the graduating students this year. I know most look forward to walking across the stage. So I tried to make a bit of a different card.

I hope it appears to you as a graduation cap!! Here is the inside with it’s funky fold.

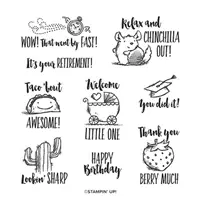
I used a variety of stamp sets for this card. They will all be listed in the supply list at the bottom of the post.
I love different folds and had made a similar card to this when a neighbor’s son graduated a few years ago. Sadly in looking for it, I realized it was before I began my blog. So I had to go by memory and a card on Pinterest. The card I started with is from Chris Sloger from 2014.
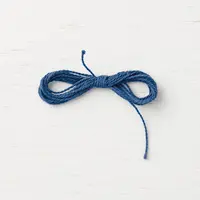
For the front of the card, I used the Witty-Cisms stamp set with the Layering Circles Dies. The Congratulations stamp is from the I say Hello stamp set and it cut using the Rectangle Stitched Dies. The “tassel” is Night Of Navy and Whisper White Bakers Twine. The White twine is a bit thicker, which required the circles to be raised with double Stampin’ Dimensionals. This might be a bit difficult to mail due to the thickness of the folds and the tassel layer!
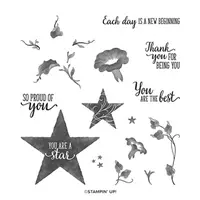
I especially love the “point of the cap” and the mimic of that on the inside layer. The star from Morning Star stamp set, seems to fit perfectly in the pointed section.
Here is my video of basic instructions. I also have written instructions at the bottom of the page from before I added the video.
More inspiration awaits! Use the Blog Hop Line-up below to visit the rest of this month’s Design Team. My fellow Pals are excited to show you what they’ve created! Mark your calendars for Wednesday, May 13th, when we will say “Goodbye to January Mini and 2019 Annual Catalog and/or Hello to 2020 Annual Catalog.” The Design Team will showcase their favorites from the retiring catalogs or new products from the new catalog. Don’t miss the fun! And, until then, please stay safe.
Pals Blog Hop Line-Up
- Mary Fish at Stampin’ Pretty
- Beth McCullough at Stamping Mom
- Su Mohr at Aromas And Art
- Mary Hanson at Up North Stampin’
- Debra Simonis at Deb’s Stampin’ Grounds
- Stesha Bloodhart at Stampin’ Hoot!
- Lisa Ann Bernard at Queen B Creations
- Ann Murray at Murray Stamps, Ink
- Jen Roque at Stamp Camp with Jen
- Rae Harper Burnet at Wild West Paper Arts
- Lori Pinto at LollyPop Paper and Ink
- Jeanie Stark at Just Stampin’
- Sue Jackson at Just Peachy Stamping
- Lynn Kolcun at Avery’s Owlery
- Jackie Beers at Blue Line Stamping
- Deb Walker at Deb Stamps Life
- Jennifer Michalski at Stamping Serenity
- Tricia Chuba at ButterDish Designs
- Debbie Mageed at Secrets to Stamping
- Rosanne Mulhern at Heartfelt Stamping
- Pamela Sadler at Stampin Pink Rose
- Wendy Klein at Doggone Delightful Stampin’
- Leah O’Brien at Ink, Paper, Stamps, Oh My!
- Peggy Noe at Pretty Paper Cards
Directions:
- Card Base is 4 1/4 X 11, score at 5 1/2. Then make little marks at 3 3/8 and 7 5/8. Rotate 180 and make the marks on the other side. If you imagine connecting the marks you should have a long X.
- Line up the marks from opposite sides using your Simple Scored (I have a black marker line down the 6″ score line of my SS so it shows up very well) or use your Paper Trimmer and scoring blade. Using the scoring tool, connect the two marks. Rotate the paper and repeat with the other two marks.
- Fold on all of the score lines. Crease well with your bone folder.
- For the inside layer, cut to 5 1/4 X 4, Make a mark on the 4″ side at 2″. Rotate to the5 1/4″ side and make a mark at 2″. Rotate 180 and make the mark on the opposite side at 2″.
- Using your Paper Trimmer, line up the mark on the 4″ side and one of the longer side marks and cut off that triangle. Repeat for the opposite side.

SUPPLIES:


Great card, Jackie. This is a fold I’ve never seen before. Looking forward to the video.
I feel so badly for all those graduating seniors this year too, Jackie. Such a cute card.
Beautiful card! I think we need to come up with a version for parents of graduating seniors too! I am sad about missing my daughters graduation after paying for 4 years of college!
Great fun to see how you put your own stamp on our Special Occasions hop Jackie! I agree with you that this year is rough for our grads, yet this card will certainly brighten someone’s day!
I love this card! I have made it before and I love it every time I see it! The witty-cisms stamp set is perfect for this, thanks for sharing.
Great fold!
Love this. It would be so easy to CASE this for the senior’s school’s colors. Thanks!
Really sweet graduation card! I feel sorry for the graduates as well. My daughter is graduating from college and seems fine with it, but it makes me sad that there won’t be a graduation.
Perfect Grad card! Thanks for sharing this fold! The ‘star’ design works perfectly.